Okta Custom Application Workflow
This topic describes how to configure Okta as an enterprise identity provider (IdP).
To return to the instructions for the new Dremio Cloud application, click Configure Okta as an Identity Provider.
To configure Okta as an enterprise IdP, you must register Dremio as an application in the Okta organization and add Okta as a provider in Dremio. Once that is done, you may configure Okta to use SCIM for secure user provisioning.
Prerequisites
-
Your SCIM API service must be connected to Okta
-
To register Dremio as an application in the Okta portal, you must be an Okta administrator, or possess explicit permissions to register an application in Okta.
-
You must also be a Dremio admin to configure an enterprise IdP
-
To configure Okta as an IdP, you will need items as described from the Okta application and security-API section:
- Client ID
- Client Secret
- Issuer URL
Requirements
- Version: SCIM 2.0+
Okta Configuration
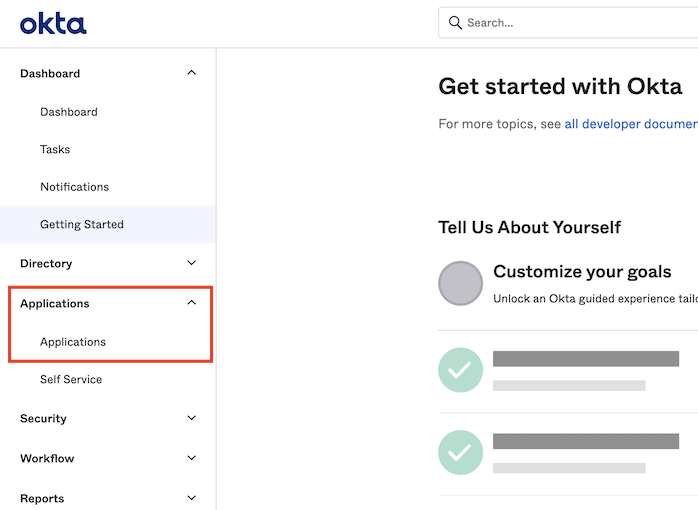
In the Okta organization, perform the following steps to register an Okta application:
-
Using the left navigation menu, go to Applications > Applications.
-
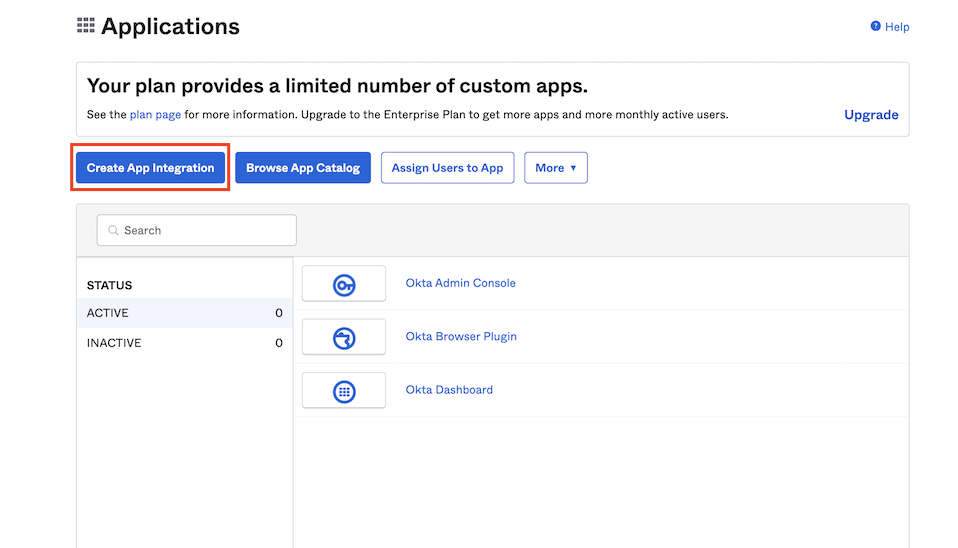
On the Applications page, click Create App Integration.
-
From the Create a new app integration page, select OIDC - OpenID Connect under Sign-in method.

-
For the Application type, select Web Application.
-
Click Next.
-
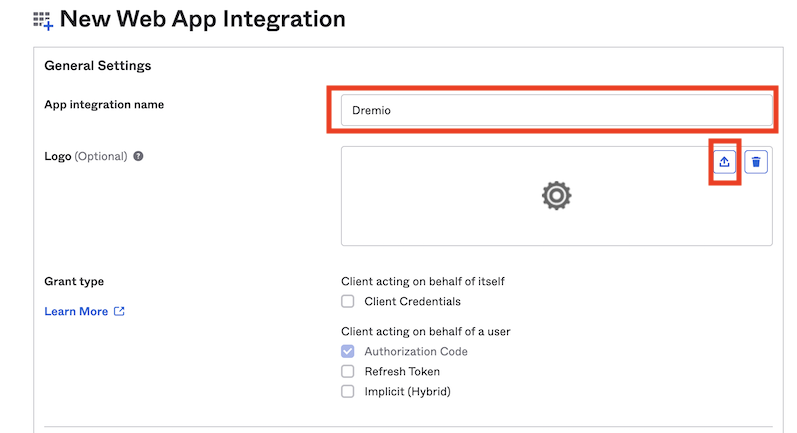
From the New Web App Integration page, enter a value for App integration name.
-
(Optional) For Logo, upload a logo using the Upload icon.
-
For Grant type, under Client acting on behalf of a user, check the Authorization Code box.
-
Under Sign-in redirect URIs, enter https://accounts.dremio.cloud/login/callback to specify each sign-in redirect URI for your application. This overwrites the default local sign-in redirect URI. This URL can also be retrieved from the Dremio Add Provider dialog.

-
(Optional) For Sign-out redirect URIs, click + Add URI, and enter https://accounts.dremio.cloud to specify the sign-out redirect URI. This overwrites the default local sign-out redirect URI.
-
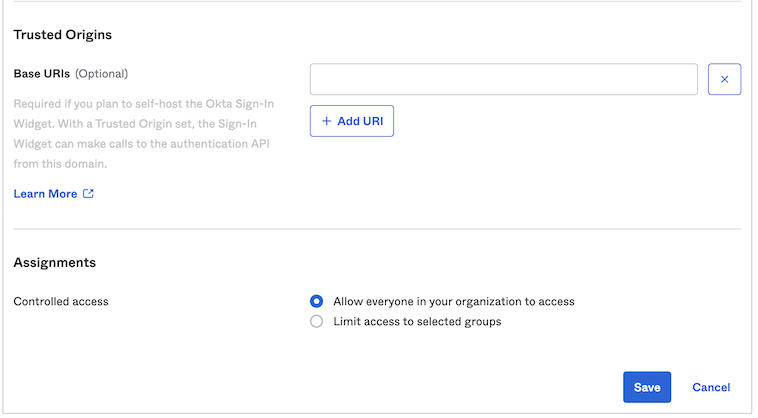
(Optional) Under Trusted Origins, enter the base URI for Base URIs (but only if you plan to self-host the Okta sign-in widget).
-
Under Assignments, select Allow everyone in your organization to access for Controlled access.
-
Click Save.
Your registered application page will display. You now need the following values to configure the IdP within Dremio:
-
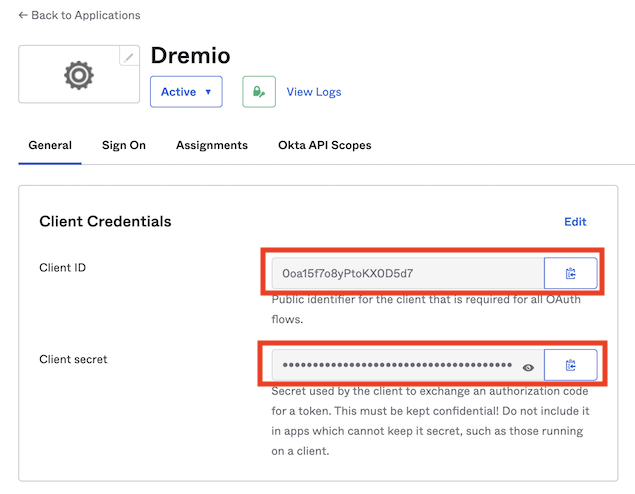
From your registered application page, select General > Client Credentials.
-
Copy the Client ID and Client Secret values. They are needed later to configure Okta in Dremio.
-
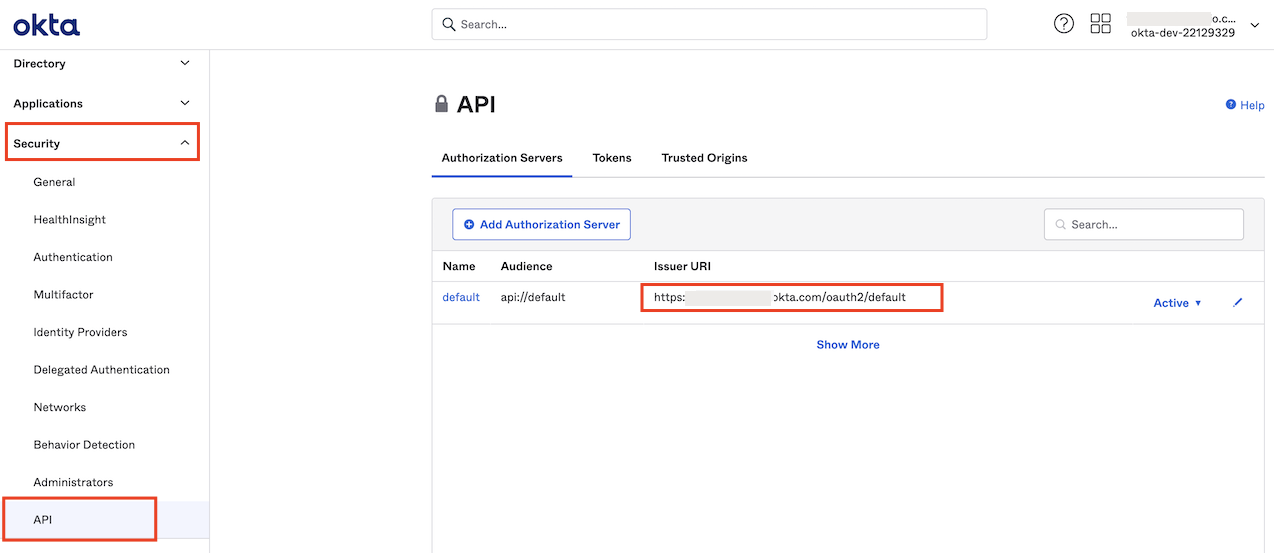
From the left sidebar, navigate to Security > API.
-
From the API page, select the Authorization Servers tab and copy the Issuer URI from your default authorization server. This is likewise needed later to configure Okta with Dremio.
Okta Properties Required for Dremio Configuration
Obtain the following properties from the Okta organization:
| Property | Tracing the Property in the Organization |
|---|---|
| Client ID |
|
| Client Secret |
|
| Issuer URL |
|
Dremio Configuration
Perform the following steps from Dremio:
-
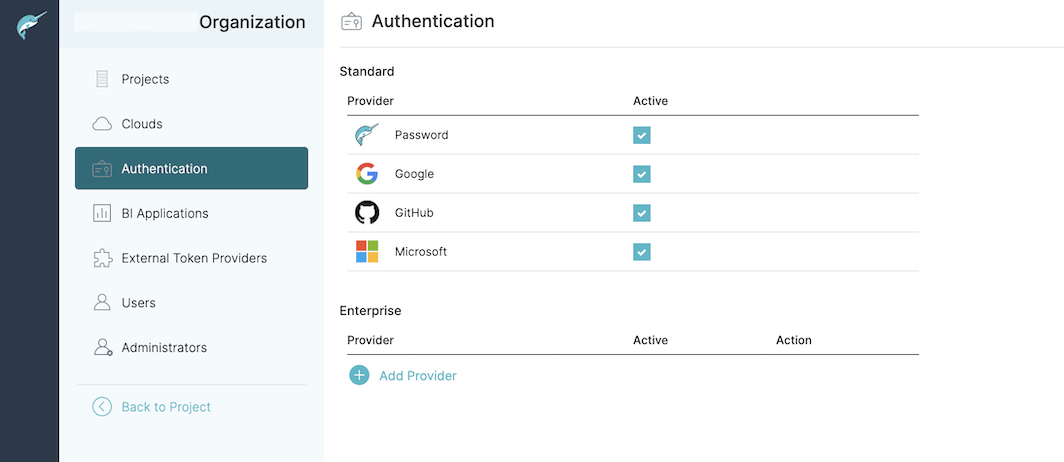
Click the Settings (gear) icon from the bottom-left corner of the screen and then select Organization Settings.
-
Click the Authentication tab from the left sidebar. Under the Enterprise selection, click Add Provider.
-
Using the Add Provider dialog, select Okta.

-
For Step 2: Create an application in Okta, enter the redirect URL from the Dremio application.
-
For Step 3: Enter the required information from Okta, enter the required information from Okta:
- For Issuer URL, enter the issuer URL.
- For Client ID, enter the client ID.
- For Client Secret, enter the client secret.
-
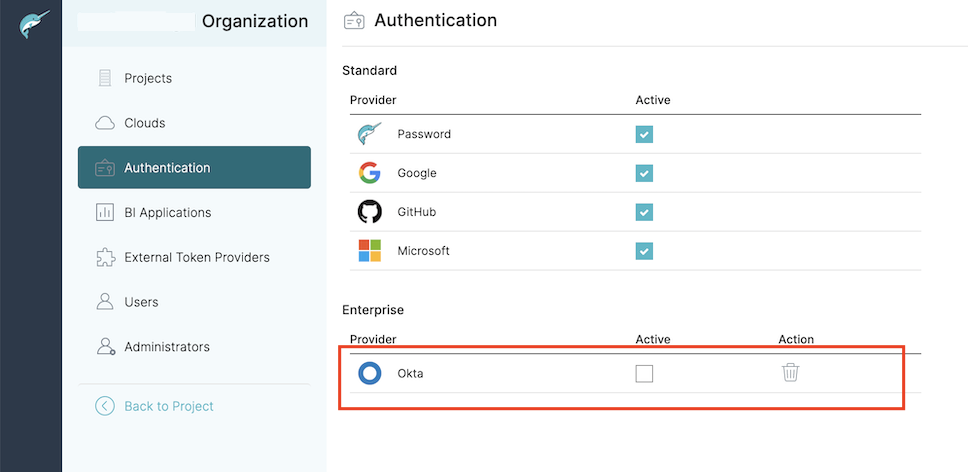
Click Add. Okta is now listed under the Enterprise section. However, it is not enabled by default.
-
To activate the Okta enterprise IdP, select the checkbox under the Active column.
Okta is now configured as an authentication IdP and will display as an option for users logging in on Dremio.
Configuring SCIM
To return to the instructions for the new Dremio Cloud application, see SCIM with Okta.
Okta may be configured to use SCIM for secure user and group provisioning in Dremio. This is accomplished through the following steps, as described below. Once you've configured Okta with SCIM, you may assign selective access to Dremio for your users or groups, or revoke access, as described below.
Adding SCIM as an App
- From the Okta interface, navigate to the Applications page.
- Click Browse App Catalog and search for SCIM.
- Select SCIM 2.0 Test App (Header Auth) and then click Add from the app's page.
- Enter an Application label and then click Next.
- From the Sign on Methods page, click the Secure Web Authorization radio button and then the Administrator sets username, user sets password.
- Click Done.
Configuring SCIM
-
From the SCIM application interface in Okta, click on the Provisioning tab.
-
Select the Integration tab and then click Configure API Integration.
-
Click Enable API Integration.
-
Enter the URL to your Dremio server in the Base URL field with the following format:
US Control PlaneEU Control Planehttps://scim.dremio.cloud/scim/v2/https://scim.eu.dremio.cloud/scim/v2/
Generating Access Tokens
Dremio personal access tokens (valid for up to 180 days) with the format bearer {PAT} may be used when configuring Okta with SCIM. To obtain this, please refer to the Personal Access Tokens page.
Completing SCIM Configuration
Once you've generated a token with Dremio, complete the following steps:
- From the Integration tab in the Okta interface, in the API Token field enter the text bearer (including a space after the word) and then paste the token value provided from Dremio.
- Click Test API Credentials to verify that Okta can access your instance of Dremio. A green message should appear at the top of the screen saying the API was verified successfully!
- Click Save.
- Navigate to the Provisioning tab, and then the To App sub-tab.
- Click the Edit button to the right of the Provisioning to App header.
- Select the Enable checkbox for Create Users, Update User Attributes, and Deactivate Users. Make any other selections as desired.
- Click Save.
SCIM is now fully configured, which means users added from Okta will automatically provision in Dremio. You may now grant users or groups access to Dremio and revoke access.
Assigning User Access
To assign or grant users access to Dremio, perform the following steps:
- From the Okta interface, navigate to the Assignments tab.
- Click the Assign drop-down from the top-left corner of the screen and select Assign to People.
- Locate the desired users by scrolling or using the search bar.
- Click the Assign button next to the desired user.
- Scroll down and click Save and Go Back.
That user is now granted access to Dremio and an account is automatically created in the service. They may log in immediately and administrators may view their account from the Users screen.
User email addresses are controlled by Okta rather than Dremio. If a user's email address changes, you must update it in Okta. Then, the user will be able to use the new email address to log in to Dremio as a new user.
We recommend assigning privileges and roles to manage their access to objects in Dremio.
Assigning Group Access
To assign or grant groups of users access to Dremio, perform the following steps:
- From the Okta interface, navigate to the Assignments tab.
- Click the Assign drop-down at the top-left corner of the screen and select Assign to Groups.
- Click Push Groups > Push Groups to push an Okta group to Dremio.
All users associated with the group will be synchronized in Dremio. The group will also synchronize with Dremio as a role with all group members assigned to the role.
Users associated with the group may log in on Dremio immediately and administrators may view their account from the Users screen.
We recommend assigning privileges to manage role members' access to objects in Dremio.
Revoking Access
If you wish to revoke a user or group's access to Dremio:
- From the SCIM app in the Okta interface, navigate to the Assignments tab.
- Click the Delete (X) button on the far right of the desired user's row.
The deleted user(s) may no longer log in on Dremio. However, this does not automatically delete their account, and must be manually removed.