Access Control
Access control lets you manage and regulate access to objects or data within Dremio by determining who can access specific objects and what actions or operations they can perform on those objects.
Access control mechanisms are fundamental to preventing unauthorized access, enforcing security policies, minimizing risks, protecting sensitive information, maintaining compliance with regulations, and ensuring that users have the appropriate level of access based on their roles and responsibilities within an organization.
-
Privileges - List of privileges provided by Dremio, along with the objects they apply to.
-
Best Practices - Recommendations for access control best practices on Dremio.
As the Dremio Cloud Shared Responsibility Model outlines, access control is a shared responsibility between Dremio and you. The Shared Responsibility Model lays out Dremio's responsibilities for providing security policies and operations and your responsibilities for managing access. For more information, download the PDF guide of the Dremio Cloud Shared Responsibility Model.
Dremio's Access Control Model
Dremio uses a Role-Based Access Control (RBAC) model, which gives you the ability to restrict access to any object in Dremio. RBAC provides a structured approach to managing and controlling user access by creating roles, assigning privileges to those roles, and then assigning users as members to those roles. Dremio’s RBAC model allows for the implementation of granular-level privileges, which determine the actions that a user/role can take on a given object, such as a table, project, or cloud.
Dremio’s RBAC models consists of the following four concepts:
User: Users are identity-entities in Dremio. They can represent a human or a non-human entity, such as other applications or services.
Role: Roles are entities to which privileges are granted based on job functions, responsibilities, or levels of authority within an organization. Roles can be assigned to users, or other roles to create a hierarchy of roles.
Privilege: Roles are assigned a set of privileges that define what actions or operations users assigned to that role are allowed to perform.
Securable Object: Securable objects are entities that serve as targets for access control rules. In Dremio, securable objects can include sources, tables, views, folders, and more.
Users
Users can be managed locally via Dremio as well as externally through third-party Identity Providers. A user’s email address is used as the unique identifier in Dremio Cloud and cannot be changed after the user has been created. Users are assigned the PUBLIC role upon creation, unless otherwise specified. There are two different types of users in Dremio: Internal (Local) and External.
Internal Users
Users that setup a local password for authentication to Dremio are considered internal users. These users’ credentials are managed through Dremio. For more information, see User Management.
External Users
External users are created and managed by an external application like an identity provider. These users need to be manually invited or provisioned using SCIM. User credentials for external users cannot be changed from within Dremio because they are controlled by the identity manager. Dremio stays in sync with the identity provider when SCIM is configured. If a user is deleted from the identity provider, this will be reflected in Dremio.
Roles
Roles are a set of privileges that can be assigned to users as needed. Roles can also be assigned to roles to create a child-role hierarchy. Roles are used to organize privileges at scale rather than managing privileges for each individual user (also called members).
You can define roles based on the types of users in your organization. For example, Analyst and Security_Admin roles can be created to manage privileges for users with different job functions within an organization.
System Roles
Dremio has two predefined system roles (ADMIN and PUBLIC) that can be used to manage privileges. These are the only roles available in Standard Edition because custom roles aren't included.
ADMIN
The ADMIN role is designed for administrative users that require superuser/global access. Users who are assigned this role are granted every privilege across all objects and resources in an organization. The privileges for the ADMIN role are immutable by users.
The first user in an organization is automatically assigned the ADMIN role.
PUBLIC
The PUBLIC role is assigned by default to all new users added to the organization and cannot be revoked from any user.
This role grants the following privileges to its members:
- USAGE on all engines.
- USAGE on any predefined OAuth apps and External Token Providers.
Membership in the PUBLIC role does not grant USAGE privileges on any projects or SELECT and ALTER privileges on any sources. These privileges must be manually assigned by the project owner or a member of the ADMIN role.
Furthermore, additional privileges can be granted to the PUBLIC role.
Custom Roles
Custom roles can be created by any user/role that has the CREATE ROLE privilege, or by members of the ADMIN role.
You can assign a custom role to users, or other roles (to create a child-role) The custom role can then be assigned a set of privileges.
For more information on managing Custom roles, please refer to Role Management.
Securable Objects
Securable objects are entities that serve as targets for access control rules. Privileges are granted, or revoked, on securable objects. These privileges define the actions that users or roles can perform on the securable object, such as read, write, modify, or more.
The concept of securable objects allows for granular access control, enabling administrators to define precise permissions and restrictions for different users or roles within the RBAC framework.
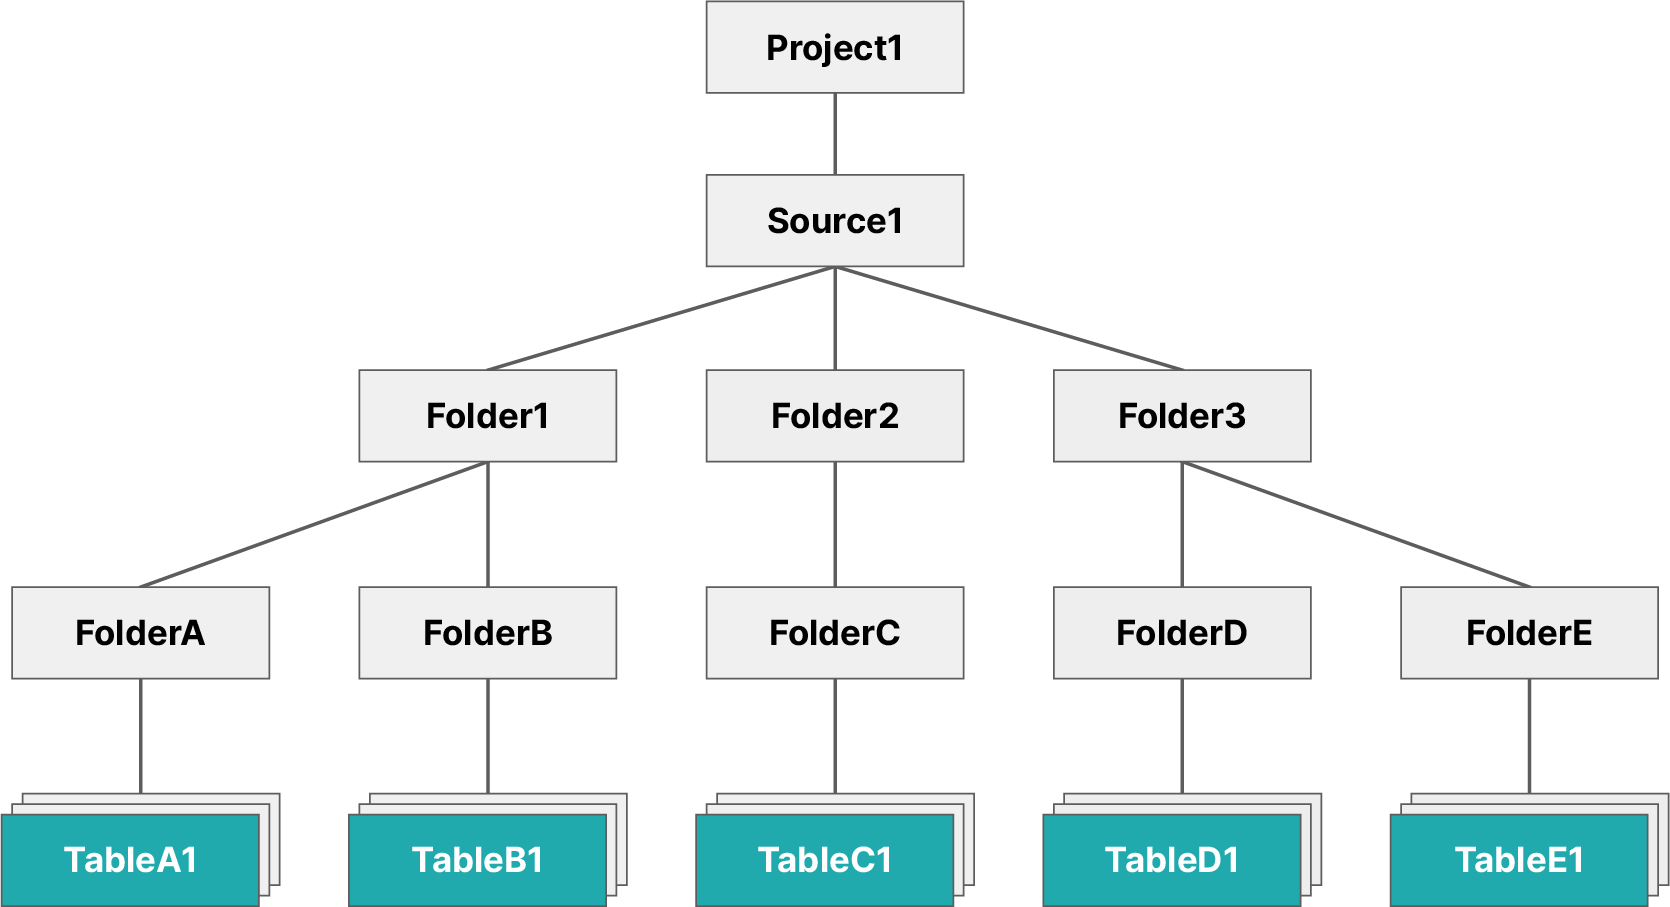
Each securable object exists within a hierarchy of objects (or containers) with the top-level object being an organization. Securable objects include projects, engines, sources, catalogs, clouds, users, roles, identity providers, folders, tables, and views, as shown in the following diagram:

For securable objects in Arctic catalogs, see Arctic Access Control.
Inheritance, Scope, and Ownership
Inheritance
The objects to which user/role's privileges apply depend on the inheritance model and ownership. Granting access to a parent object, such as your organization's Dremio project, also gives that user/role the same privilege access to any objects in the project that exist currently or are created in the future, whether it is a dataset or source. Without privileges based at the project level, even basic users cannot view, query, or alter the datasets it houses.
For example, giving a user privileges to ALL DATASETS will only grant the user access to all existing datasets in that project, not the folders that contain the datasets--which means they cannot access the dataset without first having the same privilege applied to the parent folder, and then the source, and then the project.
The following rules apply:
- The object to which a user's privileges are applied affects what is known as the scope, and, like inheritance, follows a parent-child relationship with regard to inheritance.
- Even if a user only requires access to a single dataset, they must have access to the parent object(s) that contain it.
If a user has sufficient privileges for a single table, they may create a view based on that dataset, but with the user now having ALTER and MANAGE GRANTS privileges for any view. However, the user still retains the same privileges they held before with the original table, meaning the extended access granted to the view will not extend to the table it is based upon. For more information, see View Delegation below.
Scope
Scope is a concept used to describe what objects a user or group has access to. Privileges are assigned at the object level, which ultimately determines the actions a user or role may execute for any given object.
The following rules apply:
- As described by the inheritance model any objects contained within that folder will likewise apply the privileges a user has for a parent object, such as FolderA.
- The user's access also extends to all existing and future datasets contained in that folder.
- Privileges on a source or dataset also apply to the wikis for the source or dataset.
For example, user1 is granted the SELECT privilege for FolderD. This object contains multiple datasets, which the user may now query (but not edit, as ALTER was not granted). The user may also view (but not edit) the wikis for the datasets in the folder.
Because of the established scope, user1 may not access FolderC because they were only granted access to FolderD and its child objects.
Current vs. Future Objects
Based on the selected scope, you may restrict a user's access to future and existing datasets. For example, if you set privileges for a single table as the scope of a user's privilege, then that user's actions will be restricted to that single table. However, if the scope of a privilege is instead set at the folder level, then the user's actions can be applied to any tables and views contained in that folder.
Ownership
Object ownership is a security feature used to control access to an object as well as oversee who has that control. In Dremio, each object MUST have an owner, and may have only one owner. Ownership is automatically granted to the user who initially creates the object. For example, if User1 creates an S3 data source, Dremio automatically assigns ownership of the source to User1.
Object owners must be granted the USAGE privilege on the project that contains the object they own. Once they are granted USAGE privileges on the project, the object owner also retains all other privileges for that object. The owner can then grant or revoke user/role access to that object and any child objects associated, modify the object's settings, and drop or delete the object as desired. Read View Delegation and Granting Privileges Using SQL Commands for examples and more information.
The following behaviors and limitations apply to ownership:
- Each object may only have one owner.
- An object's creator is automatically granted ownership.
- Object owners must have the USAGE privilege on the project that contains the object to query or grant and revoke other privileges on the object.
- Object ownership may be assigned or modified with GRANT TO USER or GRANT TO ROLE commands.
- If an owner is deleted or removed, the object's access control settings may not work.
- Object owners may be identified by querying sys.project."tables" or sys.project.views for views.
- If an object has no owner, the owner_id will display as
$unowned.
- If an object has no owner, the owner_id will display as
Default Ownership of Objects
By default, when a user creates an object in a Dremio project, they become the owner of that object through the OWNERSHIP privilege. Owners of objects inside a project cannot query the objects unless they have the USAGE privilege on the project. Once they are granted the USAGE privilege on the project, object owners have all other implicit privileges on the object.
Hierarchical Ownership
OWNERSHIP in Dremio is scoped/hierarchical. For example, the owner of an organization can change the owner of the projects within the organization (or do anything else on the child objects of the organization: project, engines, sources, clouds, users, roles, identity providers, folders, tables, views, and user-defined functions).
Transferring Organization Ownership
Organization owners can transfer their ownership to another user or role in the Dremio console or with the GRANT TO USER and GRANT TO ROLE SQL commands.
Ownership transfers take effect immediately, and organizations have only one owner. Only the organization owner can make ownership changes.
To use the Dremio console to transfer ownership to another user or role:
-
On the Organization home page, click
 in the left navigation menu.
 -
Select the Privileges tab in the organization settings sidebar.
-
At the top of the Privileges page, click Transfer Ownership. A search field appears under Owner.
-
In the search field under Owner, find the user or role to which you want to transfer ownership and click the user or role name to select it.
-
Click Transfer.
-
In the Transfer ownership to this user/role? confirmation dialog, click Transfer.
View Delegation
View delegation means that tables with restricted access may be shared with other Dremio users through the creation of views. When a user with SELECT access to a table creates a view, that user automatically becomes the owner of the new view.
Upon creating the view, the same rules of ownership apply to the view. The owner or delegation identity does not change when a view is edited or queried, but must be manually changed via the GRANT TO USER or GRANT TO ROLE commands. To identify the owner of a view, query the sys.views table.
The shared view still selects from the underlying dataset using the view owner's permissions at the time of the view's last modification, even if the end user querying the view lacks privileges to modify the underlying table. This applies to each table on the data graph and chain of datasets.
View delegation is different from privilege assignment. View delegation is implicit delegation of the SELECT privilege on underlying objects. For example, suppose user1 has the SELECT privilege on Table1 and creates View1 based on Table1. If user1 grants the SELECT privilege on View1 to user2, then the SELECT privilege that user1 has on Table1 is implicitly granted to user2. user2 can see the data in Table1 even though they lack explicit SELECT privileges on Table1. Privilege assignment is an explicit delegation: the owner of an object or a user who belongs to the ADMIN role grants privileges on the object to other users.
Example: View Delegation
user1 has SELECT access to Table1 and creates View1, which is based upon Table1. Whereas in Table1, user1 was restricted to only querying, with View1, they now have ALTER and MANAGE GRANTS privileges. user1 may now grant user2 with the SELECT privilege for View1 because of view delegation. The privileges for both the table and view are outlined below:
View1 | Table1 | |
|---|---|---|
user1 | ALTER, MANAGE GRANTS | SELECT |
user2 | SELECT | No access |
user2 previously lacked access to the data in Table1 but may now see it using SELECT queries on View1. The following table describes the actions that each user may perform:
| User | Action | Outcome |
|---|---|---|
user1 | View the results of View1 queries | yes |
user1 | Modify the original query of View1 | yes |
user2 | View the results of View1 queries | yes |
user2 | Modify the original query of View1 | no |
Because of view delegation, user2 can view the data in Table1 through the results of queries on View1. However, user2 has no access to Table1, so they cannot see the original dataset from the Dremio interface and cannot modify the original View1 query.
Example: View Delegation with Revoked Access to the Original Table
To continue the previous example, suppose user1 originally had SELECT access to Table1, which they used to create View1. If an administrator revokes their SELECT access to Table1, the following table lists the privileges that user1 and user2 now have on Table1 and View1:
View1 | Table1 | |
|---|---|---|
user1 | ALTER, MANAGE GRANTS | No access |
user2 | SELECT | No access |
The revoked privilege affects the actions that user1 can take with regard to View1. The following table describes what actions each user may now perform:
| User | Action | Outcome |
|---|---|---|
user1 | View the results of View1 queries | no |
user1 | Modify the original query of View1 | yes (and no) |
user2 | View the results of View1 queries | no |
user2 | Modify the original query of View1 | no |
user1 and user2 may no longer view the results of the View1 query. Both users lack privileges for the underlying table Table1, so neither can see data from the table or view from the Dremio interface. Also, user1 can no longer modify the original View1 query unless they remove the reference to Table1 from it. If user1 attempts to modify the query but does not remove the reference, they will not be able to save the modified query.
Example: View Delegation with Original Query Changed and Revoked Access
In this example, both user1 and user2 have ALTER and MANAGE GRANTS privileges for Table1 and View1 created from it, as shown in the following table:
View1 | Table1 | |
|---|---|---|
user1 | ALTER, MANAGE GRANTS | SELECT |
user2 | ALTER, MANAGE GRANTS | SELECT |
Suppose an administrator then revokes access to both Table1 and View1 from user2. If user2 modified and saved View1 before their privileges were revoked, subsequent queries would be executed as user2. After the privileges of user2 are revoked, subsequent queries performed by user1 would display an error message about lacking sufficient privileges. This is because View1 was last altered by user2, making user2 the owner of View1.
user2 can no longer see Table1 or query either View1 or Table1 from the Dremio interface. user1 can see only the last definition of View1 that user2 saved. user1 must modify the last definition of View1 to retain ownership and resume viewing query results.
Privileges
Privileges refer to the defined levels of access or permissions that are assigned to roles or users within Dremio. Privileges determine the operations a user or role can perform on securable objects. Examples of privileges in Dremio include SELECT on a table or view, INSERT on a table, DELETE on a table, CREATE TABLE on a folder, and MANAGE GRANTS on any object.
The assignment of privileges to roles, or users, should be based on the principle of least privilege, where users or roles are given only the minimum privileges required to perform their tasks effectively.
Privileges can be managed using SQL, APIs, or the Dremio Console.
For more information, please refer to Privileges.
Granting Privileges Using the Dremio Console
You can share catalog objects with others in your organization by granting privileges. By default, a new user is assigned the PUBLIC role, which grants the user the USAGE privilege on all projects.
To grant additional privileges to users or roles using the Dremio console, complete the following steps:
-
Locate the desired object.
-
Click
or  depending on the object.
 -
In the object settings dialog, select Privileges from the settings sidebar.
For some object types, the settings dialog automatically opens to display the privilege settings, and you do not need to select the Privileges tab. For organizations, select Privileges in the organization settings sidebar to open the Privileges page.
-
In the Privileges dialog, in the field under Add User/Role, enter the name of the user or role to which you want to grant privileges.
-
If you have the required privileges to view all users and roles, clicking in the Add User/Role field opens a dropdown that lists all user and role names. You can scroll the list or enter a few letters to search the list. Click user and role names in the dropdown list to add them to the Add User/Role field. You can also enter exact user and role names in the Add User/Role field.
-
If you do not have the required privileges to view all users and roles, you must enter exact user and role names in the Add User/Role field. The dropdown list is not available.
-
-
Click Add to Privileges.
For each entry in the Add User/Role field that matches a user or role in Dremio, a record appears in the USERS/ROLES table.
-
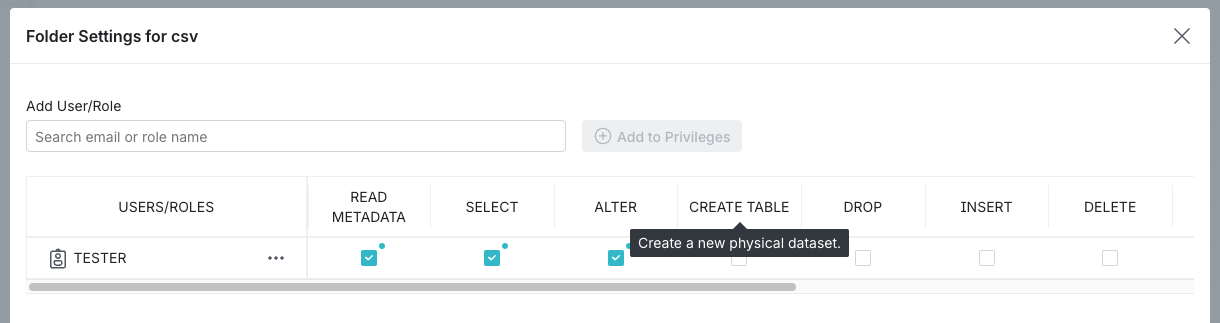
In the USERS/ROLES table, toggle the checkbox for each privilege you want to grant for that user or role. For a description of the privilege, hover over the column name in the USERS/ROLES table. See the example below:
-
(Optional) Repeat steps 4-6 if you want to add more users or roles and grant them privileges.
-
When finished, click Save.
You can also grant privileges using GRANT TO ROLE, GRANT TO USER, or REST APIs.
Revoking Privileges Using the Dremio Console
To revoke user and role privileges using the Dremio console, complete the following steps:
-
Locate the desired object.
-
Click
or depending on the object. -
In the object settings dialog, select Privileges from the settings sidebar.
For some object types, the settings dialog automatically opens to display the privilege settings, and you do not need to select the Privileges tab. For organizations, select Privileges in the organization settings sidebar to open the Privileges page.
-
In the USERS/ROLES table, locate the desired user or role record. If the user or role is not listed, then they do not have specific privileges on the object.
-
To revoke some but not all privileges for the user or role, clear the checkboxes in the columns for the privileges you wish to revoke.
-
To revoke all privileges for a user or role, click This is the icon that represents more actions. next to the user or role name and select Remove.
For a description of the privilege, hover over the column name in the USERS/ROLES table. See the example below:
-
- When finished, click Save.
If a user has a specific privilege on an object through their memberships in multiple roles and the privilege is revoked for one of the roles, the user retains the privilege until it is revoked on the same object for all roles to which the user belongs.
You can also revoke privileges using REVOKE FROM ROLE, REVOKE FROM USER, or REST APIs.
Granting Privileges Using SQL Commands
When assigning privileges to users via SQL commands, you may follow one of three methods: granting to a single dataset, granting to ALL DATASETS, and granting to a scope. Examples for each method are described in this section.
These examples assume that users already have the correct privileges assigned at the project level to access child folders and datasets.
Each of these examples includes an SQL command.
Granting to a Single Dataset
When a user needs access to only one table and no other objects, you can assign them privileges for that dataset. Use this method if you want to restrict a user's access to any other existing or future datasets.
If you're granting the user access to a table, remember that view delegation means they can create views based on that table and grant access to the views to other users.
Example: Single dataset
You have a user that you only want to give access to an individual table. You would need to navigate to the Privileges screen from that dataset's settings and grant the user the SELECT privilege, or perform the following command from the SQL Editor:
Example command for single datasetGRANT SELECT ON TABLE TableA1 TO USER user1
The image below illustrates the objects user1 now has access to.
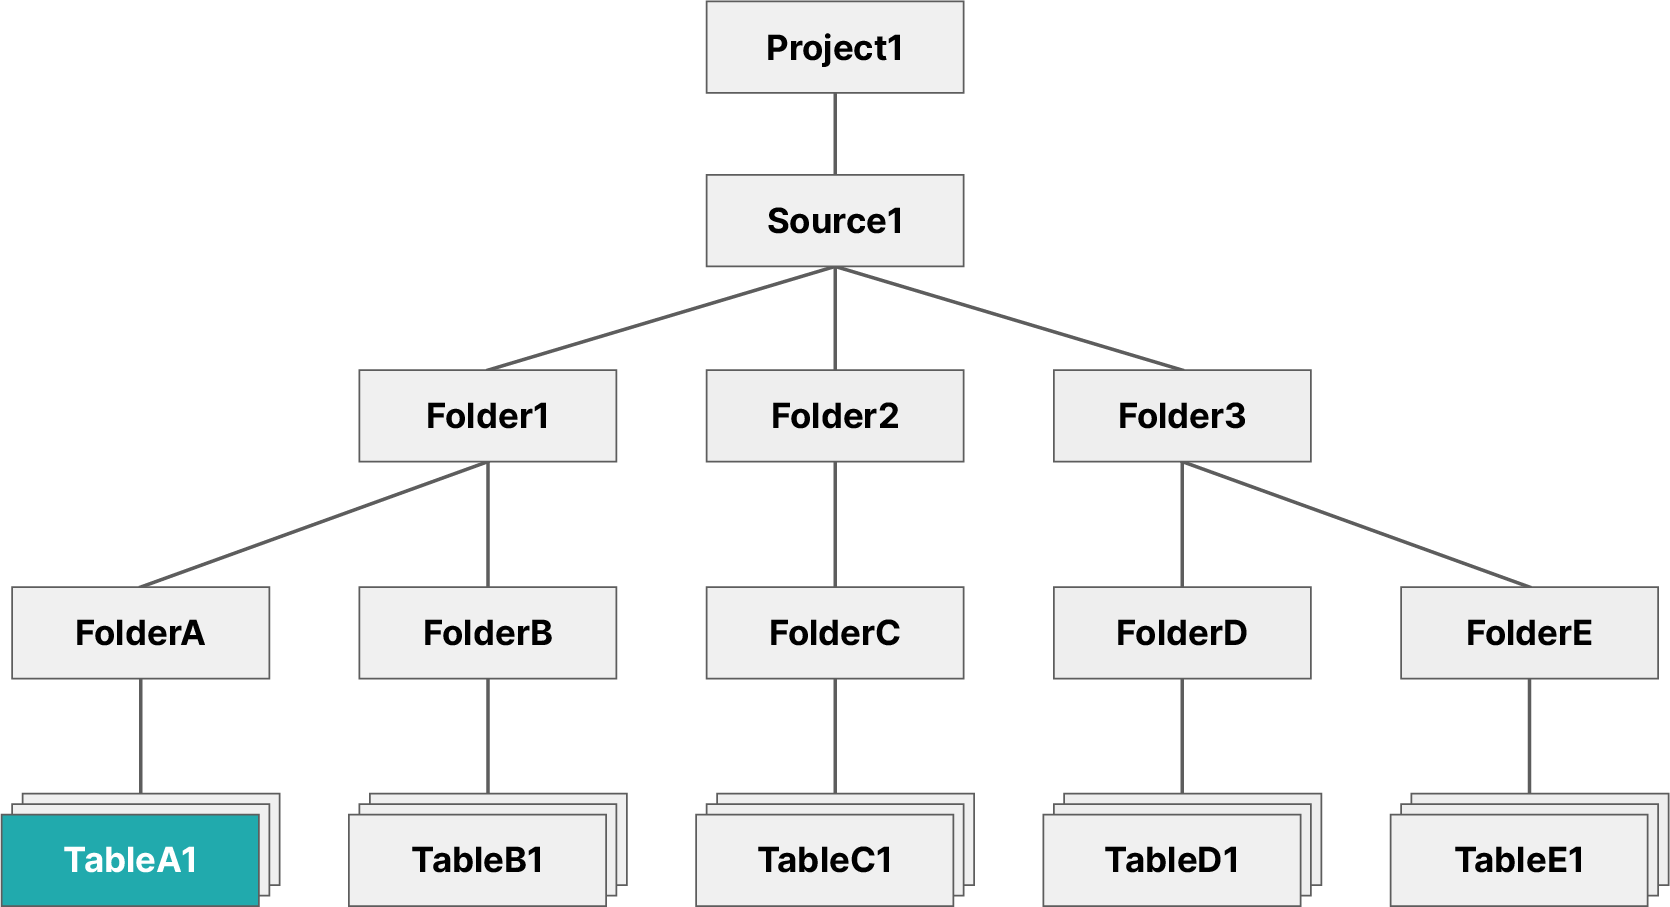
This restricts user1 so that they may only access the TableA1 table, not any other datasets contained in the same folder. However, user1 may still create views based on TableA1.
Granting to ALL DATASETS
When you have a user that needs access to all existing datasets, then you would use the SQL syntax ON ALL DATASETS (see the example scenario outlined below). This gives the user access to all existing datasets. The user would not, however, automatically receive access to any future datasets created by other users.
You should use this method of privilege assignment if you want to restrict a user's access to parent objects, but still wish for them to have access to all existing datasets.
Example: ALL DATASETS
You have a specific user that needs access to all datasets in a specific folder, but they do not require privileges for the folders containing these tables. You would then execute the following command from the SQL Editor:
Example command for all datasetsGRANT SELECT ON ALL DATASETS IN PROJECT project1 TO USER user1
The image below illustrates the objects user1 now has access to.
This command restricts the scope of user1 to all datasets presently found in source1, such as TableC1 and TableD1. Should additional datasets be created in the future, user1 will not have access to them.
Granting to a Scope
When you want to grant a user access to a parent object, such as a folder, this will also grant the user access to any datasets contained (see the example scenario outlined below).
You should use this method of privilege management if you wanted to grant a user access to all existing and future datasets contained under a parent object.
Example: Scope
This method grants a user access to all existing and future datasets contained under a specified object. To accomplish this, you need to navigate to the Privileges screen from that folder's settings and grant the user the SELECT privilege, or execute the following command from the SQL Editor:
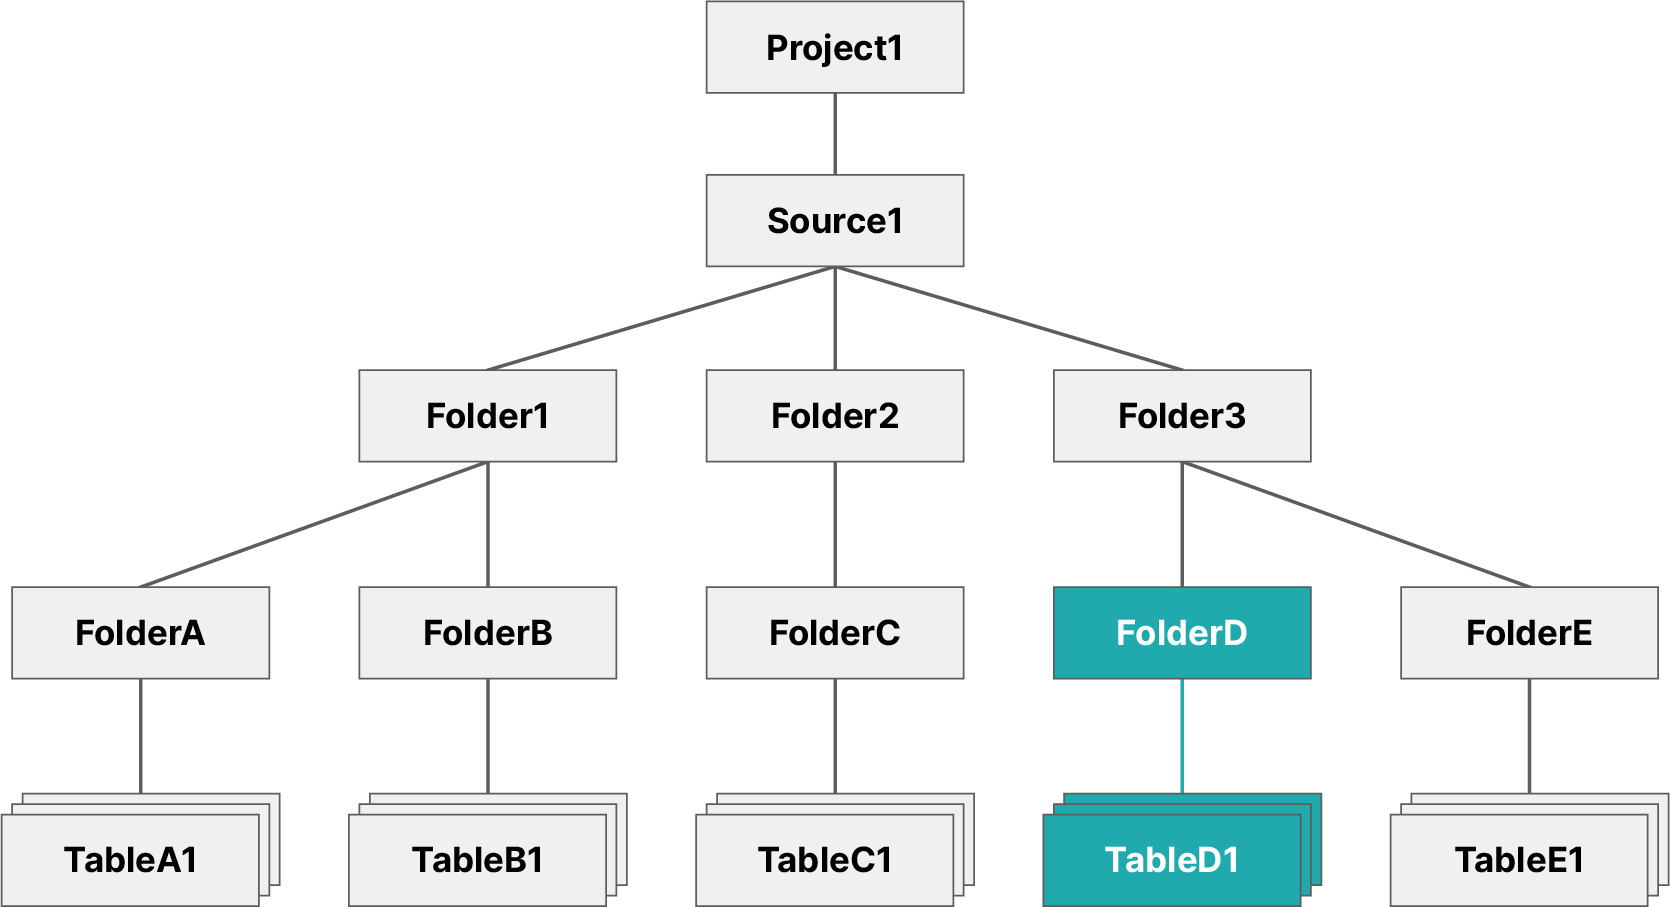
Example command for grant to a scopeGRANT SELECT ON FOLDER Folder3 TO USER user1
The image below illustrates the objects user1 now has access to.
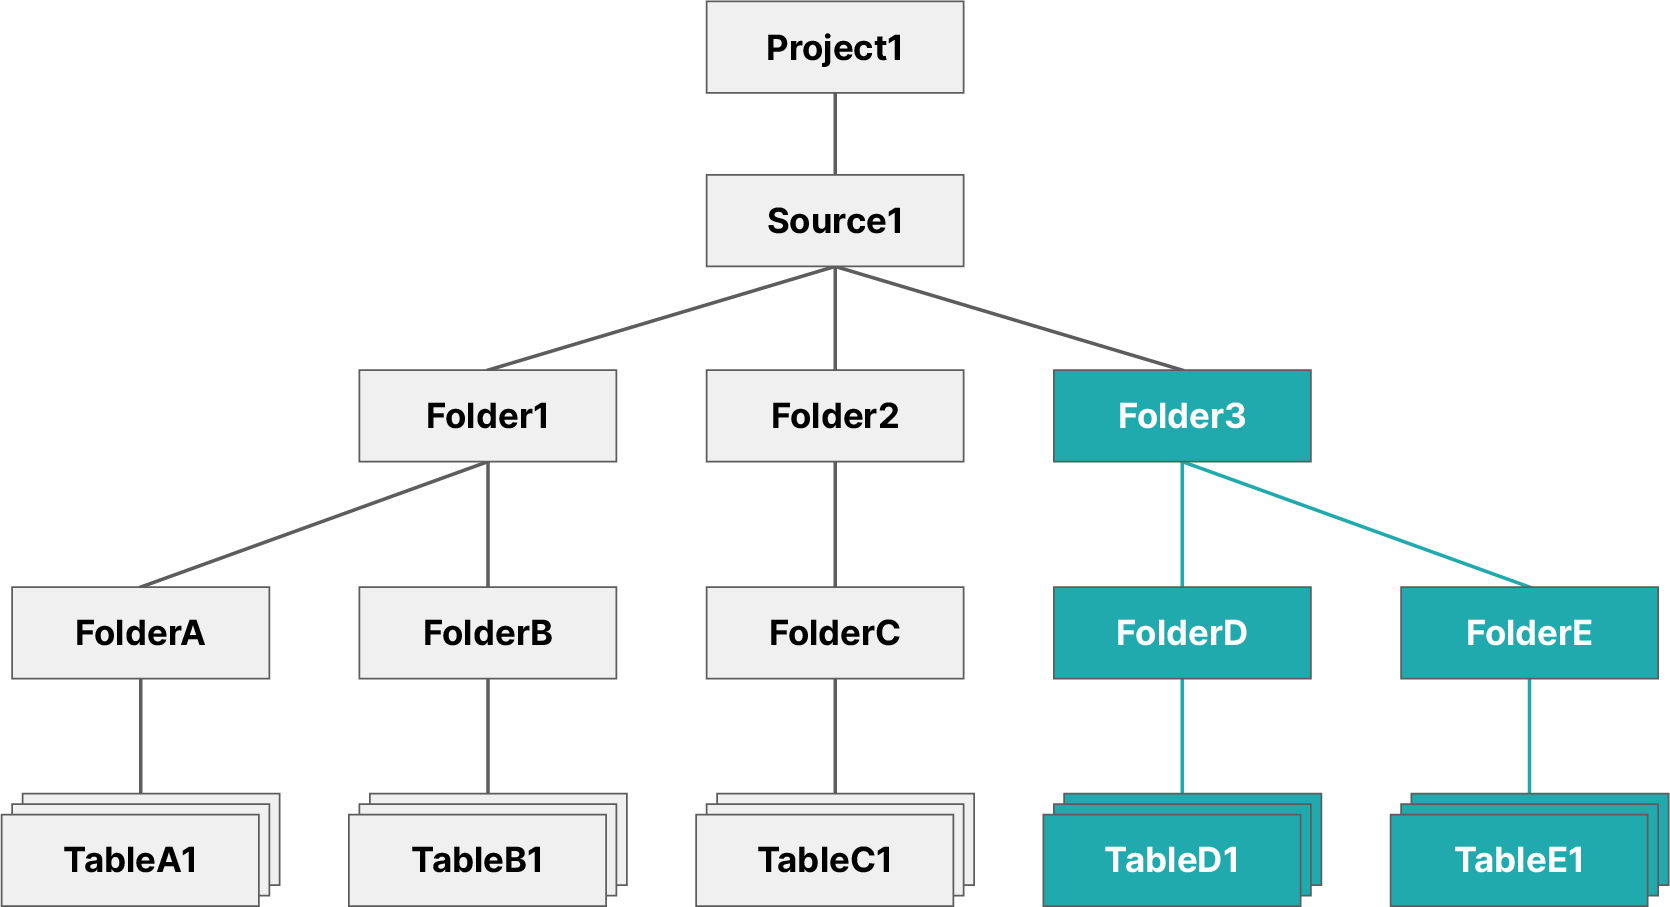
This grants user1 the SELECT privilege on Folder3, which means they now have access to all existing and future datasets contained in that folder and its subfolders.