Amazon Redshift
Amazon Redshift is a cloud data-warehouse service.
There are two different types of connection that you can make to a Redshift cluster that you add as a source:
- A secure connection to a publicly accessible Redshift cluster
- A secure connection to a private Redshift cluster
Creating a Secure Connection to a Publicly Accessible Redshift Cluster
When Dremio Cloud runs queries against the Redshift cluster, the compute engines in your VPC and the cluster communicate through a connection that consists of a NAT gateway and internet gateway in the VPC used with Dremio Cloud, the internet, and the internet gateway in the VPC used for Redshift.
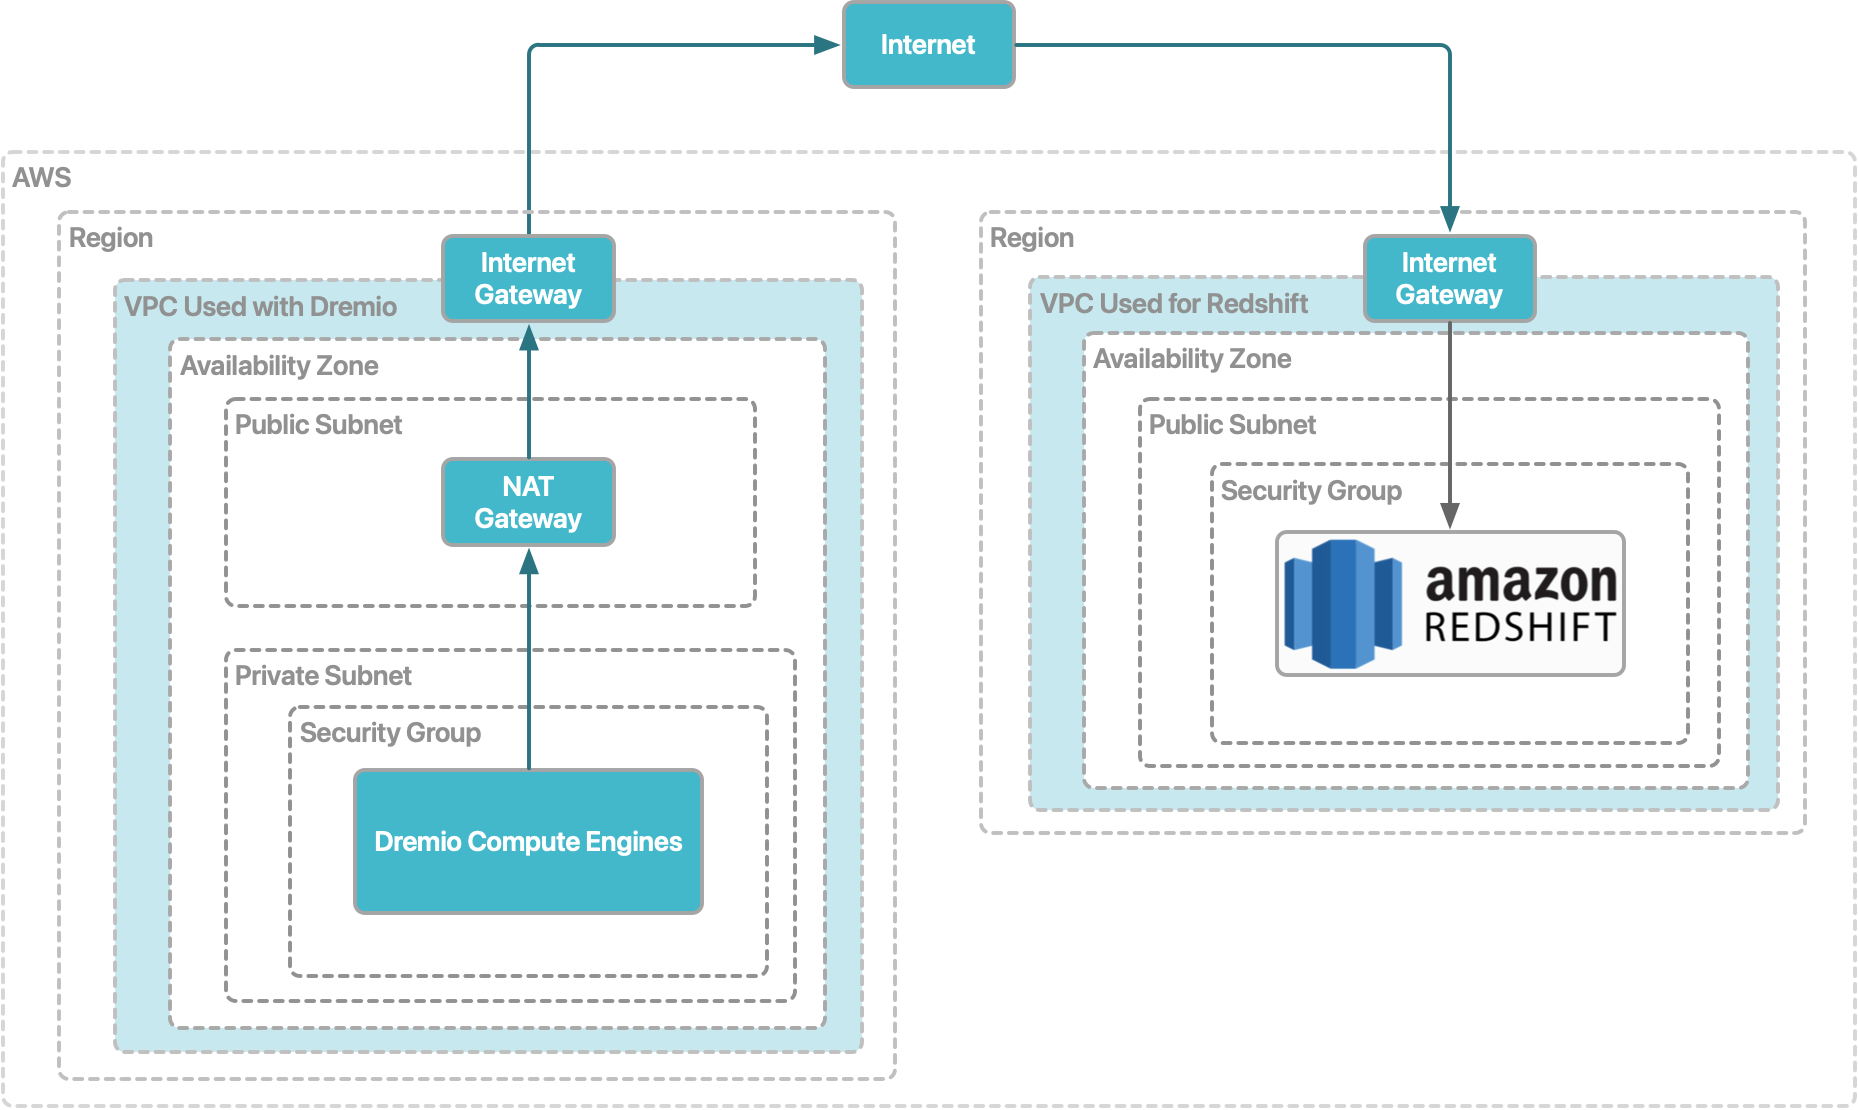
Prerequisites for the VPC that you are using for your Dremio Cloud project
- Ensure that the compute engines are deployed in a private subnet.
- Ensure that a NAT gateway configured in a public subnet.
- Ensure that an internet gateway is attached to the VPC.
Prerequisites for the VPC that you are using for Amazon Redshift
- Ensure that the Redshift cluster is in a public subnet.
- Ensure that you know the IP address of the NAT gateway that is in the VPC that you are using for Dremio Cloud.
Steps to follow in Amazon Redshift
- In the Clusters table, click the name of the Redshift cluster that you plan to use. The UI console for the cluster opens.
- Make the cluster publicly accessible:
- Click Actions in the upper-right corner of the console.
- Select Modify publicly accessible setting.
- In the Edit publicly accessible dialog, select the check box Turn on Publicly accessible, and select the Elastic IP address to use for connections to the cluster.
- Create an inbound rule for the IP address of the NAT gateway that is in the VPC being used with Dremio Cloud:
- In the UI console for the cluster, scroll down to the Network and security settings section.
- Click the name of the VPC security group. The UI console for the security group opens.
- In the Inbound rules section, click Edit Inbound Rules.
- On the Edit inbound rules page, click Add rule.
- In the Type field, select Redshift.
- Specify the IP address for the NAT gateway in the field to the right of the Source field.
- Click Save rules.
What to do next
Add the Redshift cluster as a data source in Dremio Cloud.
Creating a Secure Connection to a Private Redshift Cluster
When Dremio Cloud runs queries against the Redshift cluster, the compute engines in your VPC and the cluster communicate through a VPC peering connection.
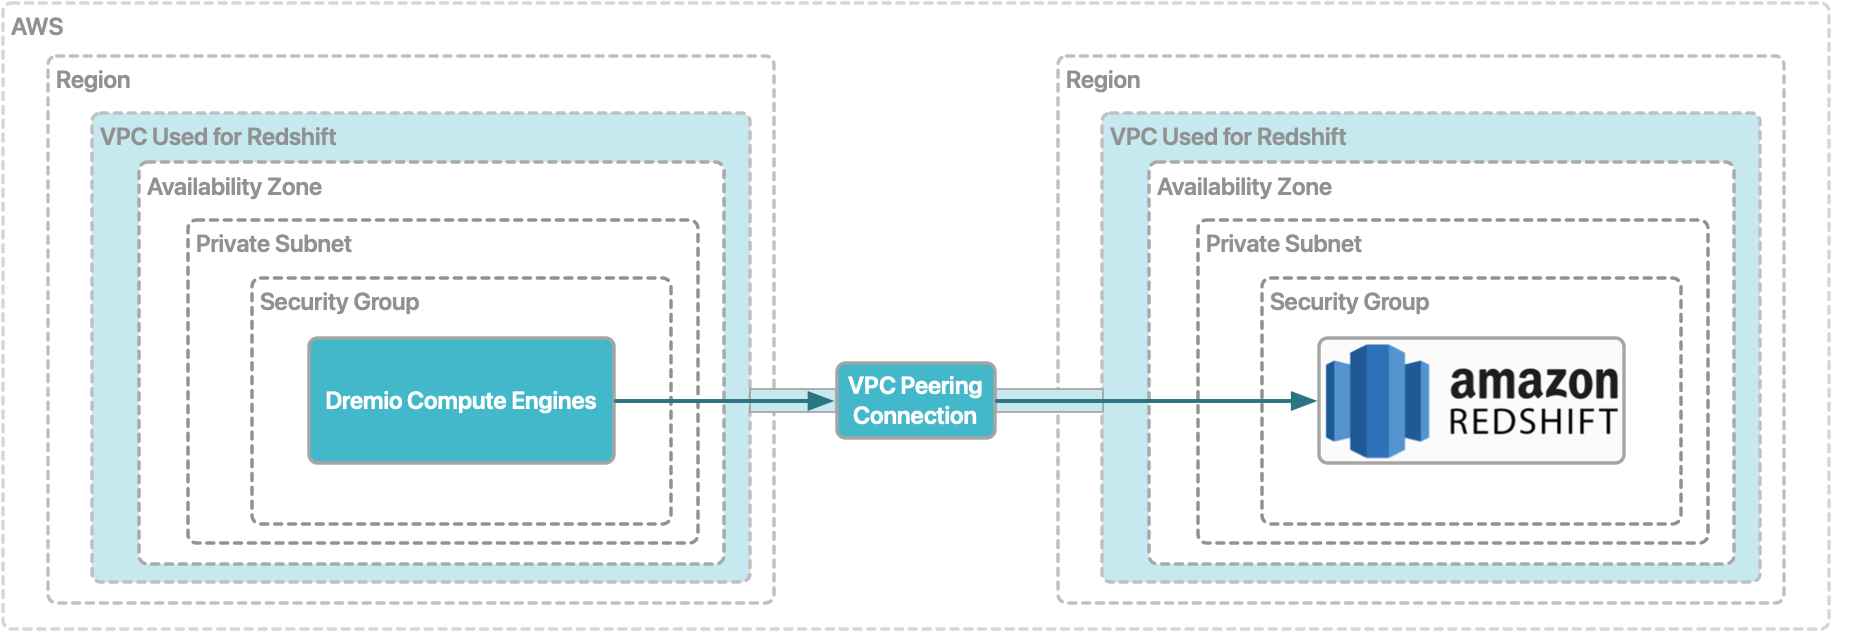
Prerequisite for the VPC that you are using for your Dremio Cloud project�
Ensure that the compute engines are deployed in a private subnet.
Prerequisite for the VPC that you are using for Amazon Redshift
Ensure that the Redshift cluster is in a private subnet.
Steps in AWS
- Create a VPC peering connection between the two VPCs.
- Add the Redshift cluster VPC's CIDR block as a destination in the route tables of the VPC that you are using for Dremio Cloud:
- In the left navigation bar of the VPC console, click Your VPCs.
- Select the VPC that you are using for Dremio Cloud.
- In the Details section, copy the VPC ID and copy the IPv4 CIDR.
- In the left navigation bar, click Route tables.
- In the search field at the top of the Route tables page, paste the VPC ID.
- Select the route table.
- In the Routes section, click Edit routes.
- On the Edit routes page, click Add route.
- In the Destination field, paste the IPv4 CIDR that you copied in step 3.
- In the Target field, specify your VPC peering connection.
- Click Save changes.
- Add the Dremio Cloud VPC's CIDR block as a destination in the route tables of the Redshift cluster's VPC:
- In the left navigation bar of the VPC console, click Your VPCs.
- Select the VPC that you are using for Redshift.
- In the Details section, copy the VPC ID and copy the IPv4 CIDR.
- In the left navigation bar, click Route tables.
- In the search field at the top of the Route tables page, paste the VPC ID.
- Select the route table.
- In the Routes section, click Edit routes.
- On the Edit routes page, click Add route.
- In the Destination field, paste the IPv4 CIDR.
- In the Target field, specify your VPC peering connection.
- Click Save changes.
- In the security group for the Redshift cluster, create an inbound rule for the CIDR block of the VPC that you are using for Dremio Cloud:
- In the left navigation bar of the VPC console, click Your VPCs.
- Select the VPC that you are using for Dremio Cloud.
- In the Details section, copy the IPv4 CIDR.
- Open the Redshift console.
- Select your Redshift cluster. The UI console for the cluster opens.
- Under Properties, scroll down to the Network and security settings section.
- Click the name of the VPC security group. The UI console for the security group opens.
- In the Inbound rules section, click Edit Inbound Rules.
- On the Edit inbound rules console, click Add rule.
- In the Type field, select Redshift.
- In the Port range field, specify
5439. - Paste the IPv4 CIDR for the Dremio Cloud VPC into the field to the right of the Source field.
- Click Save rules.
- In the security group for the Dremio Cloud VPC cluster, create an inbound rule for the CIDR block of the VPC that you are using for the Redshift cluster:
- In the left navigation bar of the VPC console, click Your VPCs.
- Select the VPC that you are using for the Redshift cluster.
- In the Details section, copy the IPv4 CIDR.
- In the left navigation bar of the VPC console, click Security groups.
- For each security group that you are using for Dremio Cloud:
- Click the name of the VPC security group. The UI console for the security group opens.
- In the Inbound rules section, click Edit Inbound Rules.
- On the Edit inbound rules console, click Add rule.
- In the Type field, select Redshift.
- In the Port range field, specify
5439. - Paste the IPv4 CIDR for the Redshift cluster VPC into the field to the right of the Source field.
- Click Save rules.
What to do next
Add the Redshift cluster as a data source in Dremio Cloud.
Adding a Redshift Cluster as a Data Source
After you create a connection between the VPC that you are using with Dremio Cloud and the VPC that hosts your Redshift cluster, you can add the cluster as a data source.
Prerequisites
Ensure that you have the JDBC connection string of the Redshift database to add it as a source. You can find the JDBC connection URL in the AWS console.
Steps
Perform these steps to configure Redshift:
-
On the Datasets page, you can see a truncated list of Sources at the bottom-left of the page. Click Add Source.
Alternatively, click Databases. The page displays all database sources. Click the Add database button at the top-right of that page.
-
In the Add Data Source dialog, click Amazon Redshift.
The following section describes the source configuration tabs.
General
The General tab contains the required fields to create a Redshift source.
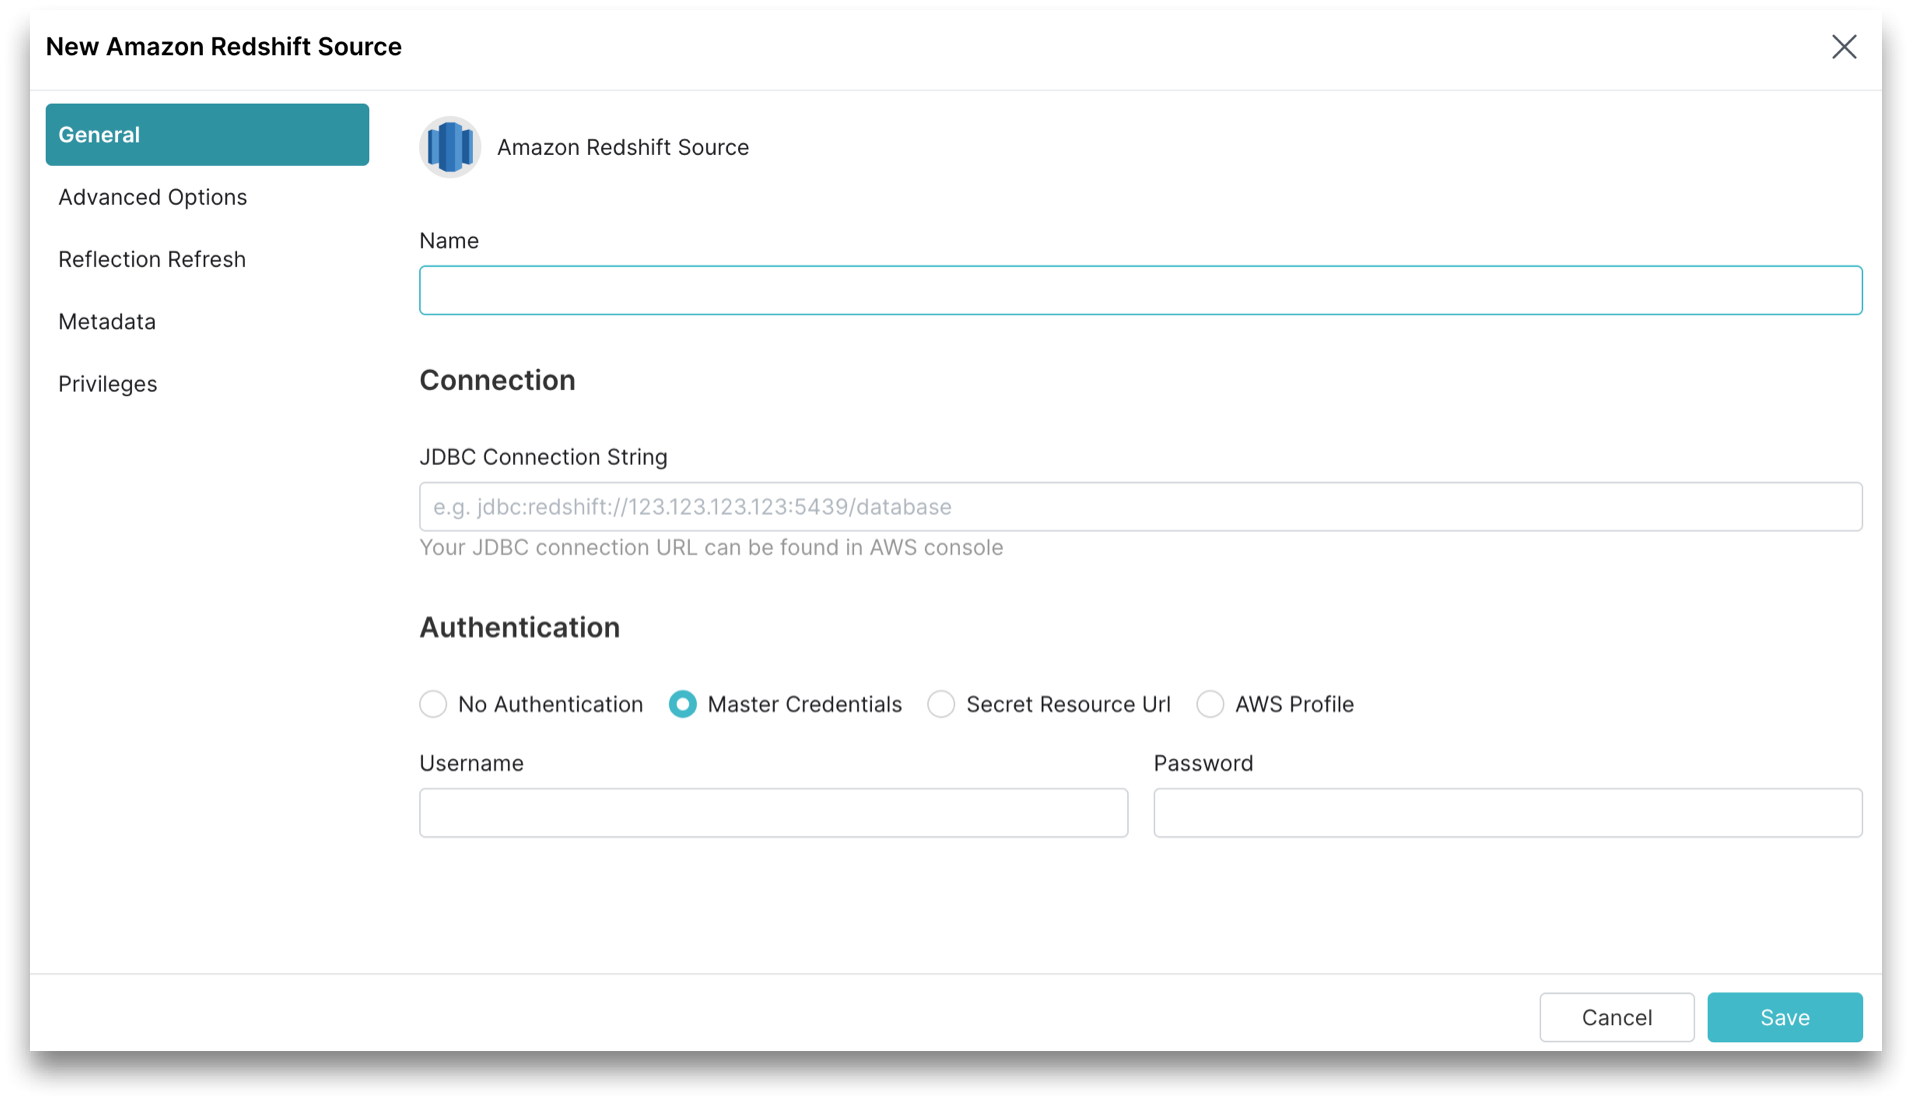
Perform these steps in the General tab:
-
In the General tab, for Name, enter a name. The name cannot include the following special characters:
/,:,[, or]. -
For JDBC Connection String, enter the JDBC connection string of the Redshift database.
-
For Authentication, you must choose one of the following authentication options:
-
Master Authentication, this is the default option. Provide the username and password of a master database user with permissions to read required objects:
- For Username, enter your Redshift database username.
- For Password, enter your Redshift database password.
-
Secret Resource Url:
- For Username, enter your Redshift database username.
- For Secret Resource Url, enter the Secret Resource URL that allows Dremio to fetch the password from AWS Secrets Manager. The Secret Resource URL is the Amazon Resource Name (ARN) for the secret (for example,
arn:aws:secretsmanager:us-west-2:123456789012:secret:my-rds-secret-VNenFy).
-
Advanced Options
Click Advanced Options in the sidebar.
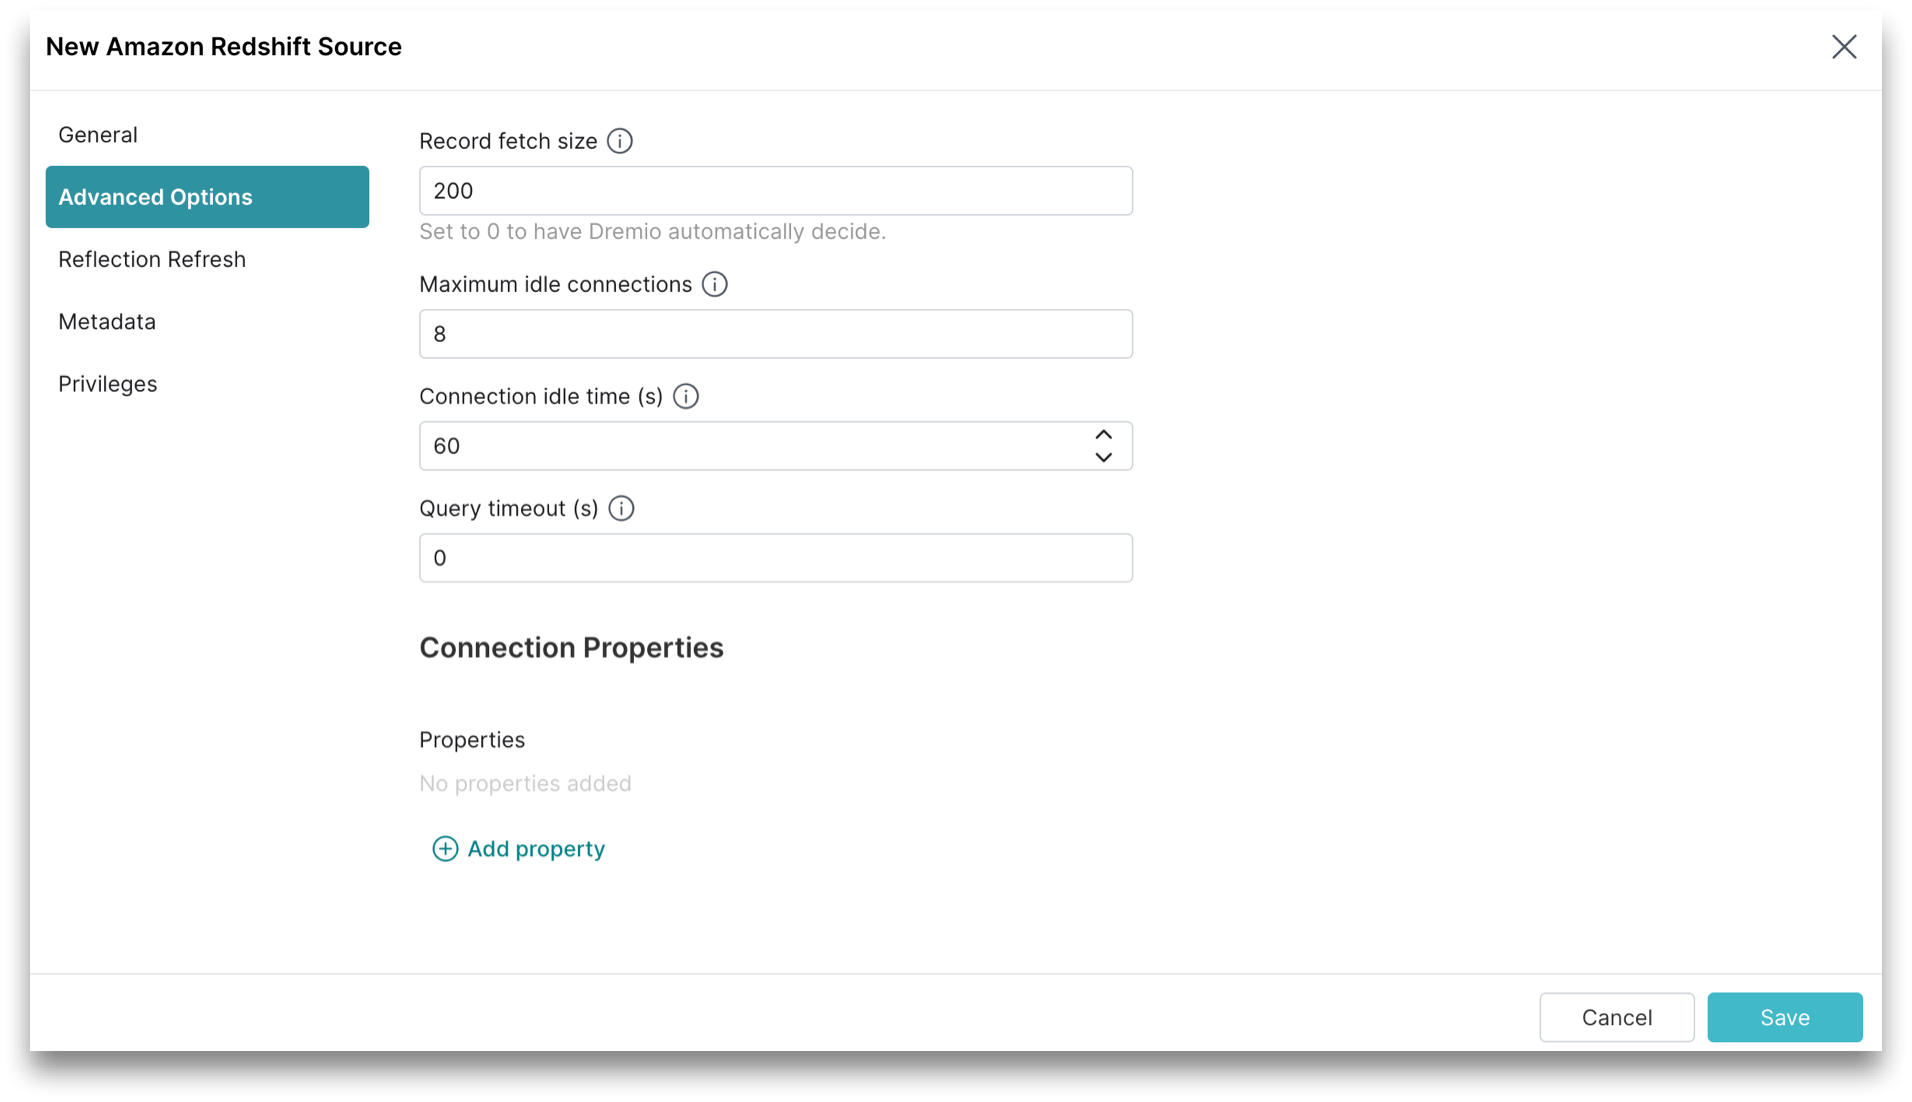
All advanced options are optional.
| Advanced Option | Description |
|---|---|
| Record fetch size | Number of records to fetch at once. Set to 0 (zero) to have Sonar automatically decide. The default record fetch size is 200. |
| Maximum Idle Connections | The total number of connections allowed to be idle at a given time. The default maximum idle connections is 8. |
| Connection Idle Time | The amount of time (in seconds) allowed for a connection to remain idle before the connection is terminated. The default connection idle time is 60 seconds. |
| Connection Properties | Custom key value pairs for the connection relevant to the source. To add a connection property, click Add property and add the property name and value. |
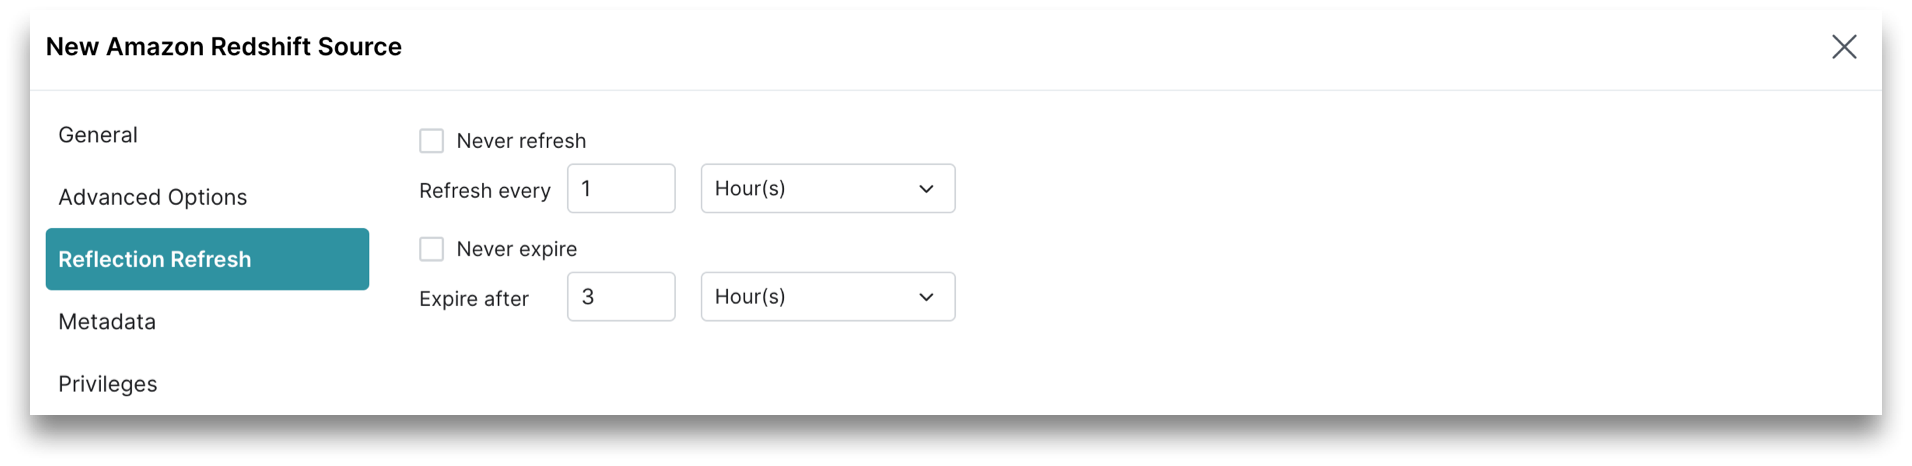
Reflection Refresh
The Reflection Refresh tab in the sidebar allows you to set time intervals for Reflections to refresh or expire.
Metadata
You can configure settings to refresh metadata and handle datasets. Click Metadata in the sidebar.
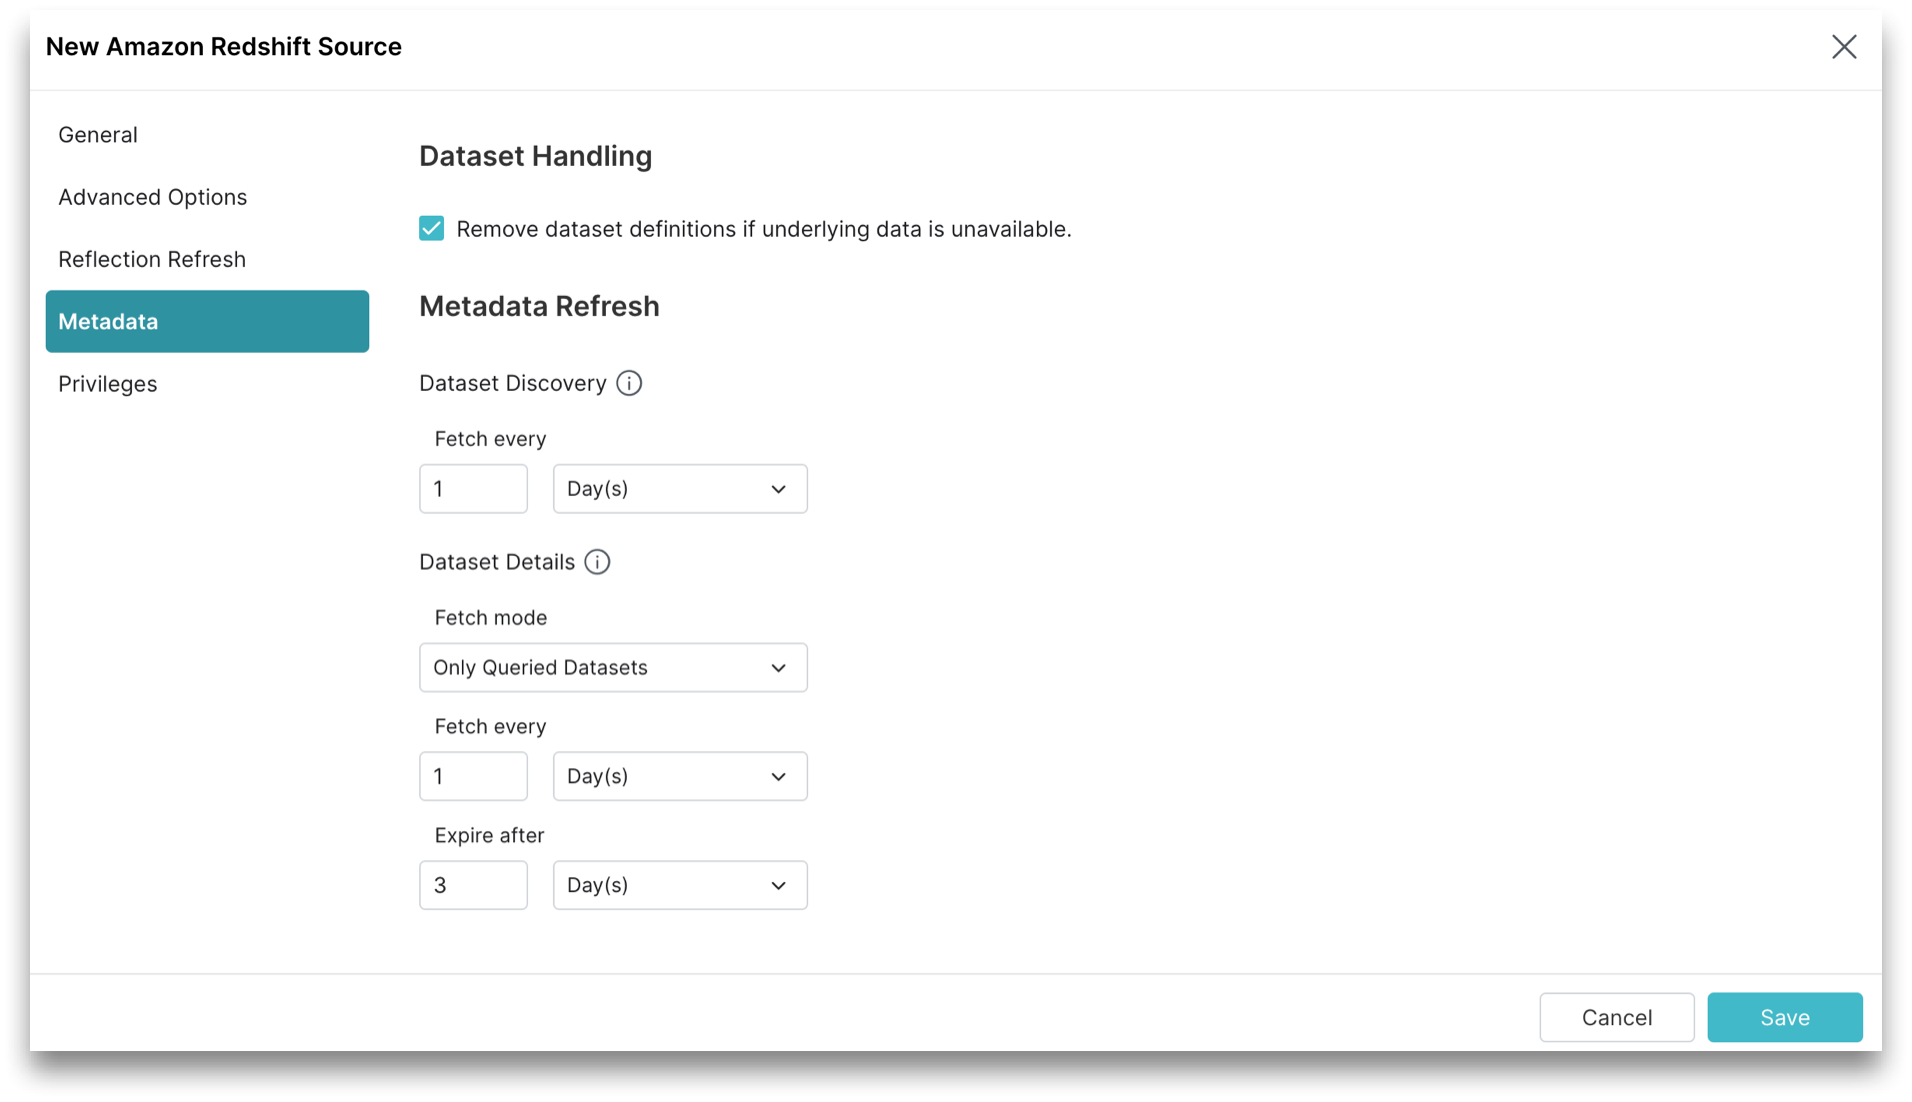
You can configure Dataset Handling and Metadata Refresh parameters.
Dataset Handling
These are the Dataset Handling parameters.
All Dataset Handling parameters are optional.
| Parameter | Description |
|---|---|
| Remove dataset definitions if underlying data is unavailable | By default, Sonar removes dataset definitions if underlying data is unavailable. Useful when files are temporarily deleted and added back in the same location with new sets of files. |
Metadata Refresh
These are the Metadata Refresh parameters:
-
Dataset Discovery: The refresh interval for fetching top-level source object names such as databases and tables. Set the time interval using this parameter.
Parameter Description (Optional) Fetch every You can choose to set the frequency to fetch object names in minutes, hours, days, or weeks. The default frequency to fetch object names is 1 hour. -
Dataset Details: The metadata that Sonar needs for query planning such as information required for fields, types, shards, statistics, and locality. These are the parameters to fetch the dataset information.
noteAll Dataset Details parameters are optional.
Parameter Description Fetch mode You can choose to fetch only from queried datasets that are set by default. Sonar updates details for previously queried objects in a source. Fetching from all datasets is deprecated. Fetch every You can choose to set the frequency to fetch dataset details in minutes, hours, days, or weeks. The default frequency to fetch dataset details is 1 hour. Expire after You can choose to set the expiry time of dataset details in minutes, hours, days, or weeks. The default expiry time of dataset details is 3 hours.
Privileges
You can grant privileges to specific users or roles.
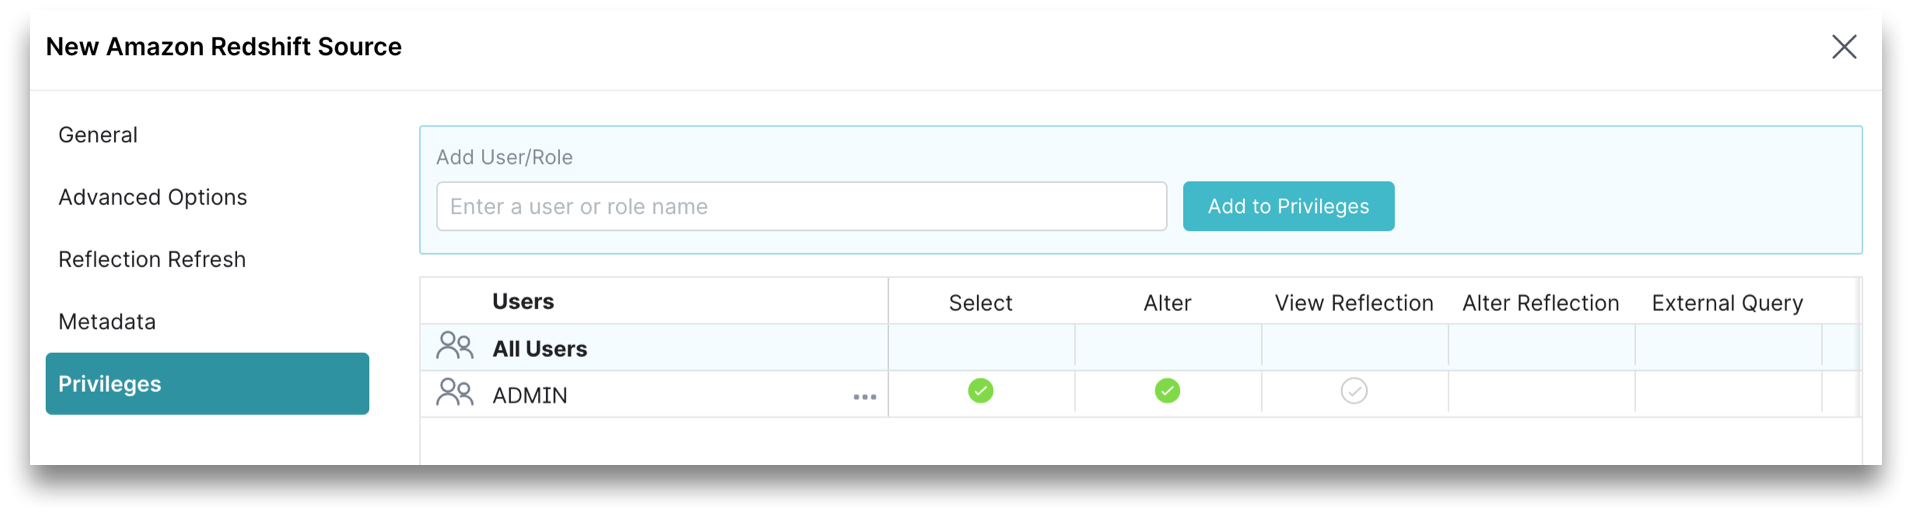
- (Optional) For Privileges, enter the user name or role name that you want to grant access to and click the Add to Privileges button. The added user or role is displayed in the Users table.
- (Optional) For the users or roles in the Users table, toggle the green checkmark for each privilege you want to grant to the Redshift source that is being created.
Click Save after setting the configuration.
Sources containing a large number of files or tables may take longer to be added. During this time, the source name is grayed out and shows a spinner icon, indicating the source is being added. Once complete, the source becomes accessible.
Editing Information about a Redshift Cluster Used as a Data Source
To edit a Redshift source:
-
On the Datasets page, click Databases. A list of databases is displayed.
-
Hover over the database and click the Settings
 icon that appears next to the database.
 -
In the Source Settings dialog, you cannot edit the name. Editing other parameters is optional.
-
Click Save.
Removing a Redshift Cluster Used as a Data Source
To remove a Redshift source, perform these steps:
-
On the Datasets page, click Databases. A list of sources is displayed.
-
Hover over the database and click the More (...) icon that appears next to the database.
-
From the list of actions, click Remove Source. Confirm that you want to remove the source.
cautionRemoving a source causes all downstream views dependent on objects in this source to break.
noteSources containing a large number of files or tables may take longer to be removed. During this time, the source name is grayed out and shows a spinner icon, indicating the source is being removed. Once complete, the source disappears.
Predicate Pushdowns
Dremio offloads these operations to Redshift.
-*, +, -, /
<, <=, <>, =, >, >=, !=
AND, NOT, OR, ||
ABS
ACOS
ADD_MONTHS
ASIN
ATAN
ATAN2
AVG
CAST
CBRT
CEIL
CEILING
CHAR_LENGTH
CHARACTER_LENGTH
CONCAT
COS
COT
DATE_ADD
DATE_SUB
DATE_TRUNC_CENTURY
DATE_TRUNC_DAY
DATE_TRUNC_DECADE
DATE_TRUNC_HOUR
DATE_TRUNC_MINUTE
DATE_TRUNC_MONTH
DATE_TRUNC_QUARTER
DATE_TRUNC_SECOND
DATE_TRUNC_WEEK
DATE_TRUNC_YEAR
DEGREES
E
EXP
EXTRACT_CENTURY
EXTRACT_DAY
EXTRACT_DECADE
EXTRACT_DOW
EXTRACT_DOY
EXTRACT_EPOCH
EXTRACT_HOUR
EXTRACT_MILLENNIUM
EXTRACT_MINUTE
EXTRACT_MONTH
EXTRACT_QUARTER
EXTRACT_SECOND
EXTRACT_WEEK
EXTRACT_YEAR
FLOOR
IS DISTINCT FROM
IS NOT DISTINCT FROM
IS NOT NULL
IS NULL
LAST_DAY
LCASE
LEFT
LENGTH
LIKE
LN
LOCATE
LOG
LOG10
LOWER
LPAD
LTRIM
MAX
MEDIAN
MIN
MOD
PERCENT_CONT
PERCENT_DISC
PI
POSITION
POW
POWER
RADIANS
REPLACE
REVERSE
RIGHT
ROUND
RPAD
RTRIM
SIGN
SIN
SQRT
STDDEV
STDDEV_POP
STDDEV_SAMP
SUBSTR
SUBSTRING
SUM
TAN
TIMESTAMPADD_DAY
TIMESTAMPADD_HOUR
TIMESTAMPADD_MINUTE
TIMESTAMPADD_MONTH
TIMESTAMPADD_QUARTER
TIMESTAMPADD_SECOND
TIMESTAMPADD_WEEK
TIMESTAMPADD_YEAR
TIMESTAMPDIFF_DAY
TIMESTAMPDIFF_HOUR
TIMESTAMPDIFF_MINUTE
TIMESTAMPDIFF_MONTH
TIMESTAMPDIFF_QUARTER
TIMESTAMPDIFF_SECOND
TIMESTAMPDIFF_WEEK
TIMESTAMPDIFF_YEAR
TO_CHAR
TO_DATE
TRIM
TRUNC
TRUNCATE
UCASE
UPPER
VAR_POP
VAR_SAMP