Creating and Editing Reflections
When a Reflection is created, Dremio runs a single job with two steps:
- The first step writes the query results as a materialization to the distributed acceleration storage by running the REFRESH Reflection SQL command.
- The second step registers the materialization table and its metadata with the catalog so that the query optimizer can find the Reflection's definition and structure.
The following screenshot shows the REFRESH Reflection SQL command used to create the Reflection named Super-duper reflection:

The Reflection creation job is listed as a single job on the Jobs page, as shown in the example below:

Dremio creates all Reflections as Apache Iceberg tables, and the metadata for the Reflection is generated at the same time.
Locations of the Reflections Editor
You use the Reflections editor to create, edit, and remove raw and aggregation Reflections.
If you know which table or view you want to create a Reflection from, follow either of these steps to open the Reflections editor:
- On the Datasets page, in the catalog or folder in which the anchor is located, hover over the anchor name and click
 . In the sidebar of the Dataset Settings window, select Reflections.
 - On the Datasets page, in the catalog or folder in which the anchor is located, hover over the anchor name and click
 or
or  on the metadata card. Then, click Reflections in the bar at the top of the screen.
You can also open the Reflections editor from an existing Reflection that is listed in the Reflections page. Follow these steps to open the Reflections editor:
- Open the Reflections page.
- If you are using Dremio, click the gear in the sidebar, and then select Reflections in the sidebar of the Settings page.
- If you are using Dremio Cloud, hover over the gear in the sidebar, select Project Settings, and then select Reflections in the sidebar of the page that is opened.
- Click the name of the Reflection. The Acceleration window is opened. The editor appears in this window.
Creating Raw Reflections
You can use the Reflections editor to create two types of raw Reflection:
-
A default raw Reflection that includes all of the columns of the anchor, but does not sort or horizontally partition on any columns
-
A raw Reflection that includes all or a subset of the columns of the anchor, and that does one or both of the following things:
- Sorts on one or more columns
- Horizontally partitions the data according to the values in one or more columns
Prerequisites
- If you want to accelerate queries on unoptimized data or data in slow storage, create a view that is itself created from a table in a non-columnar format or on slow-scan storage. You can then create your raw Reflection from that view.
- If you want to accelerate "needle-in-a-haystack" queries, create view that includes a predicate to include only the rows that you want to scan. You can then create your raw Reflection from that view.
- If you want to accelerate queries that perform expensive transformations, create a view that performs those transformations. You can then create your raw Reflection from that view.
- If you want to accelerate queries that perform joins, create a view that performs the joins. You can then create your raw Reflection from that view.
Creating Default Raw Reflections
In the Basic view of the Reflections editor, you can create a raw Reflection that includes all of the columns that are in a table or view. Creating a basic raw Reflection ensures that Dremio never runs user queries against the underlying table or view when the raw Reflection is enabled.
Restrictions of the Basic View
- You cannot select columns to sort or create horizontal partitions on.
- The name of the Reflection that you create is restricted to "Raw Reflection".
- You can create only one raw Reflection. If you want to create multiple raw Reflections at a time, use the Advanced view.
Procedure
To create a raw Reflection in the Basic view of the Reflections editor:
-
Open the Reflections editor.
See Locations of the Reflections Editor to find out where you can open the editor from. -
Click the toggle switch on the left side of the Raw Reflections bar.
-
Click Save.
For tips on what to do now after your raw Reflection is created and enabled, see What to Do Next.
Creating Customized Raw Reflections
In the Advanced view of the Reflections editor, you can create one or more raw Reflections that include all or a selection of the columns that are in the anchor or supported anchor. You can also choose sort columns and columns for partitioning horizontally.
Dremio recommends that you follow the best practices listed in Best Practices for Creating Raw and Aggregation Reflections when you create customized raw Reflections.
If you make any of the following changes to a raw Reflection when you are using the Advanced view, you cannot switch to the Basic view:
- Deselect one or more columns in the Display column. By default, all of the columns are selected.
- Select one or more columns in the Sort, Partition, or Distribute column.
Procedure
To create a raw Reflection in the Advanced view of the Reflections editor:
-
Open the Reflections editor.
See Locations of the Reflections Editor to find out where you can open the editor from. -
If the Advanced view is not already displayed, click the Advanced View button in the top-right corner of the editor.
-
Click the toggle switch in the table labeled Raw Reflection to enable the raw Reflection.
Queries do not start using the Reflection, however, until after you finished editing the Reflection and click Save in a later step.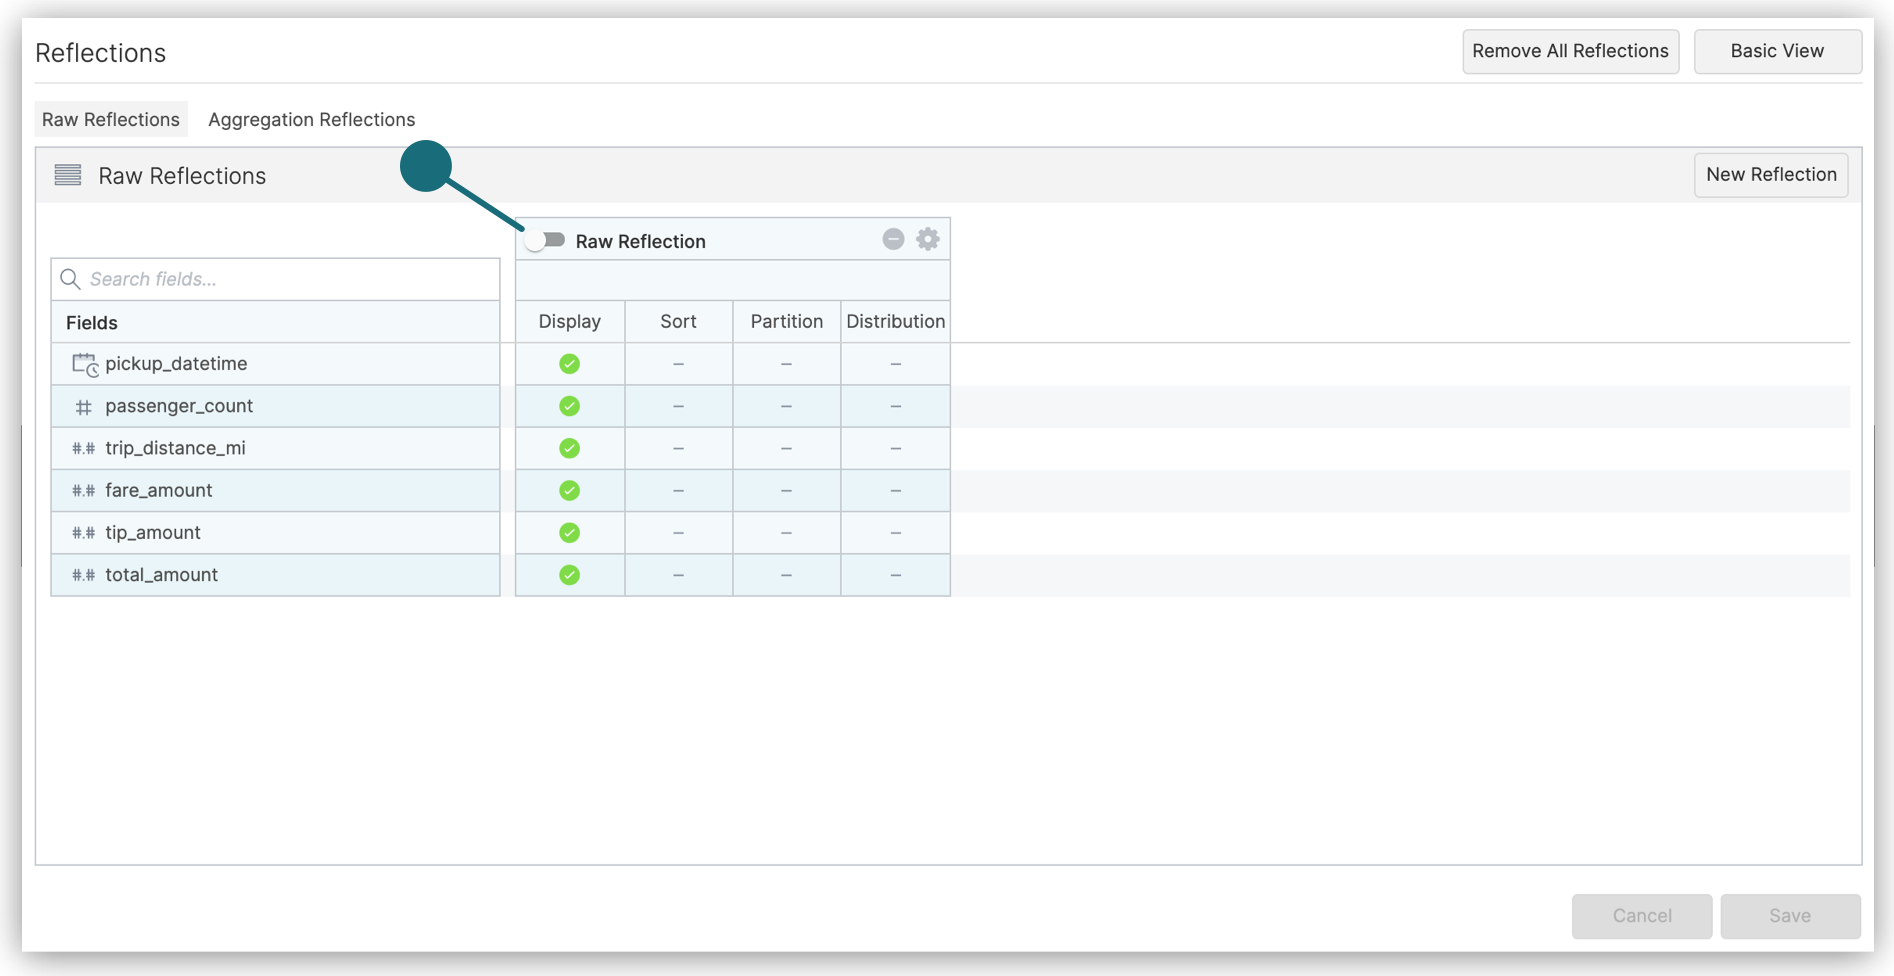
-
(Optional) Click in the label to rename the Reflection.
The purpose of the name is to help you understand, when you read job reports, which Reflections the query optimizer considered and chose when planning queries. -
In the columns of the table, follow these steps, which you don't have to do in any particular order:
noteIgnore the Distribution column. Selecting fields in it has no effect on the Reflection.
-
Click in the Display column to include columns in or exclude them from your Reflection.
-
Click in the Sort column to select columns on which to sort the data in the Reflection. For guidance in selecting a column on which to sort, see the section Sort Reflections on High-Cardinality Columns in Best Practices for Creating Raw and Aggregation Reflections.
-
Click in the Partition column to select columns on which to horizontally partition the rows in the Reflection. For guidance in selecting columns on which to partition, see the section Horizontally Partition Reflections that Have Many Rows.
noteIf the Reflection is based on an Iceberg table, a filesystem source, or an AWS Glue source, and that table is partitioned, recommended partition columns and transforms are selected for you. If you change the selection of columns, then this icon appears at the top of the table:
 . You can click it to revert back to the recommended selection of partition columns.
-
-
(Optional) Optimize the number of files used to store the Reflection. You can optimize for fast refreshes or for fast read performance by queries. Follow these steps:
a. Click the gear icon in the table in which you are defining the Reflection.
b. In the field Reflection execution strategy, select either of these options:
- Options
- Select Minimize Time Needed To Refresh if you need the Reflection to be created as fast as possible. This option can result in the data for the Reflection being stored in many small files. This is the default option.
- Select Minimize Number Of Files when you want to improve read performance of queries against the Reflection. With this option, there tend to be fewer seeks performed for a given query.
- Options
-
Click Save when you are finished.
You can also create raw Reflections using SQL commands.
What to Do Next
After you create a raw Reflection that is enabled, test whether the query optimizer is making queries use it. See Testing Reflections for the steps.
When you are sure that the Reflection is being used, follow one of these steps:
- If the base table is in the Apache Iceberg format or the Delta Lake format: Set the schedule according to which all Reflections on the table are refreshed.
- For all other base tables: Set the refresh type for all Reflections on the underlying table and set the schedule according to which they are refreshed.
Creating Aggregation Reflections
Aggregation Reflections are summarized representations of data. Most BI tools generate aggregation and GROUP BY queries. Aggregation Reflections optimize these kinds of query patterns.
When you create aggregation Reflections, keep in mind these best practices:
-
Use dimensions that have relatively low cardinality in a table or view. The higher the cardinality of a dimension, the less benefit an aggregation Reflection has on query performance. Lower cardinality aggregation Reflections require less time to scan.
-
For a single table or view, create one aggregation Reflection for each important subset of dimensions in your queries, rather than one aggregation Reflection that includes all dimensions. Multiple small aggregation Reflections (versus one large one) are good for isolated pockets of query patterns on the same table or view that do not overlap. If your query patterns overlap, use fewer larger aggregation Reflections.
There are two cautions that accompany this advice, however:
-
Be careful of creating aggregation Reflections that have too few dimensions for your queries.
If a query uses more dimensions than are included in an aggregation Reflection, the Reflection cannot satisfy the query and the query optimizer does not run the query against it.
-
Be careful of creating more aggregation Reflections than are necessary to satisfy queries against a table or view.
The more Reflections you create, the more time the query optimizer requires to plan the execution of queries. Therefore, creating more aggregation Reflections than you need can slow down query performance, even if your aggregation Reflections are low-cardinality.
-
-
If you want to include a computed measure, first create a view with the computed column to use as a measure, and then create the aggregation Reflection on the view.
Dremio recommends that you also follow the best practices listed in Best Practices for Creating Raw and Aggregation Reflections when you create customized aggregation Reflections.
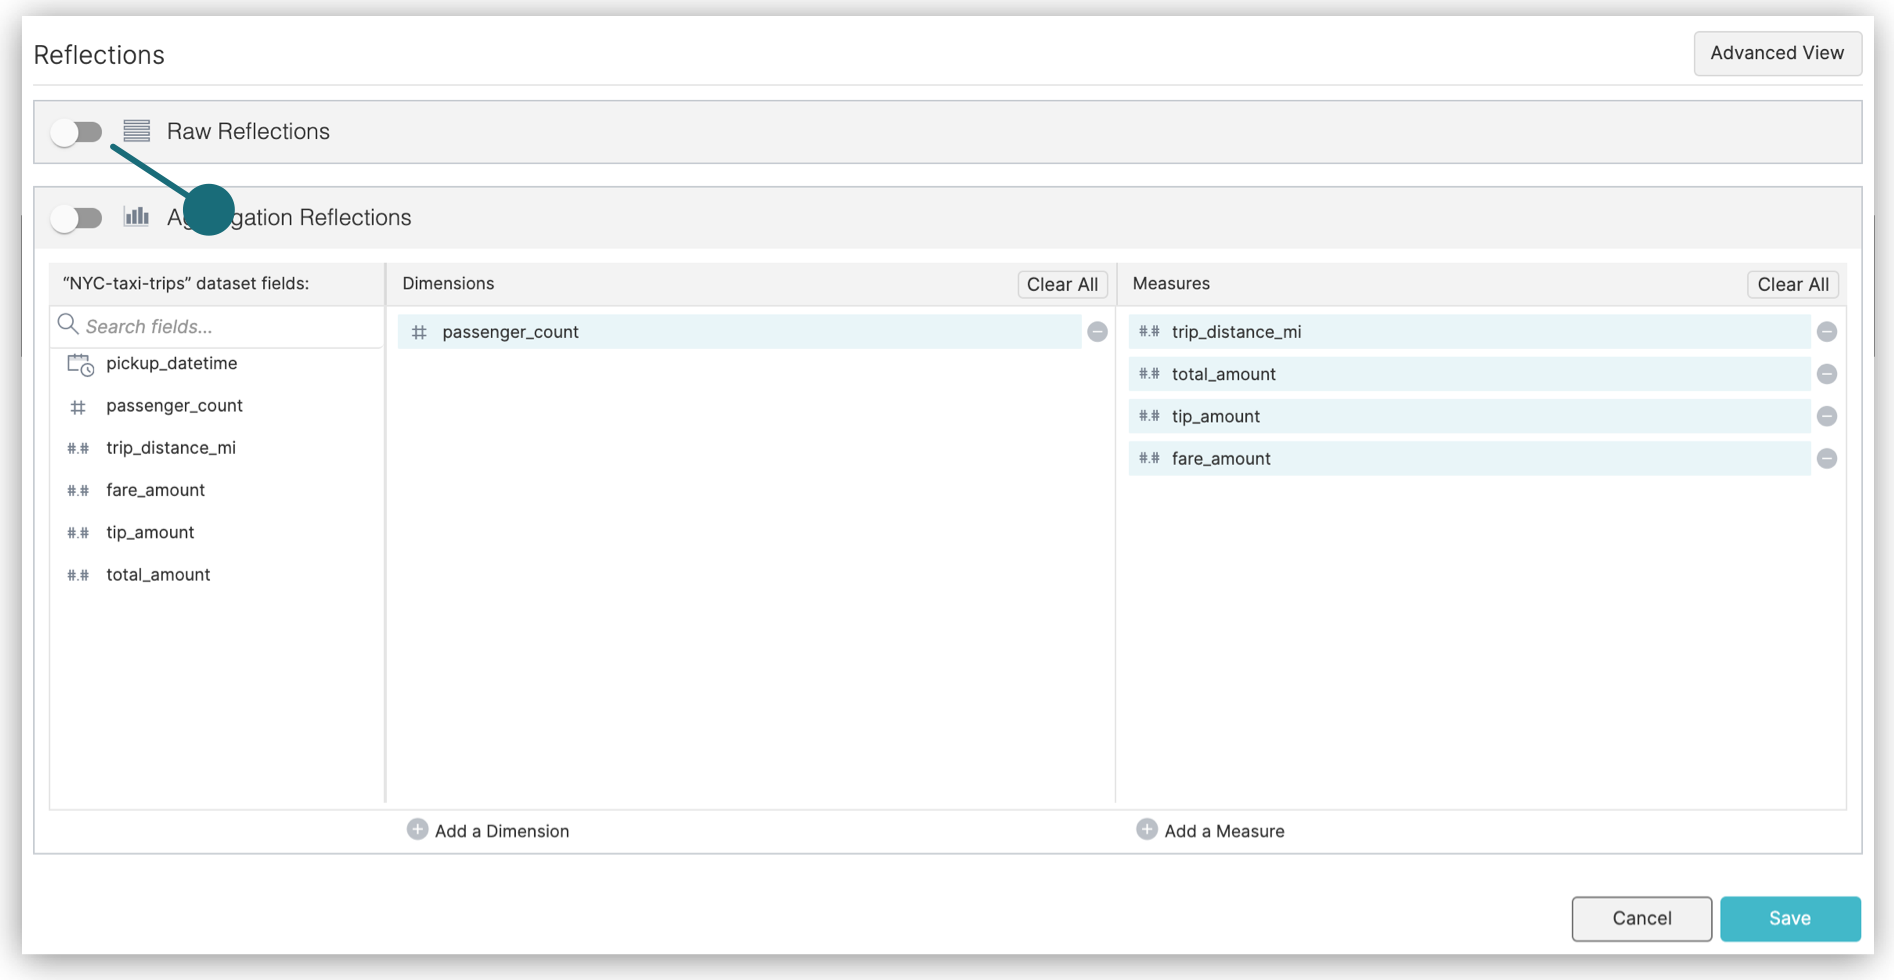
Creating Default Aggregation Reflections
You can use the Basic view of the Reflections editor to create one aggregation Reflection that includes columns, from the anchor or supported anchor, that are recommended for use as dimensions or measures. You can add or remove dimensions and measures, too.
Restrictions
- You can create only one aggregation Reflection in the Basic view. If you want to create multiple aggregations Reflections at a time, use the Advanced view.
- You cannot select columns for sorting or horizontally partitioning.
- The name of the Reflection is restricted to "Aggregation Reflection".
Procedure
To create an aggregation Reflection in the Basic view of the Reflections editor:
-
Open the Reflections editor.
See Locations of the Reflections Editor to find out where you can open the editor from. -
(Optional) In the Aggregate Reflections section of the editor, click Generate to get suggested fields to use as dimensions and measures.
-
In the Aggregate Reflections section of the editor, modify or accept suggestions for dimension and measure fields.
-
To turn on the Reflection after you create it, click the toggle switch on the left side of the Aggregate Reflections bar.
- Click Save.
You can also create aggregation Reflections using SQL commands.
For tips on what to do now after your aggregation Reflection is created and enabled, see What to Do Next.
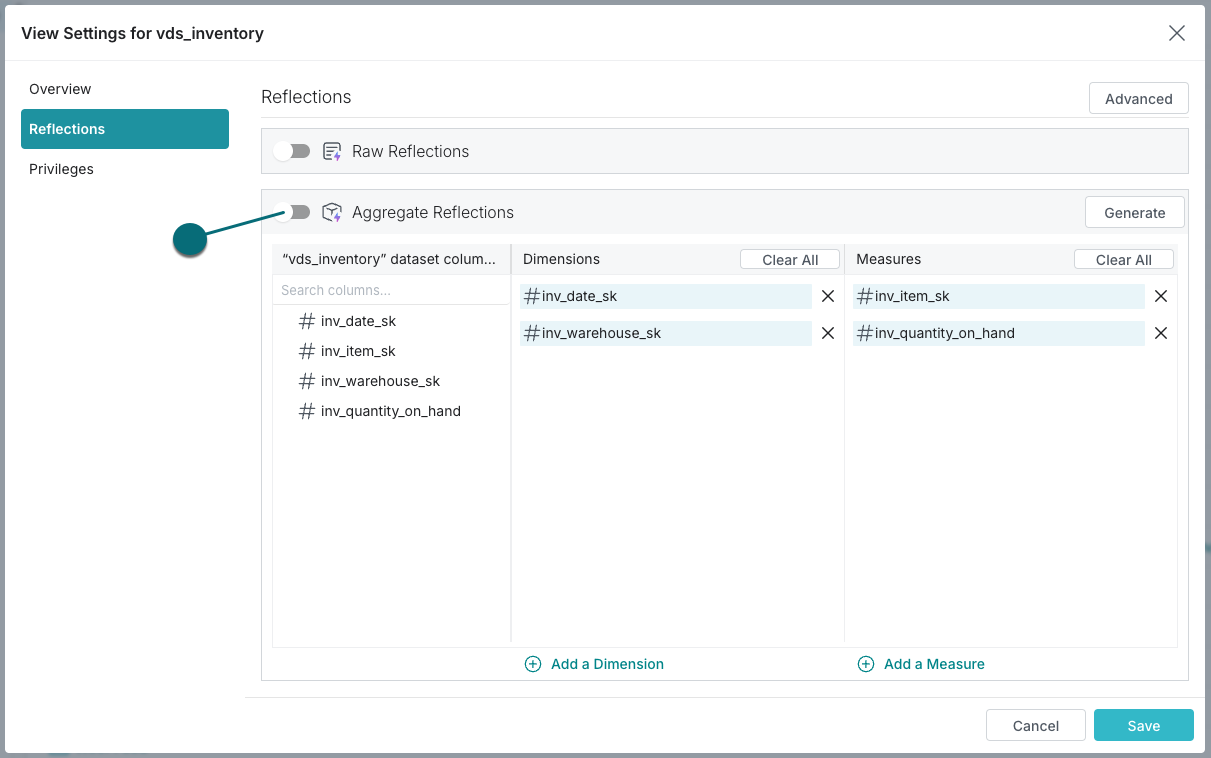
Creating Customized Aggregation Reflections
You can use the Advanced view of the Reflections editor to create one or more aggregation Reflections that select which columns in the anchor or supporting anchor to use as dimensions and measures. For each column that you use as a measure, you can use one or more of these SQL functions: APPROX_DISTINCT_COUNT, COUNT, MAX, and MIN. You can also choose sort columns and columns for partitioning horizontally.
Procedure
To create an aggregation Reflection in the Advanced view of the Reflections editor:
-
Open the Reflections editor.
See Locations of the Reflections Editor to find out where you can open the editor from. -
Click the Advanced View button in the top-right corner of the editor.
-
Click Aggregation Reflections. The Aggregation Reflections section is displayed, and one table for refining the aggregation Reflection that appeared in the Basic view is ready.

-
(Optional) Click in the name to rename the Reflection.
The purpose of the name is to help you understand, when you read job reports, which Reflections the query optimizer considered and chose when planning queries. -
In the columns of the table, follow these steps, which you don't have to do in any particular order:
noteIgnore the Distribution column. Selecting fields in it has no effect on the Reflection.
-
Click in the Dimensions column to include or exclude columns to use as dimensions.
-
Click in the Measures column to include or exclude columns to use as measures. You can use one or more of these SQL functions for each measure: APPROX_DISTINCT_COUNT, COUNT, MAX, and MIN.
The full list of SQL aggregation functions that Dremio supports is not supported in the Reflections editor. If you want to create a Reflection that aggregates data by using the sQL function AVG, CORR, HLL, SUM, VAR_POP, or VAR_SAMP, you must create a view that uses the function, and then create a raw Reflection from that view.
-
Click in the Sort column to select columns on which to sort the data in the Reflection. For guidance in selecting a column on which to sort, see the section Sort Reflections on High-Cardinality Columns in Best Practices for Creating Raw and Aggregation Reflections.
-
Click in the Partition column to select columns on which to horizontally partition the rows in the Reflection. For guidance in selecting columns on which to partition, see the section Horizontally Partition Reflections that Have Many Rows.
noteIf the Reflection is based on an Iceberg table, a filesystem source, or an AWS Glue source, and that table is partitioned, recommended partition columns and transforms are selected for you. If you change the selection of columns, then this icon appears at the top of the table:
. You can click it to revert back to the recommended selection of partition columns.
-
-
(Optional) Optimize the number of files used to store the Reflection. You can optimize for fast refreshes or for fast read performance by queries. Follow these steps:
a. Click the gear icon in the table in which you are defining the Reflection.
b. In the field Reflection execution strategy, select either of these options:
- Options
- Select Minimize Time Needed To Refresh if you need the Reflection to be created as fast as possible. This option can result in the data for the Reflection being stored in many small files. This is the default option.
- Select Minimize Number Of Files when you want to improve read performance of queries against the Reflection. With this option, there tend to be fewer seeks performed for a given query.
- Options
-
Click Save when you are finished.
What to Do Next
After you create an aggregation Reflection that is enabled, test whether the query optimizer is making queries use it. See Testing Reflections for the steps.
When you are sure that the Reflection is being used, follow one of these steps:
- If the base table is in the Apache Iceberg format or the Delta Lake format: Set the schedule according to which all Reflections on the table are refreshed.
- For all other base tables: Set the refresh type for all Reflections on the underlying table and set the schedule according to which they are refreshed.
Editing Raw Reflections
You can edit an existing raw Reflection. You might want to do so if you are iteratively designing and testing a raw Reflection, if the definition of the view that the Reflection was created from was changed, or if the schema of the underlying table was changed.
If you created a raw Reflection in the Basic view of the Reflections editor, you must use the Advanced view to edit it.
Dremio runs the job or jobs to recreate the Reflection after you click Save.
Procedure
-
Open the Reflections editor.
See Locations of the Reflections Editor to find out where you can open the editor from. -
Click the Advanced View button in the top-right corner of the editor.
-
In the Raw Reflections section of the Advanced view, locate the table that shows the definition of your Reflection.
-
(Optional) Click in the label to rename the Reflection.
The purpose of the name is to help you understand, when you read job reports, which Reflections the query optimizer considered and chose when planning queries. -
In the columns of the table, follow these steps, which you don't have to do in any particular order:
noteIgnore the Distribution column. Selecting fields in it has no effect on the Reflection.
-
Click in the Display column to include columns in or exclude them from your Reflection.
-
Click in the Sort column to select columns on which to sort the data in the Reflection. For guidance in selecting a column on which to sort, see the section Sort Reflections on High-Cardinality Columns in Best Practices for Creating Raw and Aggregation Reflections.
-
Click in the Partition column to select columns on which to horizontally partition the rows in the Reflection. For guidance in selecting columns on which to partition, see the section Horizontally Partition Reflections that Have Many Rows.
noteIf the Reflection is based on an Iceberg table, a filesystem source, or an AWS Glue source, and that table is partitioned, partition columns and transforms are recommended for you. Hover over the
icon at the top of the table to see the recommendation. Click the icon to accept the recommendation.
-
-
(Optional) Optimize the number of files used to store the Reflection. You can optimize for fast refreshes or for fast read performance by queries.
If the underlying tables for your Reflection are set to Incremental Refresh, then changing the setting of this option affects only new data that is added to your Reflection at each refresh.
If the underlying tables are set to Full Refresh, then changing the setting of this option affects the entire set of data in the Reflection. The new setting takes effect at the next full refresh.
Follow these steps:
a. Click the gear icon in the table in which you are defining the Reflection.
b. In the field Reflection execution strategy, select either of these options:
- Options
- Select Minimize Time Needed To Refresh if you need the Reflection to be created as fast as possible. This option can result in the data for the Reflection being stored in many small files. This is the default option.
- Select Minimize Number Of Files when you want to improve read performance of queries against the Reflection. With this option, there tend to be fewer seeks performed for a given query.
- Options
-
Click Save when you are finished.
Editing Aggregation Reflections
You might want to edit an aggregation Reflection if you are iteratively designing and testing an aggregation Reflection, if the definition of the view that the Reflection was created from was changed, if the schema of the underlying table was changed, or if you want to revise one or more aggregations defined in the Reflection.
If you created an aggregation Reflection in the Basic view of the Reflections editor, you can edit that Reflection either in the Basic view or in the Advanced view.
Dremio runs the job or jobs to recreate the Reflection after you click Save.
Editing Aggregation Reflections in the Basic View of the Reflections Editor
- Open the Reflections editor.
See Locations of the Reflections Editor to find out where you can open the editor from. - In the Aggregation Reflection section of the editor, modify or accept the recommendation for dimension columns and measure columns.
- Click Save.
Editing Aggregation Reflections in the Advanced View of the Reflections Editor
-
Open the Reflections editor.
See Locations of the Reflections Editor to find out where you can open the editor from. -
Click the Advanced View button in the top-right corner of the editor.
-
Click Aggregation Reflections.
-
(Optional) Click in the name to rename the Reflection.
The purpose of the name is to help you understand, when you read job reports, which Reflections the query optimizer considered and chose when planning queries. -
In the columns of the table, follow these steps, which you don't have to do in any particular order:
noteIgnore the Distribution column. Selecting fields in it has no effect on the Reflection.
-
Click in the Dimensions column to include or exclude columns to use as dimensions.
-
Click in the Measures column to include or exclude columns to use as measures. You can use one or more of these SQL functions for each measure: APPROX_DISTINCT_COUNT, COUNT, MAX, and MIN.
The full list of SQL aggregation functions that Dremio supports is not supported in the Reflections editor. If you want to create a Reflection that aggregates data by using the sQL function AVG, CORR, HLL, SUM, VAR_POP, or VAR_SAMP, you must create a view that uses the function, and then create a raw Reflection from that view.
-
Click in the Sort column to select columns on which to sort the data in the Reflection. For guidance in selecting a column on which to sort, see the section Sort Reflections on High-Cardinality Columns in Best Practices for Creating Raw and Aggregation Reflections.
-
Click in the Partition column to select columns on which to horizontally partition the rows in the Reflection. For guidance in selecting columns on which to partition, see the section Horizontally Partition Reflections that Have Many Rows.
noteIf the Reflection is based on an Iceberg table, a filesystem source, or an AWS Glue source, and that table is partitioned, partition columns and transforms are recommended for you. Hover over the
icon at the top of the table to see the recommendation. Click the icon to accept the recommendation.
-
-
(Optional) Optimize the number of files used to store the Reflection. You can optimize for fast refreshes or for fast read performance by queries. Follow these steps:
a. Click the gear icon in the table in which you are defining the Reflection.
b. In the field Reflection execution strategy, select either of these options:
- Options
- Select Minimize Time Needed To Refresh if you need the Reflection to be created as fast as possible. This option can result in the data for the Reflection being stored in many small files. This is the default option.
- Select Minimize Number Of Files when you want to improve read performance of queries against the Reflection. With this option, there tend to be fewer seeks performed for a given query.
- Options
-
Click Save when you are finished.
Creating External Reflections
See External Reflections for a description of what external Reflections are and their benefits.
To create an external Reflection:
-
Follow these steps in the data source:
a. Select your source table.
b. Create a table that is derived from the source table, such as an aggregation table, if you do not already have one.
-
Follow these steps in Dremio:
a. Define a view on the derived table in the data source. The definition must match that of the derived table.
b. Define a new external Reflection that maps the view to the derived table.
The data types and column names in the external Reflection must match those in the view that the external Reflection is mapped to.
Example
Suppose you have a data source named mySource that is connected to Dremio. In that data source, there are (among all of your other tables) these two tables:
sales, which is a very large table of sales data.sales_by_region, which aggregates by region the data that is insales. You want to make the data insales_by_regionavailable to data analysts who use Dremio. However, because you already have thesales_by_regiontable created, you do not see the need to create a Dremio table fromsales, then create a Dremio view that duplicatessales_by_region, and finally create a Reflection on the view. You would like instead to makesales_by_regionavailable to queries run from Bi tools through Dremio.
To do that, you follow these steps:
- Create a view in Dremio that has the same definition as
sales_by_region. Notice that theFROMclause points to thesalestable that is in your data source, not to a Dremio table.
CREATE VIEW "myWorkspace"."sales_by_region" AS
SELECT
    AVG(sales_amount) average_sales,
    SUM(sales_amount) total_sales,
    COUNT(*) sales_count,
    region
FROM mySource.sales
GROUP BY region
- Create an external Reflection that maps the view above to
sales_by_regioninmySource.
ALTER DATASET "myWorkspace"."sales_by_region"
CREATE EXTERNAL Reflection "external_sales_by_region"
USING "mySource"."sales_by_region"
The external Reflection lets Dremio's query planner know that there is a table in mySource that matches the Dremio view myWorkplace.sales_by_region and that can be used to satisfy queries against the view. When Dremio users query myWorkspace.sales_by_region, Dremio routes the query to the data source mySource, which runs the query against mySource.sales_by_region.
Editing External Reflections
If you have modified the DDL of a derived table in your data source, follow these steps in Dremio Cloud to update the corresponding external Reflection:
- Replace the view with one that has a definition that matches the definition of the derived table.
When you do so, the external Reflection is dropped. - Define a new external Reflection that maps the view to the derived table.