Automatic Optimization
Query performance may be impacted as you ingest and make changes to data. For example, small files produced by data ingestion jobs result in slower queries because the query engine needs to read more files.
Arctic can automate optimization tasks for tables within the catalog to optimize query performance and minimize storage costs. Arctic currently supports automation for the following optimization tasks:
- Table optimization, which compacts small files into larger files.
- Table cleanup, which uses the VACUUM CATALOG command to delete expired snapshots and orphaned metadata files for Iceberg tables in Arctic catalogs.
- Ensure you have sufficient Role-Based Access Control (RBAC) privileges to manage Arctic optimization resources, schedules, and jobs.
- For more details on how Dremio optimizes Iceberg tables, see Optimizing Tables.
Managing Optimization Resources
Arctic uses compute and storage resources in your cloud account for automated table maintenance, so data processing and storage stays in your account. Specifically, Arctic uses the following:
- VM instances to perform table maintenance tasks
- An Amazon S3 bucket path or Azure storage container to store log files associated with maintenance jobs
- Appropriate data access credentials that will allow read/write access to the tables in the Arctic catalog and to the log file location
The default Arctic catalog for your Sonar project is automatically configured to use the Sonar project’s cloud resources for Arctic optimization jobs. You need to configure optimization resources for any other Arctic catalogs you create.
To configure optimization resources for an Arctic catalog, complete the following steps:
-
Go to Arctic Catalogs and select your catalog.
-
Click
 and then select Configuration from the catalog settings sidebar.
 -
For Cloud, select the cloud that you want to use to run optimization tasks on. To add a new cloud, see Managing Clouds. For information about setting up AWS and Azure clouds, see Configuring Cloud Resources Manually.
To continue the configuration, follow the steps for your cloud provider.
- AWS
- Azure
- For Engine size, select an engine size to be used for optimization tasks. We recommend a small engine size, which minimizes compute costs.
- For Data location, enter the S3 path where you want Arctic to store the metadata files associated with maintenance operations (e.g.,
s3://your-bucket-name/folder). - For Data access credential, select Access Key or IAM Role. These credentials will be used to read and write to tables in the Arctic catalog and to the log file location you specified above.
- If you select Access Key, provide the AWS access key ID and AWS secret access key.
- If you select IAM Role, you will need to:
- Use the Trust Account ID and External ID values that appear to create an AWS IAM role.
- Copy the AWS Cross-Account Role ARN and the AWS Instance Profile ARN values from your AWS account and enter them in the respective configuration fields.
- Click Add.
- For Engine size, select an engine size to be used for optimization tasks. We recommend a small engine size, which minimizes compute costs.
- For Data location, enter the ADLS path where you want Arctic to store the metadata files associated with maintenance operations (e.g.,
adls://your-container-name). Note: the ADLS path can only accommodate a blob container name and not a folder suffix. - For Tenant ID, paste the ID of the Azure tenant.
- For Account Name, paste the name of the storage account that you want to use for the project store.
- For Client ID, paste the application (client) ID of the registered application you are using for storage access.
- For Client Secret, paste the value of the client secret that you created in the registered application.
- (Optional) If you want to use a tailored set of permissions, copy the policy template to create a custom role for Dremio Cloud to manage storage resources.
- Click Add.
You can also use the Arctic Engine API to configure, update, and retrieve information about compute engines that run optimization tasks.
Managing Table Optimization Schedules
To manage optimization schedules and parameters for a table, complete the following steps:
-
Go to Arctic Catalogs and select your catalog.
-
On the Catalog page, hover over your table and click
 to see the dataset settings.
In the Dataset Settings dialog, you can trigger a one-off optimization job or set up scheduled optimization for your table.
Optimize Once
To trigger a one-off optimization job, complete the following steps:
-
Click Optimize Once.
-
In the Advanced Optimization Settings dialog, set the following fields:
-
Under Target file size (MB), enter a target file size (in MB) of the files that are generated.
-
Under Min. input files, enter the minimum number of qualified files needed to be considered for optimization.
-
Under Min. file size (MB), enter the minimum file size (in MB) to be considered for optimization.
-
Under Max. file size (MB), enter the maximum file size (in MB) to be considered for optimization.
-
-
Click Optimize.
Optimize Regularly
To set up scheduled optimization for for a table, complete the following steps:
-
Under Optimize regularly, click Set schedule.
-
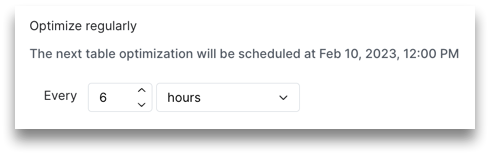
For Every, select hours, day, week, or month as the frequency.
-
If selecting hours, enter a number. For example, you can run an optimization job every 6 hours:
-
If selecting day, enter a time. For example, you can run an optimization job at 18:00 every day:

-
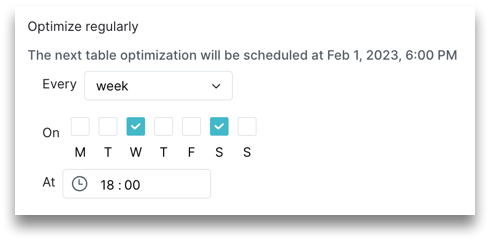
If selecting week, choose the day(s) of the week and enter a time. For example, you can run an optimization job on Wednesday and Saturday at 18:00 every week:
-
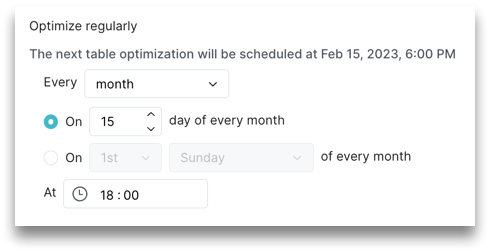
If selecting month, select whether you want to run an optimization job on a certain date or day of the month, and then enter a time. For example, you can run an optimization job on the 15th day of every month, or you can run the job on the 1st Sunday of every month:
-
-
Under Advanced Configuration, set the following options (see the OPTIMIZE TABLE parameters for information):
-
Under Target file size (MB), enter a target file size (in MB) of the files that are generated.
-
Under Min. input files, enter the minimum number of qualified files needed to be considered for optimization.
-
Under Min. file size (MB), enter the minimum file size (in MB) to be considered for optimization.
-
Under Max. file size (MB), enter the maximum file size (in MB) to be considered for optimization.
-
-
Click Save.
- Optimization schedules and parameters for tables are branch-specific, so the same table in another branch is not affected. You can use this isolation to experiment with different optimization parameters.
- Before an optimization job runs, a check is performed to determine whether new snapshots were added to the Iceberg table since the last successful optimization job was run. If not, the optimization job is canceled to save compute costs.
- You can also use the Arctic Jobs API and Schedules API to run a one-off optimization job and manage optimization schedules respectively.
Enabling Table Cleanup and Setting the Cutoff Policy
You can enable table cleanup and set the cutoff policy for the Arctic catalog in the Dremio console. Dremio uses the cutoff policy to determine which snapshots and associated files to expire and delete. For example, if you set the cutoff policy to 5 days, Dremio expires and deletes snapshots that are older than 5 days. After you enable table cleanup, Dremio automatically runs the VACUUM CATALOG command for the catalog once every 24 hours for the Arctic catalog according to the cutoff policy you set.
To enable automatic table cleanup with VACUUM CATALOG and set the cutoff policy in the Dremio console:
-
Go to Arctic Catalogs and click
for your catalog. -
Select Table Cleanup from the catalog settings sidebar.
-
Toggle Enable table cleanup to enable the setting.
-
Under Expire and delete all table snapshots older than, enter the number of days that Dremio should use as the cutoff policy for the catalog (minimum 1; maximum 90).
-
Click Save.
If you use the Dremio console to enable table cleanup and set the cutoff policy, the VACUUM CATALOG command runs once each day at midnight in UTC time (00:00 UTC). If you want Dremio to run the command at a different interval and time, use the Arctic Catalog Schedules API to create or modify the schedule.
If you disable table cleanup in the Dremio console or with the Arctic Vacuum API, Dremio does not retain the customized schedule made with the Arctic Catalog Schedules API. If you re-enable table cleanup, you must recreate the customized schedule.
If you change the cutoff policy in the Dremio console after setting a custom table cleanup schedule using the Arctic Catalog Schedules API, Dremio retains the custom schedule.
Cutoff Policy Overrides
You can use override properties to specify cutoff policies for individual tables, overriding catalog-level cutoff policies.
Use these override properties to specify a different cutoff policy for the table:
history.expire.max-snapshot-age-mshistory.expire.min-snapshots-to-keep
Table-level overrides with history.expire.max-snapshot-age-ms can lengthen but not shorten the cutoff policy for individual tables. When a table's properties include an override for the cutoff policy, Dremio compares the table-level and catalog-level cutoff policy values and applies the larger value. For example, if the catalog's cutoff policy value is 5 days and you set a table-level override of 10 days for Table1, Dremio retains Table1 snapshots and files for 10 days.
With overrides, you can set different cutoff policies for tables on different branches. For example, suppose Table1 at branch main has 11 snapshots, and you set the history.expire.min-snapshots-to-keep table-level property to keep at least 5 snapshots. At the same time, Table1 at branch newBranch also has 11 snapshots, but you set the table-level property to keep 2 snapshots. After the VACUUM CATALOG command runs, Table1 at main will retain 5 snapshots, and Table1 at newBranch will retain 2 snapshots.
You can also exclude specific tables directly in the catalog source when running the VACUUM CATALOG SQL command.
Table Cleanup Results and Output
When the VACUUM CATALOG command runs, Dremio removes expired snapshots and orphaned metadata files for tables in the catalog if the following conditions are met:
- The snapshot is older than the number of days specified in the catalog settings or, if you created a custom schedule using the Vacuum API, the defaultCutoffPolicy parameter.
- The snapshot is not in the branch or tag head. Dremio always retains the branch or tag head, even if it was created before the specified cutoff policy.
For example, suppose you set a catalog's cutoff policy to 7, and Dremio retains 7 days of table history for each table in the catalog. Queries that use commits that are less than 7 days old succeed unless the query refers to the history of a table before the cutoff policy. Users can roll back the catalog to any commit that is less than 7 days old. Users should not create tags or branches using a commit that is more than 7 days old.
In the Dremio console, if you run the VACUUM CATALOG command manually in the SQL Runner, the output is a table that includes two columns:
| Column Name | Data Type | Description |
|---|---|---|
| deleted_files_count | Integer | The number of files the VACUUM CATALOG command removed. |
| deleted_files_total_size_mb | Integer | The total size of the files the VACUUM CATALOG command removed in megabytes. |
You can also use the Job API to retrieve the number of files removed by the VACUUM CATALOG command.
After Dremio runs the VACUUM CATALOG command, users cannot roll back to the previous table state for expired commits. Users can still view the commit tree and metadata for expired commits.
Common Table Cleanup Scenarios
This section describes the results of the VACUUM CATALOG command in several common scenarios. In the images that illustrate the examples, each square represents a commit, and the dotted line represents the cutoff policy. Gray commits are older than the cutoff policy, and green commits were created after the cutoff policy. Red snapshot numbers indicate that the snapshots are expired and deleted according to the cutoff policy.
Snapshots Older than the Cutoff Policy
The image below depicts how the VACUUM CATALOG command affects snapsots that are older than the cutoff policy. In this scenario, snapshots S1 and S2 are older than the cutoff policy. After Dremio runs the VACUUM CATALOG command, users cannot query these snapshots. Only snapshots that are not expired according to the cutoff policy are available. Queries on Table 1 at commit C1 or C2 will result in an error, but queries on Table 1 at commit C3 or C4 will run.

Branch Older than the Cutoff Policy
The image below depicts how the VACUUM CATALOG command affects branches and commits that are older than the cutoff policy. In this scenario, branch D1 is older than the cutoff policy. After Dremio runs the VACUUM CATALOG command, the latest snapshot on the table in branch D1 remains: snapshot S2. As a result, users can query snapshot S2 on all commits beyond commit C1.
Tables in commits that are created after the cutoff policy retain their snapshots until their snapshots are expired according to the cutoff policy. For commits C3 and C4, snapshots S3 and S4 are retained. Users cannot query snapshot S1 on commit C1, and queries that reference snapshot S1 fail.

Commit Created After the Cutoff Policy
The image below depicts how the VACUUM CATALOG command affects commits created after the cutoff policy. In this scenario, Table 1 was deleted from the main branch but exists on commit D2, which is older than the cutoff policy. After Dremio runs the VACUUM CATALOG command, users can query Table 1 on commit D2. Any orphaned metadata files for Table 1 on the main branch are removed.

Table Cleanup Limitations
The VACUUM CATALOG command has the following limitations:
- It is only supported for Iceberg tables in Arctic catalog sources.
- It does not remove snapshots and files for tables that are deleted before the cutoff policy or for tables that exist only on a deleted branch or tag in a Arctic catalog.
- It does not clean up any tables that exist only on deleted branches or tags.
There are several limitations that affect the outcome of VACUUM CATALOG jobs:
- Dremio does not prevent operations on expired commits, so users can create branches and tags from and roll back to commits that are older than the specified cutoff policy.
- Dremio does not group expiry commits for each table. VACUUM CATALOG creates a single expiry commit for each table.
- Historical commits are immutable. Iceberg metadata queries on historical commits will continue to show all snapshots after the VACUUM CATALOG command runs, including snapshots that VACUUM CATALOG cleaned up. However, SELECT queries will retrieve only live data.
- Arctic commit logs do not distinguish between expired commits and live commits.
Managing Table Optimization and Table Cleanup Jobs
Optimization job records for both table optimization and table cleanup jobs are stored on the Jobs page. The owners of optimization jobs can see their own job history. Owners of an Arctic catalog can see all optimization jobs for the catalog.
To view optimization job history, complete the following steps:
-
From the Arctic Catalogs page, select the catalog that you want to manage.
-
Click
 in the side navigation bar.
Viewing Jobs and Job Details
All jobs run in Arctic are listed on a separate page, showing the target, status, user, and other attributes. To navigate to the Jobs page, click ![]() in the side navigation bar.
in the side navigation bar.
Search Filter and Columns
By default, the Jobs page lists the optimization jobs run within the last 30 days. You can filter on values and manage columns directly on the Jobs page, as shown in this image:

-
Filter a free form text search bar that enables you to search jobs by table name, reference name (branch, tag, or commit), username, and job ID.
-
Status represents one or more job states. For descriptions, see Job Statuses.
-
Type includes Optimize (table optimization) and Vacuum (table cleanup).
-
User can be searched by typing the username or checking the box next to the username in the dropdown.
-
List of optimization jobs:
-
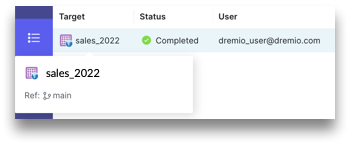
Target lists the tables that either are in process or have been optimized in the catalog.
noteYou can see the reference by hovering over the table name.
-
Status identifies the status of the optimization job. For a description of the available statuses, see Job Statuses.
-
User shows the user's email address.
-
Job Type identifies the type of optimization job: Optimize (table optimization) or Vacuum (table cleanup).
-
Engine Size identifies the engine that was used to run the optimization job.
-
Start Time filters the jobs by the specified timeframe.
-
Duration shows how long the optimization job ran for.
-
Job ID shows the unique ID of the optimization job.
-
You can also use the Arctic optimization APIs to retrieve job status. For more information, see the Jobs API.
Job Statuses
Each optimization job passes through a sequence of states until it is complete, though the sequence can be interrupted if a query is canceled or if there is an error during a state. This table lists the statuses that the UI lets you filter on and shows how they map to the states:
| Icon | Status | Description |
|---|---|---|
| Setup | Represents a state where the optimization job is in the process of being set up. | |
| Queued | Represents a state where the optimization job is queued. | |
| Starting | Represents a state where the optimization job is starting up. | |
| Running | Represents a state where the optimization job is running. | |
| Completed | Represents a terminal state that indicates that the optimization job is successfully completed. Note: You can see the results of the completed job by hovering over the status.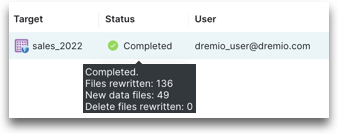 | |
| Cancelled | Represents a terminal state that indicates that the optimization job is cancelled or an intervention in the system. | |
| Failed | Represents a terminal state that indicates that the optimization job has failed due to an error. Note: You can see the error message for the failed job by hovering over the status.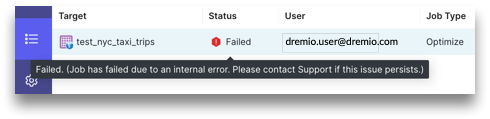 |
Canceling a Job
You can cancel optimization jobs from either the Jobs page or the Dataset Settings dialog.
To cancel a job from the Jobs page, complete the following steps:
-
From the Arctic Catalogs page, select the catalog that you want to manage.
-
Click
in the side navigation bar. -
Locate the optimization job and under the Status column, click
 .
.
To cancel a job from the Dataset Settings dialog, complete the following steps:
-
From the Arctic Catalogs page, select the catalog that you want to manage.
-
From the Catalog page, hover over the table and click
to see the dataset settings. -
In the Dataset Settings dialog, click Cancel Job.
Troubleshooting Table Optimization Jobs
This section can help you troubleshoot issues that you might encounter when Optimize-type jobs do not run as expected. The Jobs page shows all the optimization jobs that have been run in a catalog, including the jobs that failed to run.
Issue: The Iceberg table cannot access the metadata location.
Solution: Verify that the data access credentials are valid and has access to the table metadata location.
Issue: The compute resources and/or data access credentials that you configured are no longer valid.
Solution: Check the configuration settings and update the compute resources and/or data access credentials. For instructions, see Managing Optimization Resources.
Issue: The optimization job has failed due to an internal error.
Solution: You can try running the job again. If the problem persists, contact Dremio Support.
Troubleshooting Table Cleanup Jobs
To investigate and resolve issues related to table cleanup jobs, add the Arctic catalog as a source so that you can run the VACUUM CATALOG command manually. Then, refer to the sub-sections below to interpret the results from the VACUUM CATALOG command and resolve the problem.
File Not Found Exception
FileNotFoundException ErrorFileNotFoundException: No such file or directory <file_directory_path>
This error means that at least one table in the Arctic catalog source is not queryable because the live snapshot of the table or the table itself is corrupted. To resolve the problem, re-instantiate the missing files to fix the corruption, set the cutoff policy so that it excludes the corrupted snapshot, or drop the corrupted table.
Vacuum Runs but Does Not Delete Expired Files
If the VACUUM CATALOG command runs but no files are deleted, it's possible that there are no expired files to delete. Check your cutoff policy to make sure that it is set to your desired value. Check the table history against the cutoff policy to confirm whether there are any snapshots that should have been expired and deleted according to your cutoff policy.
Vacuum Job Does Not Run
If your cutoff policy is set correctly but the VACUUM CATALOG command does not execute after you run it with the SQL API or the SQL Runner, inspect the job profile for errors. Also, check the job profile metrics for more information about the number of files considered for deletion, any files that Dremio could not delete, the total number of tables and files scanned, and the total number of live references identified. This information can help you understand why a specific manual vacuum job did not run.
Helpful metrics include the following:
| Metric | Description | Operator |
|---|---|---|
| COMMIT_SCAN_TIME | Time taken by the Nessie identification phase to identify the catalog's live contents. | NESSIE_COMMITS_SUB_SCAN (NessieCommitsRecordReader) |
| ICEBERG_COMMIT_TIME | Time taken to commit expired snapshot operations. | ICEBERG_SNAPSHOTS_SUB_SCAN (IcebergExpirySnapshotReader) |
| NUM_ACCESS_DENIED | Number of "access denied" errors for metadata files while running the VACUUM CATALOG command. The NUM_ACCESS_DENIED count is included in the NUM_PARTIAL_FAILURES count. | NESSIE_COMMITS_SUB_SCAN (NessieCommitsRecordReader) ICEBERG_SNAPSHOTS_SUB_SCAN (IcebergExpirySnapshotReader) |
| NUM_EXPIRED_SNAPSHOTS | Total number of snapshots expired by the VACUUM CATALOG command. | ICEBERG_SNAPSHOTS_SUB_SCAN (IcebergExpirySnapshotReader) |
| NUM_NOT_FOUND | Number of "file not found" errors for metadata files while running the VACUUM CATALOG command. The NUM_NOT_FOUND count is included in the NUM_PARTIAL_FAILURES count. | NESSIE_COMMITS_SUB_SCAN (NessieCommitsRecordReader) ICEBERG_SNAPSHOTS_SUB_SCAN (IcebergExpirySnapshotReader) |
| NUM_PARTIAL_FAILURES | Number of partial failures while running the VACUUM CATALOG command, including failures because Dremio could not access metadata and therefore skipped the affected tables during the operation. | NESSIE_COMMITS_SUB_SCAN (NessieCommitsRecordReader) ICEBERG_SNAPSHOTS_SUB_SCAN (IcebergExpirySnapshotReader) |
| NUM_TABLE_EXPIRY | Number of tables expired by the VACUUM CATALOG command. | ICEBERG_SNAPSHOTS_SUB_SCAN (IcebergExpirySnapshotReader) |
| NUM_TABLES | Number of total live tables. | NESSIE_COMMITS_SUB_SCAN (NessieCommitsRecordReader) |
| NUM_TOTAL_SNAPSHOTS | Number of total snapshots for all live tables. | ICEBERG_SNAPSHOTS_SUB_SCAN (IcebergExpirySnapshotReader) |
Missing Intermediate Files
Errors related to ManifestListScanTableFunction, ManifestScanTableFunction, and PartitionStatsScanTableFunction typically mean that an intermediate manifest or partition stats file is missing, and the table is therefore corrupted. To resolve the problem, re-instantiate the missing files to fix the corruption, set the cutoff policy so that it excludes the corrupted snapshot, or drop the corrupted table.
You may also see these errors if you do not have sufficient permissions to read the intermediate files.
Error While Expiring Snapshots
The ExpireSnapshots operation trims snapshot history by removing obsolete parts of the history, which requires updating the table with rewritten history. You may see an error message while Iceberg is updating the table. If the problem is conflict errors, retry the ExpireSnapshots operation. If the problem is system issues, contact your Dremio administrator.
Long-Running Vacuum
When Dremio runs VACUUM CATALOG on an Arctic catalog or Arctic catalog source for the first time, it may take a long time if there are many expired files to delete. To help reduce the amount of time it takes to run VACUUM CATALOG, use the job profile to identify bottlenecks and confirm whether the VACUUM CATALOG command is using all available execution resources. Consider scaling up the cluster with more executors to increase vacuum performance.
Number of Files Increases after VACUUM CATALOG Runs
The number of files may increase after VACUUM CATALOG runs because the VACUUM CATALOG command rewrites table metadata without using expired snapshots. The new metadata files are introduced post-vacuum, which allows cleanup of the expired snapshots and related files in subsequent runs and enables efficient storage sizes.