Dremio Test Drive
Test Drive is a Dremio environment that lets you try out selected features such as querying sample data, joining data from sample data sources, and connecting your BI tools to Dremio.
When you sign up for Test Drive, you'll have 24 hours to use it and try out Dremio. When your 24-hour trial expires, your account will be deactivated.
Goal
This tutorial walks you through some of the basics of using Dremio Test Drive. After completing the steps that follow, you'll know how to:
Prerequisites
Before you begin, you need to sign up for Dremio Test Drive.
Step 1. Query an Iceberg Table Stored in Amazon S3
After you sign up, we'll use Dremio Sonar to run your first query. In this step, you'll be working with the nyc_trips view, which has been created from data in S3 and has over 1 billion rows.
To run your first query:
-
From the Datasets page, click the SQL Runner icon
 in the side navigation bar.
 -
Copy the following SQL and paste it into the SQL editor.
SELECT *
FROM semantic.nyc_trips
-
Click the Run button to execute your query.
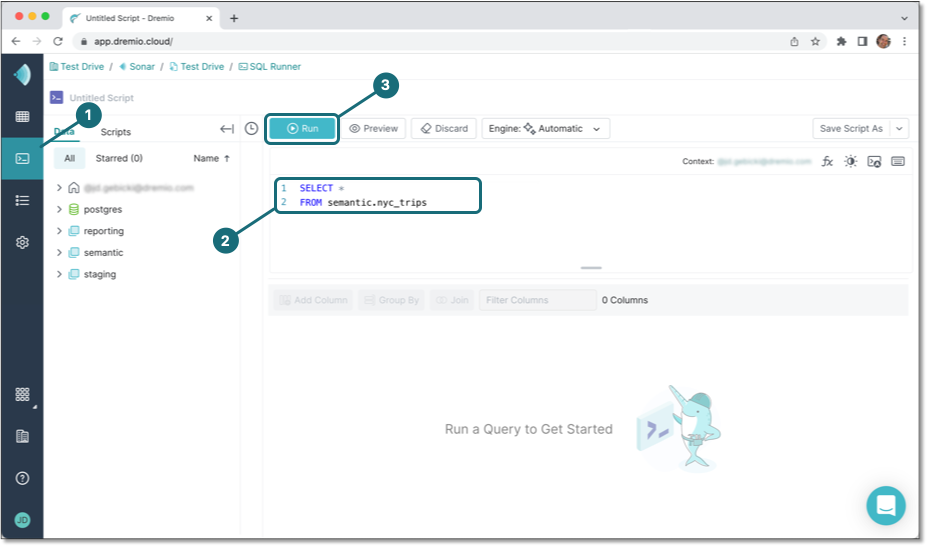
Over 1 million records are returned in sub second response time.
Step 2. Create a View by Joining Data in Amazon S3 and Postgres
Now we'll use Sonar to create a new view using the same nyc_trips view and the nyc_weather view, which is built on data in Postgres and has 3800+ rows.
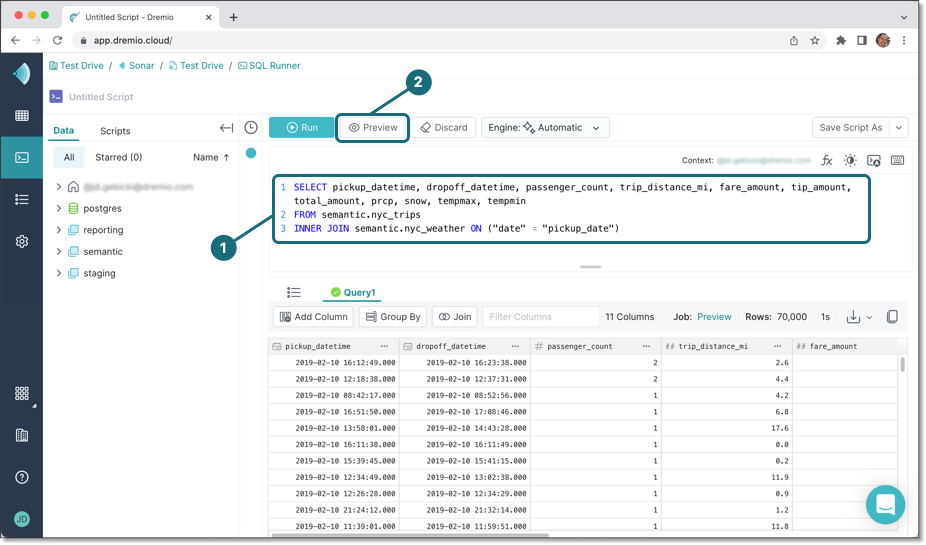
- Copy the following SQL and paste it into the SQL editor.
SELECT pickup_datetime, dropoff_datetime, passenger_count, trip_distance_mi, fare_amount, tip_amount, total_amount, prcp, snow, tempmax, tempmin
FROM semantic.nyc_trips
INNER JOIN semantic.nyc_weather ON ("date" = "pickup_date")
-
Click Preview to preview the joined view.
-
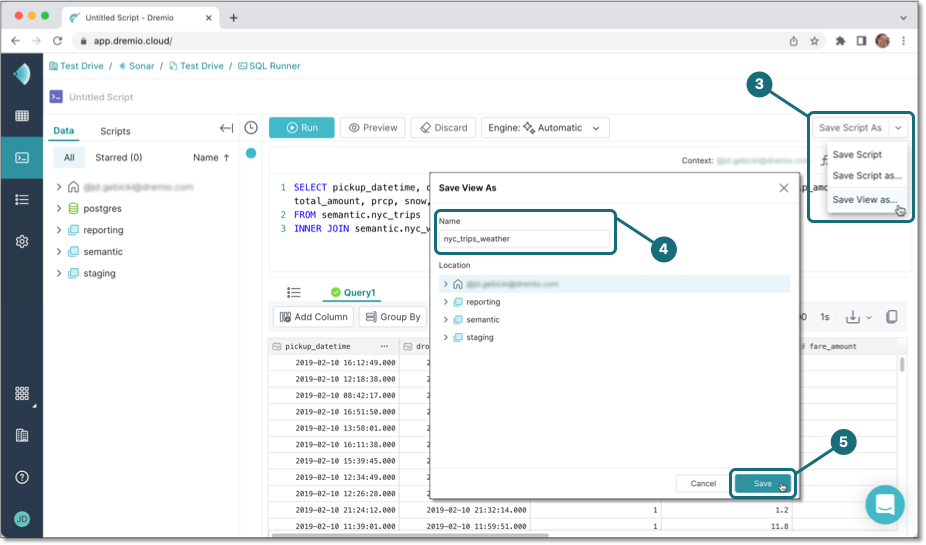
To save this view, click the drop down on the top right and select Save View as....
-
In the Save View As dialog, enter a name for your view (
nyc_trips_weather) and specify the folder where Dremio should save the view. -
Click Save.
After the view is saved, you will be returned to the Datasets page and the definition for the view is displayed in the SQL editor.
noteUsing this new view you've created, try answering the following questions:
- Which month had the most number of taxi rides?
- Are there more or less rides taken when it rains?
Step 3. Connect from Tableau or Power BI to Create a Report
This section provides steps to create a report using the following tools:
Tableau
-
Add a new connection to Dremio from Tableau and select Dremio from the list of connectors.
-
For Product, verify that Dremio Cloud is selected.
-
For Region, verify that
USregion is selected. For Tableau 2024.3 or before, in the Server field,sql.dremio.cloud (US)should be selected. -
Check the following under Authentication:
-
If you signed up to Test Drive using Google, select OAuth 2.0 and click Sign in. When redirected to the Dremio login page, enter the email that you used to sign up for Dremio Test Drive and log in, then navigate back to Tableau.
-
If you signed up to Test Drive using your email and created a password, select Personal Access Token for Authentication. To generate a personal access token in Dremio, hover over the User icon (user initials) in side navigation bar and select Account Settings.
-
In the Account Settings dialog, select Personal Access Tokens in the sidebar, then click Generate Token. For Label, enter a name for your token, then click Generate.
-
Copy the Token, paste it into the Password field in the Tableau connector dialog, then click Sign in.
-
-
-
For Database, verify that DREMIO is selected.
-
For Schema, select a folder. For Table, select the view you created in Step 2 (Join Data), which should be
nyc_trips_weather. -
In a Tableau sheet, drag
Pickup Datetimeinto the Columns shelf, click onYEAR(Pickup Datetime), then select Month, which hasMay 2015in gray on the right side. -
Drag
Fare Amountinto the Rows shelf, click onSUM(Fare Amount), then select Average under Measure(Sum). -
Drag
Tip Amountinto the Rows shelf, click onSUM(Fare Amount), then select Average under Measure(Sum). -
Click on
AVG(Tip Amount)and select Dual Axis. Notice that the chart response is almost instantaneous, giving the user a truly interactive experience and allowing them to ask business questions at the speed of thought. -
Open the Jobs page in Dremio to see the six queries that Tableau sent to Dremio—notice that Dremio responded to all of them in less than a second!
Microsoft Power BI
-
From Power BI, click Get data.
a. In the Get data dialog, search for and select Dremio Cloud (Beta).
b. Click Connect.
c. Click Continue in the dialog that indicates the connector is still under development.
-
In the Dremio Cloud dialog, verify that
sql.dremio.cloud (US)is selected for Server, then click OK. -
To sign in to your Dremio Test Drive account, select Personal Access Token. To generate a personal access token in Dremio, hover over the User icon (user initials) in the side navigation bar and select Account Settings.
-
In the Account Settings dialog, select Personal Access Tokens in the sidebar, then click Generate Token. For Label, enter a name for your token, then click Generate.
-
Copy the token, paste it into the Power BI personal access dialog, then click Sign in.
-
-
From the datasets listed in the Navigator, search for the view you created in Step 2, (
nyc_trips_weather). -
Select line chart for the type of visual, add the
pickup_datetimefield to the report, click onpickup_datetimeunder X-axis, and select Month for granularity. -
Add
fare_amountto the report as the Y-axis, click onfare_amountunder Y-axis, then select Average. -
Add
tip_amountto the report as the Y-axis, clicktip_amountunder Y-axis, then select Average. Notice that the chart response is almost instantaneous, giving the user a truly interactive experience and allowing them to ask business questions at the speed of thought. -
Open the Jobs page in Dremio to see the queries that Power BI sent to Dremio -- notice that Dremio responded to all of them in less than a second!
Wrap-Up and Next Steps
Congratulations! You have successfully completed this tutorial and built a dashboard on a view joining data across two different sources.
-
To try this with your data, sign up for your own Dremio Cloud account.
-
After you've signed up, go here to learn more about getting started with Dremio Sonar.
-
To learn how to create a view using SQL, see the CREATE VIEW command.