Workload Management Enterprise
For Community Edition, see Queue Control.
The Workload Management (WLM) feature provides the capability to manage cluster resources and workloads.
This is accomplished through defining a queue with specific characteristics (such as memory limits, CPU priority, and queueing and runtime timeouts) and then defining rules that specify which query is assigned to which queue.
This capability is particularly important in Dremio clusters that are deployed in multi-tenant environments with a variety of workloads ranging from exploratory queries to scheduled reporting queries. In particular, WLM provides the following:
-
Provides workload isolation and predictability for users and groups.
-
Ease of configuration for service level agreements (SLAs) and WLM.
-
Predictable and efficient utilization of cluster resources.
Homogeneous Environment
Workload management works optimally in a homogeneous environment in terms of memory. That is, when each node in the Dremio cluster has the same amount of memory.
If you have a heterogeneous environment (nodes in a Dremio cluster have different amounts of memory), you should plan for the lowest common denominator (lowest amount of memory associated with a node).
How Workload Management Works
To access WLM, click the Settings (gear) icon near the bottom of the side navigation bar, and then click Queues.
You set up WLM by:
-
Creating queues with different criteria depending on how you want to manage your jobs.
-
Creating rules that do the following:
-
Establish conditions that target specific queries.
-
Assign queries that fit the conditions to specific queues.
-
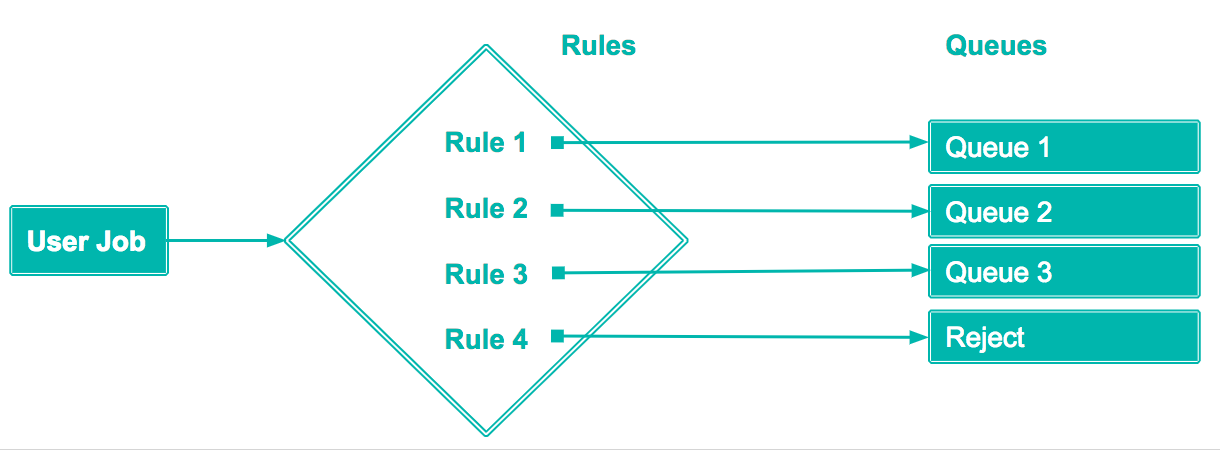
The following diagram shows a basic WLM flow when a job query is submitted where Rule1 assigns job queries to Queue1, Rule2 to Queue2, Rule3 to Queue3, and so on. Rule4 indicates that any specified rule and/or all other queries can be rejected.
The rule conditions that a job query matches determines the queue to which the job query is sent.
Queues
Dremio allows you to define job queues, to which queries can be assigned, based on defined rules. You can also add new queues, edit existing queues, or remove queues.
-
If you add a new queue, you can customize the queue with the following configuration options.
-
If you edit an existing queue, all of the options are available for modification as when you add a new queue.
-
If you delete a queue, Dremio prompts you to confirm your choice before deleting the queue.
Default Queues
Dremio provides the following generic queues as a starting point for customization:
| Rule Name | Description |
|---|---|
| UI Previews | CPU priority: High Concurrency limit: 50 |
| Low Cost User Queries | CPU priority: Medium Concurrency limit: 25 |
| High Cost User Queries | CPU priority: Medium Concurrency limit: 5 |
| Low Cost Reflections | CPU priority: Low Concurrency limit: 25 |
| High Cost Reflections | CPU priority: Low Concurrency limit: 1 |
Queue and Job Limits
If you set up concurrency limits, ensure that you allocated job limits accordingly. For example, if you allow multiple concurrent jobs and if the total limit for each job is higher than the queue limit, then a job may fail if memory is consumed by other concurrent jobs.
Rules
Rules allow you to specify conditions that WLM uses to either assign a query to a queue or reject a query. Rules are applied in order, the first rule that a query matches determines the action taken.
You can create custom rules, use the provided rule templates, or modify the provided rule templates.
Rule Configuration Options
| Category | Option | Description |
|---|---|---|
| Overview | Name | Name of the job queue. |
| CPU Priority | Defines how much CPU time a query in execution receives relative to other queries. Changing this attribute only affects newly created or queued queries. Queries in execution keep their priority level until they are finished. By default, all queries execute with Medium CPU priority. Queries with other CPU priority levels receive more or less CPU time than the default (Medium) as follows: Critical: Four times the default CPU time. High: Twice the default CPU time. Low: Half of the default CPU time. Background: One-quarter of the default CPU time. | |
| Concurrency Limit | Defines how many queries are allowed to run in parallel. Changing this attribute only affects new queries. For example, when the current limit is 5 and 10 long running queries have been submitted to the queue such that 5 of them are enqueued. If the user changes the setting to be unlimited, those 5 enqueued queries will remain enqueued until the running queries are done but new queries will start immediately. Enabled by default; set to 10 queries. | |
| Memory Management | Queue memory Limit | Defines the total memory that all queries running in parallel in a given queue can use per executor. Changing this attribute is effective immediately and may cause some queries to fail if the new value is smaller. Disabled by default. |
| Job memory Limit | Sets a limit on the memory usage at the query level. Changing this attribute only affects enqueued and new queries but not the currently running queries. Disabled by default. | |
| Time Limits | Enqueued Time Limit | Defines how long a query can wait in the queue before starting without being cancelled. Changing the setting only affects new queries. Enqueued queries are not affected. Enabled by default; set to 5 minutes |
| Query Runtime Limit | Defines how long a query can run before being cancelled. Changing the setting affects enqueued and new queries but won’t affect queries that are already running. Disabled by default. | |
| Routing Tags | Tag Name | A JDBC connection parameter can be used to set a tag for rule processing. When the JDBC connection property ROUTING_TAG = <Tag Name> is set, the specified tag value is associated with all queries executed within that connection's session. Rules can check for the presence of a tag with the function tag().Routing tags are distinct from the tags used for version control in the API and the tags you can add to datasets as labels that allow sorting. |
Rule Examples
You can use Dremio SQL syntax to specify rules to target particular jobs.
The following are the types of rules that can be created along with examples.
User
Create a rule that identifies the user that triggers the job.
Create rule that identifies userUSER in ('JRyan','PDirk','CPhillips')
Group Membership
Create a rule that identifies if the user that triggers the job is part of a particular group.
Create rule that identifies whether user belongs to a specified groupis_member('MarketingOps') OR is_member('Engineering')
Query Label
Create a rule that routes queries to specific queues if they are running the COPY INTO <table> or OPTIMIZE SQL command. The allowed values are COPY for queries that run the COPY INTO <table> SQL command and OPTIMIZATION for queries that run the OPTIMIZE SQL command.
COPY INTO SQL command
query_label() IN ('COPY')
OPTIMIZE TABLE SQL command
query_label() IN ('OPTIMIZATION')
Here is an example of a rule in the New Rule dialog:

Query Attributes
Query attributes enable routing rules that direct queries to specific engines based on their characteristics.
Dremio supports the following query attributes:
| Query Attribute | Description |
|---|---|
DREMIO_MCP | Set when the job is submitted via the Dremio MCP Server. |
AI_AGENT | Set when the job is submitted via the Dremio's AI agent. |
AI_FUNCTIONS | Set when the job contains AI functions. |
You can use the following functions to define routing rules based on query attributes:
| Function | Applicable Attribute | Description |
|---|---|---|
query_has_attribute(<attr>) | DREMIO_MCP, AI_AGENT, AI_FUNCTIONS | Returns true if the specified attribute is present. |
query_attribute(<attr>) | DREMIO_MCP, AI_AGENT, AI_FUNCTIONS | Returns the value of the attribute (if present), otherwise NULL. |
query_calls_ai_functions() | NA | Returns true if the job has an AI function in the query. |
Examples:
Create a routing rule for queries that use AI functions and are executed by a userquery_calls_ai_functions() AND USER = 'JRyan'
DREMIO_MCP and AI_FUNCTION
query_has_attribute('DREMIO_MCP') AND query_has_attribute('AI_FUNCTIONS')
Query Type
Create a rule depending on the type of query. The types of queries can be identified by the following categories:
| Query Type | Description |
|---|---|
| Flight | Jobs submitted from Arrow Flight clients, including the Arrow Flight SQL JDBC and Arrow Flight SQL ODBC drivers. |
| JDBC | Jobs submitted from the legacy Dremio JDBC driver (unsupported). |
| ODBC | Jobs submitted from the legacy Dremio ODBC driver (unsupported). |
| Metadata Refresh | Refreshes pick up the latest metadata changes from external sources. The refresh can be run on specific engines rather than all engines. |
| REST | Jobs submitted from REST. |
| Reflections | Manual Reflections creation and maintenance jobs. |
| Autonomous Reflections | Autonomous Reflections creation and maintenance jobs. |
| UI Run | Full query runs in the UI. |
| UI Preview | Preview queries in the UI. |
| UI Download | Download queries in the UI. |
| Internal Preview | Dataset formatting previews. Reflection recommender analysis queries. |
| Internal Run | Node activity query. Data curation histogram and transformation suggestion queries. |
query_type() IN ('Flight', 'UI Run')
Query Plan Cost
To find the cost of a query, navigate to: Job Profile > Raw Profile > Resource Allocation > Query Cost
Create rule that routes jobs based on query costquery_cost() > 1000000
Tag
Create a rule that routes jobs based on a routing tag.
Create rule that routes jobs based on routing tagtag() = 'ProductionDashboardQueue'
Date and Time
Create a rule that routes a job based on the time it was triggered. Use Dremio SQL Functions.
Create rule that routes jobs based on time triggeredEXTRACT(HOUR FROM CURRENT_TIME)
BETWEEN 9 AND 18
Combined Conditions
Create rules based on multiple conditions.
The following example routes a job depending on user, group membership, query type, query cost, tag, and the time of day that it was triggered.
Create rule based on user, group, job type, query cost, tag, and time triggered(
USER IN ('JRyan', 'PDirk', 'CPhillips')
OR is_member('superadmins')
)
AND query_type() IN ('Flight')
AND query_cost() > 3000000
AND tag() = 'ExecutiveDashboard'
AND EXTRACT(HOUR FROM CURRENT_TIME)
BETWEEN 9 AND 18
Default Rules
Dremio provides the following generic rules as a starting point for customization.
| Order | Rule Name | Available Query Types | Rule | Queue Name |
|---|---|---|---|---|
| 1 | UI Previews | UI Preview | query_type() = 'UI Preview' | UI Previews |
| 2 | Low Cost User Queries | Flight, REST, UI Run, UI Download, Internal Preview, Internal Run | query_cost() < 30000000 | Low Cost User Queries |
| 3 | High Cost User Queries | Flight, REST, UI Run, UI Download, Internal Preview, Internal Run | query_cost() >= 30000000 | High Cost User Queries |
| 4 | Low Cost Reflections | Reflections | query_type() = 'Reflections' AND query_cost() < 30000000 | Low Cost Reflections |
| 5 | High Cost Reflections | Reflections | query_type() = 'Reflections' AND query_cost() >= 30000000 | High Cost Reflections |
| 6 | All Other Queries | Reject |
The default setup covers all query types. When setting your own custom rules, ensure that all query types are taken into account. Otherwise, you may experience unexpected behavior when using Dremio.
Viewing All Rules
To view all rules:
- Click the Settings (gear) icon from the side navigation bar.
- Click Engine Routing from the sidebar menu to see the list of engine routing rules.
Adding a Rule
To add a rule:
-
On the Engine Routing page, click + Add Rule in the top left.
-
In the New Rule dialog, for Rule Name, enter a name.
-
For Conditions, enter the routing condition. See Rules for supported conditions.
-
For Action, complete one of the following options:
a. If you want to route the jobs that meet the conditions to a particular queue, select the Route to queue option. Then use the queue selector to choose the queue.
b. If you want to reject the jobs that meet the conditions, select the Reject option.
-
Click Add.
Editing a Rule
To edit a rule:
-
On the Engine Routing page, click the Edit Rule (pencil) icon that appears next to the rule.
-
In the Edit Rule dialog, for Rule Name, enter a name.
-
For Conditions, enter the routing condition. See Rules for supported conditions.
-
For Action, complete one of the following options:
a. If you want to route the jobs that meet the conditions to a particular queue, select the Route to queue option. Then use the queue selector to choose the queue.
b. If you want to reject the jobs that meet the conditions, select the Reject option.
-
Click Save.
Deleting a Rule
To delete a rule:
-
On the Engine Routing page, click the Delete Rule (trash) icon that appears next to the rule.
cautionYou must have at least one rule to route queries to a particular queue.
-
In the Delete Rule dialog, click Delete to confirm.
Per Session Configuration
JDBC and ODBC sessions are held open. This means you can set the session properties once, and they will remain in effect for the lifetime of the session. In contrast, the SQL Runner in the Dremio console does not maintain an open session, so you will need to reset the session properties after you run a query or execute a preview. This behavior applies to all session properties defined in SQL with the SET keyword.
SET QUEUE
The SET QUEUE SQL command is used to specify the queue to direct subsequent queries in the current session. When using SET QUEUE, WLM rules and direct routing connection properties are bypassed, and queries are routed directly to the specified queue. The RESET QUEUE command clears the session-level queue override, reverting query routing to follow the Workload Management (WLM) rules or any direct routing connection property if set.
This is the Dremio Software equivalent of SET ENGINE from Dremio Cloud. SET ENGINE is not supported in Dremio Software.
SET TAG
The SET TAG SQL command is used to specify routing tag for subsequent queries in the current session. If a ROUTING_TAG connection property is already set for the session, SET TAG will override it. When setting routing tag using SET TAG, make sure you have a previously defined WLM routing rule that routes queries based on that routing tag. The RESET TAG command clears the session-level routing tag override, reverting query routing to follow the WLM rules or any direct routing connection property if set.
Direct Routing
Direct routing is used to specify the queue to direct queries to for a given ODBC or JDBC session. With direct routing, WLM rules are not considered, and instead, queries are routed directly to the specified queue on a per-session basis.
To use direct routing, add the connection property ROUTING_QUEUE = <WLM Queue Name> to the ODBC or JDBC session parameters when connecting to Dremio. When set, all queries for the session are automatically routed to the specified WLM queue and the engine selected for that queue.
To disable tag routing, set the Dremio support key dremio.wlm.direct_routing to false. Direct routing is enabled by default.
You can use an SQL command to route jobs for refreshing Reflections directly to specified queues. See Reflections in the SQL reference.
Connection Tagging and Direct Routing Configuration
Routing tags are configured by setting the ROUTING_TAG = <Tag Name> parameter for a given connection to the desired tag name.
Similarly, direct routing is configured by setting the ROUTING_QUEUE = <Queue Name> parameter for a given connection to the desired WLM queue.
JDBC Session Configuration
To configure JDBC sessions add the ROUTING_TAG or ROUTING_QUEUE parameter to the JDBC connection URL. For example: jdbc:arrow-flight-sql://localhost:32010?ROUTING_TAG=TagA or jdbc:arrow-flight-sql://localhost:32010?ROUTING_QUEUE=PreviewQueue
ODBC Session Configuration
Configure ODBC sessions as follows:
Windows Sessions
Add the ROUTING_TAG or ROUTING_QUEUE parameter to the AdvancedProperties parameter in the ODBC DSN field.
Mac OS Sessions
-
Add the
ROUTING_TAGorROUTING_QUEUEparameter to theAdvancedPropertiesparameter in the systemodbc.inifile located at/Library/ODBC/odbc.ini. After adding the parameter, an example Advanced Properties configuration might be:AdvancedProperties=CastAnyToVarchar=true;HandshakeTimeout=5;QueryTimeout=180;TimestampTZDisplayTimezone=utc;NumberOfPrefetchBuffers=5;ROUTING_TAG='TagA'; -
Add the
ROUTING_TAGorROUTING_QUEUEparameter to theAdvancedPropertiesparameter in the user's DSN located at~/Library/ODBC/odbc.ini
Tableau .tds File Configuration
Add the ROUTING_TAG or ROUTING_QUEUE parameter to the odbc-connect-string-extras parameter in the .tds file. After adding an example configuration is: odbc-connect-string-extras="AUTHENTICATIONTYPE=Basic Authentication;CONNECTIONTYPE=Direct;HOST=localhost;AdvancedProperties=ROUTING_QUEUE=PreviewQueue"
Multi-Cluster Isolation
Multi-cluster isolation allows you to isolate your workload by grouping nodes into virtual clusters.
Setup and Configuration
To isolate a job, set up YARN provisioning with a Cluster Name and Queue specified and configured:
-
Navigate to Admin > Cluster > Provisioning, click Add New, and click the YARN icon.
-
Set up your provisioned node in addition to specifying the following:
a. Cluster Name
b. Queue
c. Workers
-
Cores per worker (Default: 4)
-
Memory per Worker (Default: 16GB)
-
-
Navigate to Admin > Workload Management > Queue.
-
Select Add New or Edit an existing Queue and specify the Cluster Name.
You can also configure Multi-cluster Isolation in dremio.conf using the services tag.
Viewing and Assigning
-
To view the activity, navigate to Node Activity.
-
To assign or un-assign a node as an executor node, navigate to Node Activity > Actions.
Best Practices for Workload Management
Because every query workload is different, engine sizing often depends on several factors, such as the complexity of queries, number of concurrent users, data sources, dataset size, table formats, and specific business requirements for latency and cost. WLM ensures reliable query performance by choosing adequately sized engines for each workload type, configuring engines, and implementing query routing rules to segregate and route query workload type to appropriate engines.
This section describes best practices for creating and using Dremio engines in conjunction with WLM to obtain reliable query performance with Dremio.
Configuration Models
You can deploy Dremio using either of the following configuration models:
-
Single-engine configuration using virtual machines on premises to execute all query workloads.
-
Multi-engine configuration deployed in Kubernetes that separates workloads into multiple engines created to fit the needs of a workload type. Dremio recommends using Kubernetes because it enables reliability and durability by segregating workload based on type while maximizing resource efficiency through engine autoscaling.
Single-Engine Configuration
In a single-engine configuration, a large engine is created to execute the most complex query workload while meeting latency requirements. Simple query workloads, which normally do not require many resources, do not use system resources efficiently when executed on large engines. Combining two workloads with vastly different resource requirements, such as ad hoc workloads and strict low-latency BI dashboards, may cause noisy neighbor issues, resulting in inconsistent query performance and a poor experience for dashboard users who expect low latency.
To address the noisy neighbor problem, Dremio recommends that you establish queues to horizontally slice engine capacity across different workloads. You can set limits and virtual boundaries on queues to control concurrency and resources consumed by workload types.
Dremio recommends the following settings for single-engine configuration:
-
Configure the engine with homogeneous nodes, each with 128 GB of memory.
-
Set the initial concurrency limits for queues as follows:
Queue Name Initial Concurrency Limit High Cost Reflections 2 High Cost User Queries 5 Low Cost Reflections 5 Low Cost User Queries 20 UI Previews 100 Then, experiment with typical queries that are directed to specific queues to identify optimal concurrency limits. Setting the concurrency limit at an excessively high or low level may exhaust engine resources, which can affect performance and underutilize resources. Use the
sys.jobs_recentsystem table, which contains metadata for recent jobs, to monitor and adjust concurrency limits as workload and latency requirements change. -
Set the initial queue memory limit per node to 70% of average node memory for high-cost user query queues and 50% of average node memory for low-cost user query queues. The queue memory limit per node establishes a virtual boundary for the sum of memory consumed by queries that the queue executes. Your query workload decides what percentage of memory to allocate to each queue according to the limit.
The combined queue memory limits for all queues should be between 100% and 120% of the physical node memory. If you refresh Reflections during business hours, the combined queue memory limits should include Reflection queues.
-
Dremio's memory arbiter functionality manages memory efficiently across concurrent queries using spillable operators to mitigate direct memory-related errors. For this reason, we do not recommend setting a job memory limit. If you do set a job memory limit, Dremio honors it, so the limit could affect memory arbiter functionality if it is set too low.
Multi-Engine Configuration
In Kubernetes deployments, we recommend segregating identical workload types (for example, based on complexity or business unit) into engines to prevent noisy neighbor issues that affect performance reliability. Create engines that are adequately sized for a workload type to meet SLA and budget constraints. WLM tuning is relatively straightforward in multi-engine configuration deployments because engines process queries of a similar type and the deployment model prevents resource hotspots.
Kubernetes is optimal for deploying Dremio in production because Dremio can autoscale in Kubernetes deployments, so you can achieve a high level of dependability and durability in queries with efficient resource utilization.
Dremio recommends the following settings for multi-engine configuration:
-
Configure the engines with homogeneous nodes, each with 128 GB of memory.
-
In multi-engine configurations, you can create multiple engines and multiple queues per engine to split engine capacity horizontally across identical workload types. To eliminate noisy neighbor issues, run workloads for ad hoc queries, dashboard queries, metadata refresh, Reflection refresh, and lakehouse (COPY INTO, DML, and optimization) queries on separate engines.
Experiment with typical queries, concurrency, and engine sizes to determine the ideal engine size that meets your SLA and cost constraints for each workload type. On Kubernetes deployments, engines can autoscale to satisfy dynamic workload demands and save on total cost of ownership.
Create a separate engine with one or two nodes to redirect metadata queries for Parquet, Avro, and optimized row columnar (ORC) datasets.
-
Experiment with typical queries that are directed to specific queues to identify optimal concurrency limits. Setting the concurrency limit at an excessively high or low level may exhaust engine resources, which can affect performance and underutilize resources.
-
Dedicated engines and queues per workload type do not require setting a queue memory limit per node. If you use multiple queues per engine, the combined queue memory limits for all queues should be between 100% and 120% of the physical node memory.
-
Dremio's memory arbiter functionality manages memory efficiently across concurrent queries using spillable operators to mitigate direct memory-related errors. For this reason, we do not recommend setting a job memory limit. If you do set a job memory limit, Dremio honors it, so the limit could affect memory arbiter functionality if it is set too low.
Workload Routing
Route queries to queues using routing rules. The table below lists queues and parameters for an out-of-the-box Dremio installation.
| Queue Name | CPU Priority | Concurrency Limit |
|---|---|---|
| High Cost Reflections | Background | 1 |
| High Cost User Queries | Medium | 10 |
| Low Cost Reflections | Background | 10 |
| Low Cost User Queries | Medium | 100 |
| UI Previews | Critical | 100 |
You may use existing out-of-the-box queues or create new queues and route queries based on your workloads and business requirements by creating routing rules. Your customized routing rules can combine factors including User, Group Membership, Job Type, Query Cost, Date and Time, Query Label (for lakehouse queries), and ROUTING_TAG (tags; for JDBC and ODBC connections). You can also use the ROUTING_QUEUE option to configure direct routing for JDBC and ODBC connections. Read Rule Examples for more information.
The following table lists example routing rules based on query_type, query_label, and tags:
| Order | Rule Name | Rule | Engine |
|---|---|---|---|
| 1 | Reflections | query_type() = 'Reflections' | Reflection |
| 2 | Metadata | query_type() = 'Metadata Refresh' | Metadata |
| 3 | Dashboards | tag() = 'dashboard' | Dashboard |
| 4 | Ad hoc Queries | query_type() IN ( 'UI Run' , 'REST') OR tag() = 'ad hoc' | Ad hoc |
| 5 | Lakehouse Queries | query_label() IN ('COPY','DML','CTAS', 'OPTIMIZATION') | Lakehouse |
| 6 | All Other Queries | All other queries | Ad hoc |
Query cost, as computed by the query planner based on estimates to compare two query plans, is not a reliable indicator of query complexity. Cost may fluctuate for similar queries as the datasets evolve, filter conditions change, and query plans are optimized between Dremio releases. We do not recommend using query cost to predict query duration.
Using the sys.jobs_recent` System Table
The sys.jobs_recent system table contains metadata for recent jobs, including time statistics, cost, and queues. You can use the data in the sys.jobs_recent system table to evaluate the effectiveness of WLM settings and make adjustments.