Quick Tour of the Console
This section walks you through the Dremio console and how to best use the different capabilities to get to insights quickly and how to manage your data products.
The Dremio console has two main pages:
-
Datasets page: Provides a view of your data products and underlying source tables. You can discover and explore your data on this page. For a quick tour of the Datasets page, see Datasets Page Quick Tour.
-
SQL Runner: An easy to use editor to query data and create data products. For a quick tour of the SQL Runner, see SQL Runner Quick Tour.
Datasets Page
When you work on the Datasets page, there are different components that you can use to manage your data. The largest component is the Data panel, which is used to explore the spaces and sources in your data catalog, as shown in this image:

| Location | Description |
|---|---|
| 1 | By default, you have a home space that you can further organize by creating a hierarchy of folders, and you can create additional spaces. |
| 2 | A space is a directory in which views are saved. Spaces provide a way to group datasets by common themes such as a project, purpose, department, or geographic region. |
| 3 | A source is a data lake or external source (such as a relational database) that you can connect to Dremio. |
| 4 | The title indicates that the Samples data lake is open and lists the contents of the sample source. A source also consists of layers, so if you expand a data source, you will find datasets and data types within the datasets. |
| 5 | A dataset is a collection of data. The datasets stored in files can be in many different formats, and to run SQL queries against data in different formats, you can create tables and views. By default, when you click on a dataset, the SQL editor is opened on the SQL Runner page with a SELECT * FROM <dataset_name> statement. To get a preview of the query, click Run or Preview. If you would rather click directly on a dataset to see or edit the definition, see Preferences for modifying this setting. |
Opening Datasets
If you have privileges to modify the table or view, you will have the option of viewing and editing the table or view definition. When viewing or editing a table or view, you are directed to the Data tab by default, which shows the definitions of the table or view. For more options, check out the other tabs:

| Location | Description |
|---|---|
| 1 | Details shows the columns in a dataset and lets you add information about a specific dataset in its wiki. You can add searchable labels, which enhances team collaboration because other users can search the labels to trace a specific dataset. |
| 2 | Lineage is a graph of the dataset, showing its data source, parent datasets, and children datasets. |
| 3 | Reflections are physically optimized representations of source data. |
Tabs are made visible based on the privileges that you have.
SQL Runner
The SQL Runner is where you run queries on your datasets and get results. To navigate to the SQL Runner, click ![]() in the side navigation bar. The main components of the SQL Runner are highlighted below:
in the side navigation bar. The main components of the SQL Runner are highlighted below:

Dremio's query engine intentionally ignores any file or folder if the filename or folder name starts with a period (“.”) or an underscore (“_”).
1. Data
The Data panel is used to explore your data catalog, which includes sources, tables, and views. For catalog objects that you use frequently, you can star the objects to make them easier to access from the panel.
To add a dataset into the SQL editor, go to the data source. Use the left caret > to expand the source view. Locate the dataset that you would like to use within the query. Click the + button or drag and drop the data into the SQL editor.
2. Scripts
You can save your SQL as a script if you have drafts or SQL statements that you run frequently. Each saved script has a name, when the script was created or modified, and the context that was set for the editor.
In the Scripts panel, you can:
- Open a script in the SQL editor
- Rename a script
- Delete a script
- Share a script by granting privileges
- Search your set of scripts by name
- Sort scripts by name or date
3. Run Mode
Running the query routes it to the engine and returns the complete result set. Dremio's query engine intentionally ignores any file or folder if the filename or folder name starts with a period (“.”) or an underscore (“_”).
If the engine scaled down, the startup time will take about two minutes.
Sometimes COUNT(*) and SELECT query results do not match because the result of queries run in the Dremio app has a threshold of one million. Depending on the number of threads (minor fragments) and how data is distributed among those threads, Dremio could truncate results before reaching the threshold. Each individual thread stops processing after returning a number of records equal to threshold/# of threads. For example, a query runs with 10 threads and should return 800,000 records, but one of the threads is responsible for 400,000 records. The per-thread threshold is 100,000, so that thread will only return 100,000 records and you will only see 500,000 records in the output. When results are truncated, the Dremio app will display a warning that the results are not complete and users can execute the query using JDBC/ODBC to get complete results.
Known issue: Running a USE statement will not update the context that is set in the SQL Runner.
4. Preview Mode
Executing a preview returns a subset of rows in the result set. Like the run mode, running the preview job will route the query to the selected engine, although the preview mode runs a subset of your results in less time.
5. SQL Editor
The SQL editor is where you create and edit queries to get insight from your data. In the top-right corner of the SQL editor, you'll find:
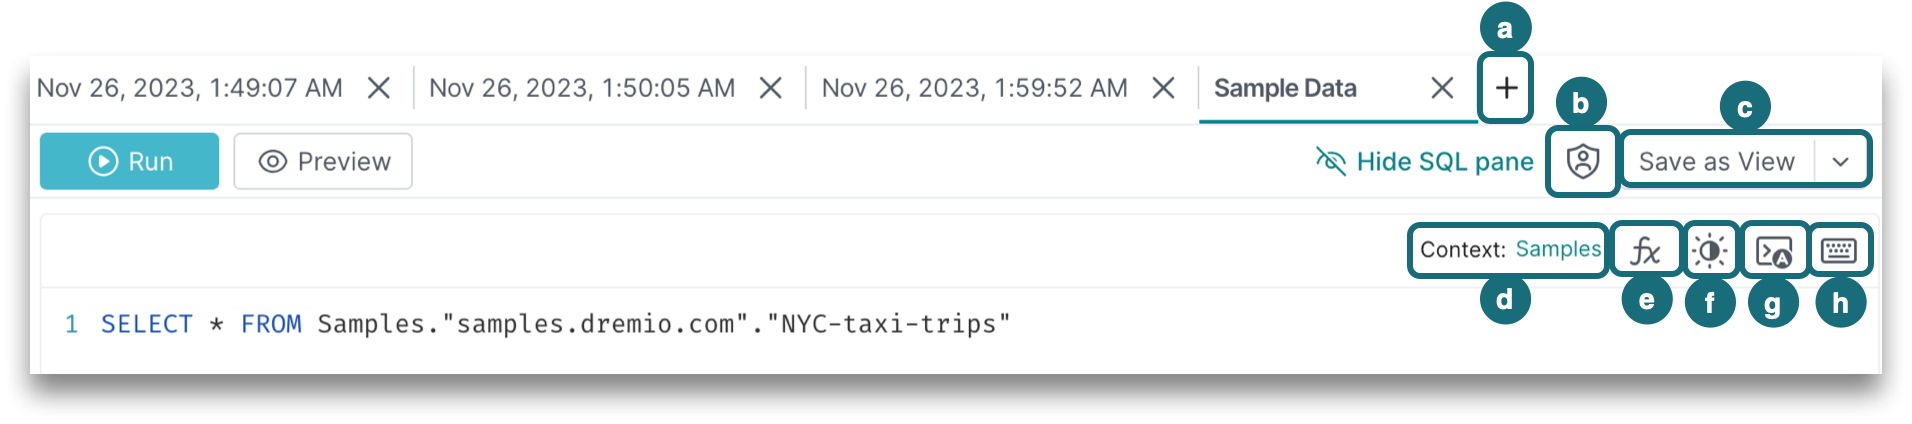
a. Create a new tab by clicking + next to the other tabs. Because a tab is defined by a session, a new tab is automatically saved as a script and named as the date and time that the session was created, such as Nov 3, 2023, 10:19:57 AM.
b. Grant script privileges to share a saved script with others in your organization.
c. Save your SQL as a script or as a view. You can save a script even if there are syntax errors. Saving a new view requires valid syntax, and there can be only one SQL statement in the editor. When you save the script as a view, the tab will remain open in the SQL Runner and the Edit dataset page for the view will open in a new browser tab.
d. Set a Context for a session to run queries without having to qualify the referenced objects.
e. Use fx to see a list of functions supported by Dremio along with a short description and syntax of each function. Click on the + button or drag and drop the function template into the SQL editor. For more information on supported SQL, see the SQL Reference.
f. Toggle the dark/light mode to change the theme of the SQL editor.
g. Enable autocomplete to receive suggestions for SQL keywords, catalog objects, and functions while you are constructing SQL statements. Suggestions depend on the context set in the SQL Runner. To enable or disable the autocomplete feature, see Dremio Preferences.
h. Click the keyboard button to see the shortcuts for the SQL Runner. For a list of shortcuts, see Keyboard Shortcuts.
Syntax Error Highlighting
Before you run a query, make sure to fix any syntax errors that have been detected in your query.
The SQL editor automatically checks for syntax errors, and every detected error is marked with a red wavy underline. If you hover over the error, you’ll see a message stating whether the error is the result of a token that is missing, unexpected, unrecognized, or extraneous in the query.
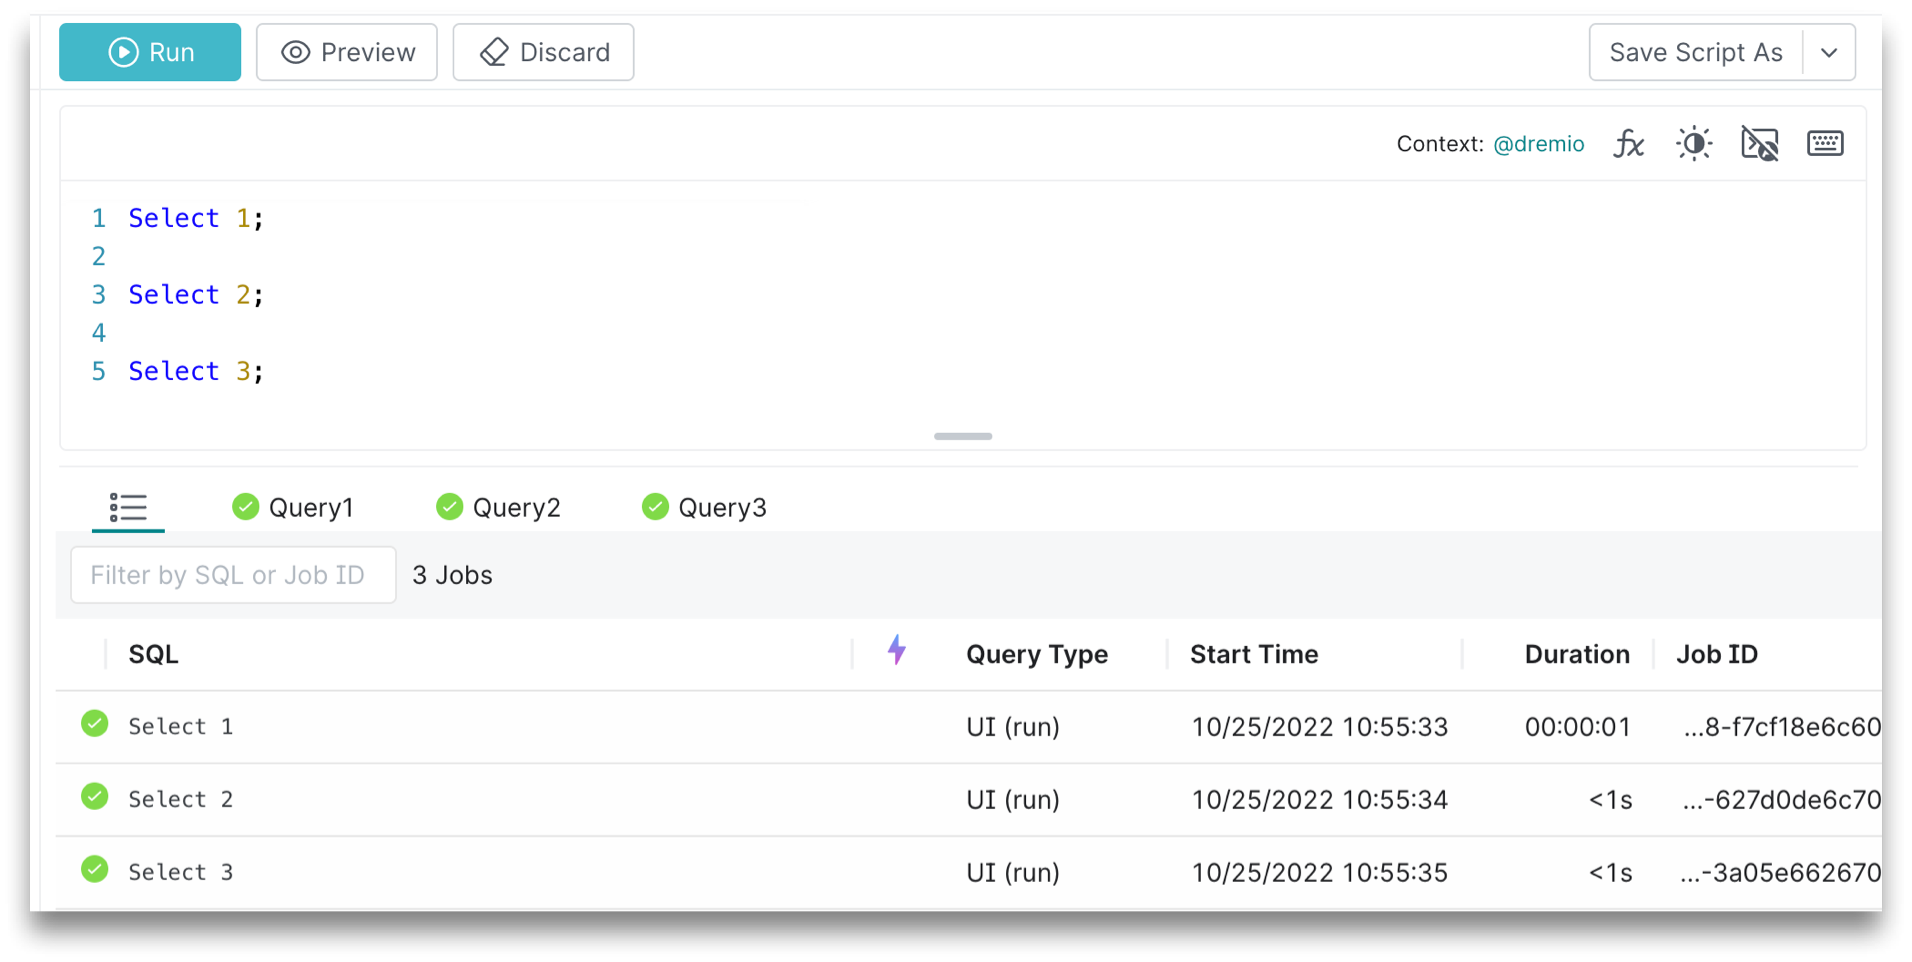
Running Multiple Queries
You can run multiple queries in the SQL editor by using a semicolon to separate each statement. To run all of the queries in the SQL editor, simply click Run. The results of each query will be shown in the same order that the queries are constructed:
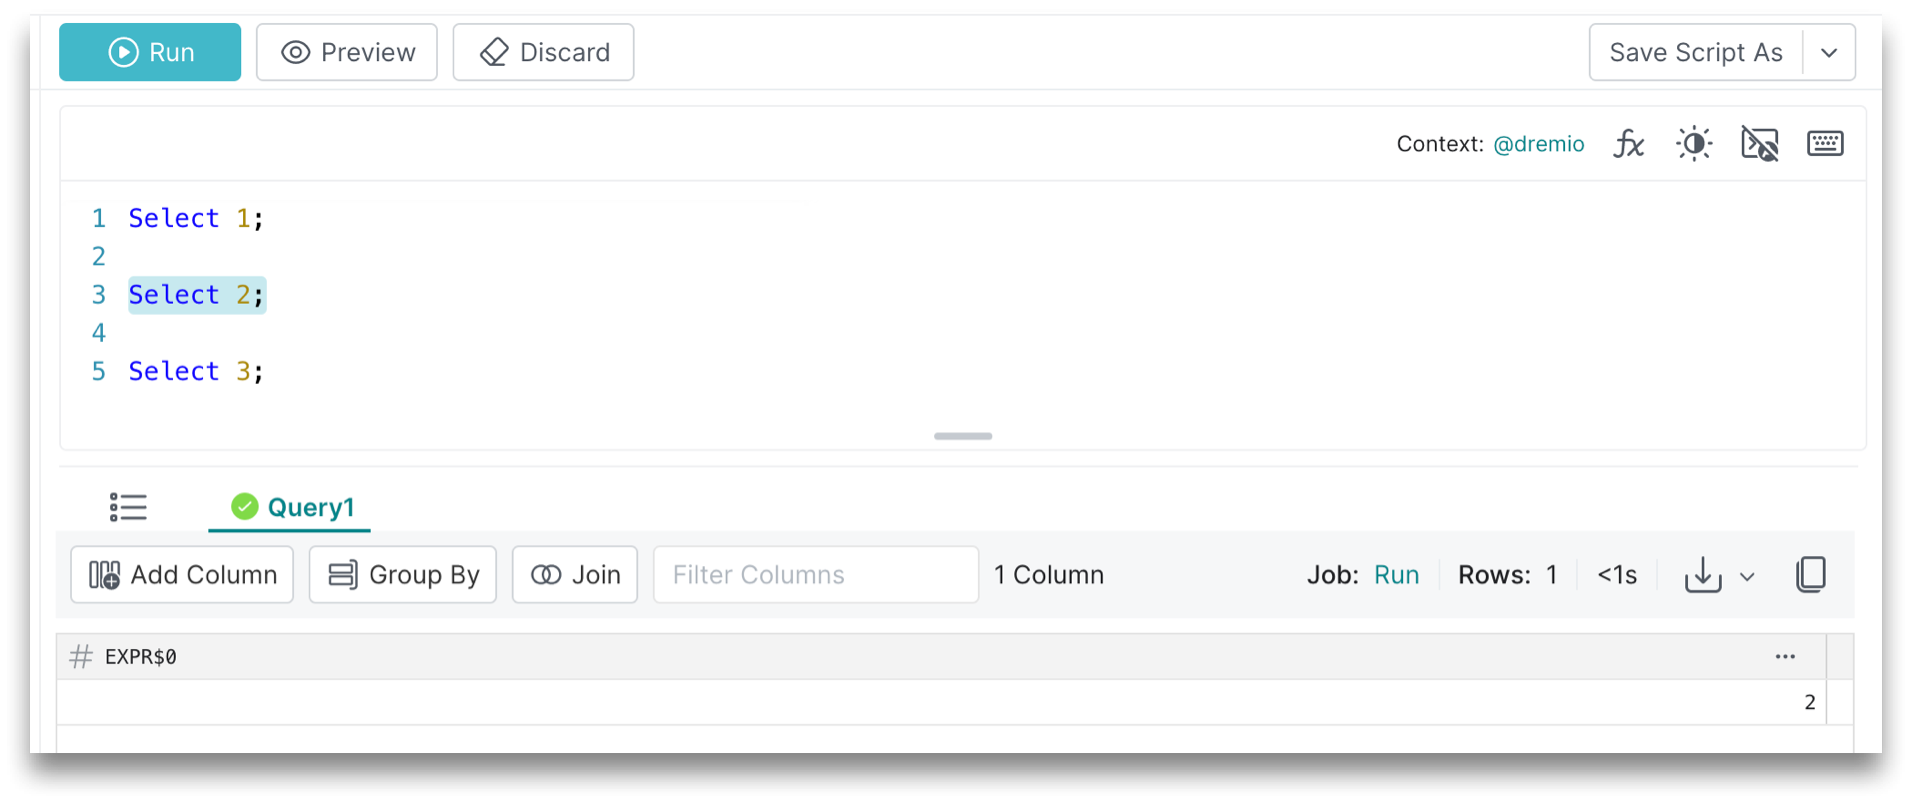
When you have multiple queries, you can also select a subset to run. If you select one or more queries and then click Run, only the selected queries will run accordingly, as shown below:
6. Result Set Actions
Above the top-right corner of the result set, you will find these actions:
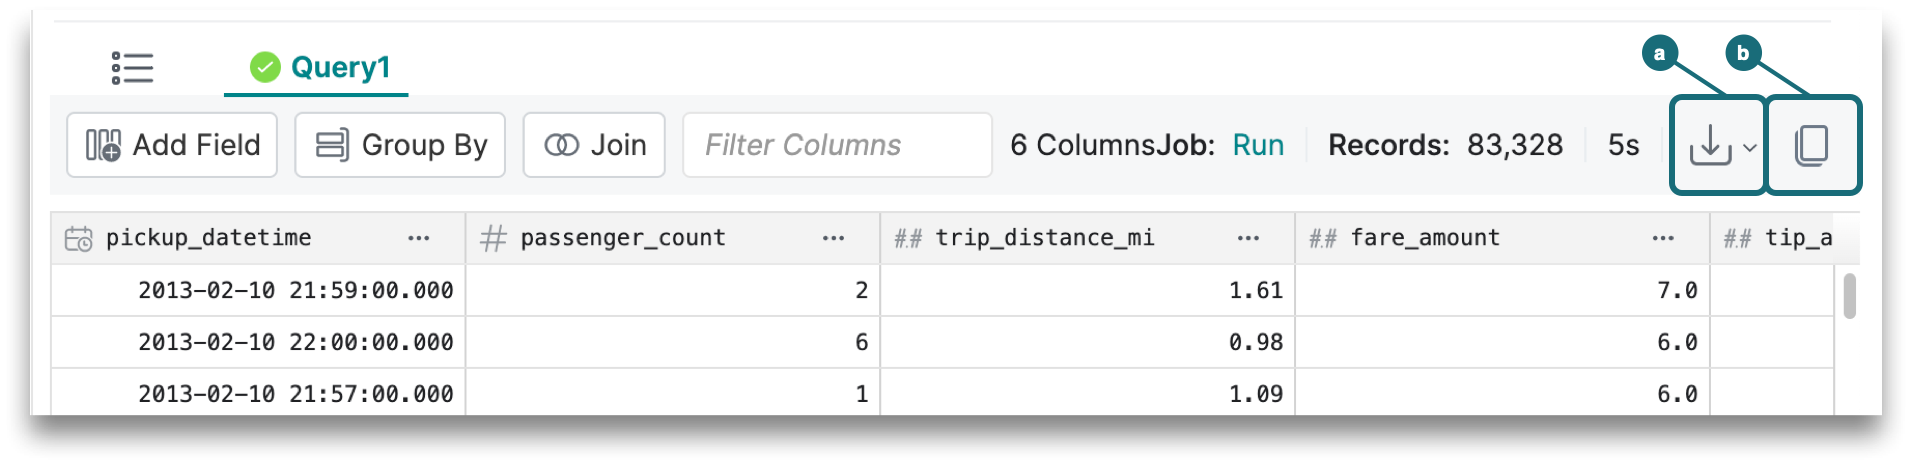
a. Download the result set as a JSON, CSV, or Parquet file. By default, downloading writes out the results from the last run of the query into the download file. To trigger a rerun of queries for downloads, see the Rerun on download preference.
b. Copy result set to a clipboard. If the result set is too large, then download the table content to get the complete results.
- The option to download as a CSV file is not available if the result set includes one or more columns that have complex datatypes (ie., a union, map, or array). Column headers for the results table indicate complex types with this icon:

- The download process runs a CREATE TABLE AS SELECT (CTAS) command, which is why compute resources are required.
The download and copy results features can be enabled or disabled for a project in Dremio Preferences. Disabling this in a project will prevent all users from downloading and copying results from the project.
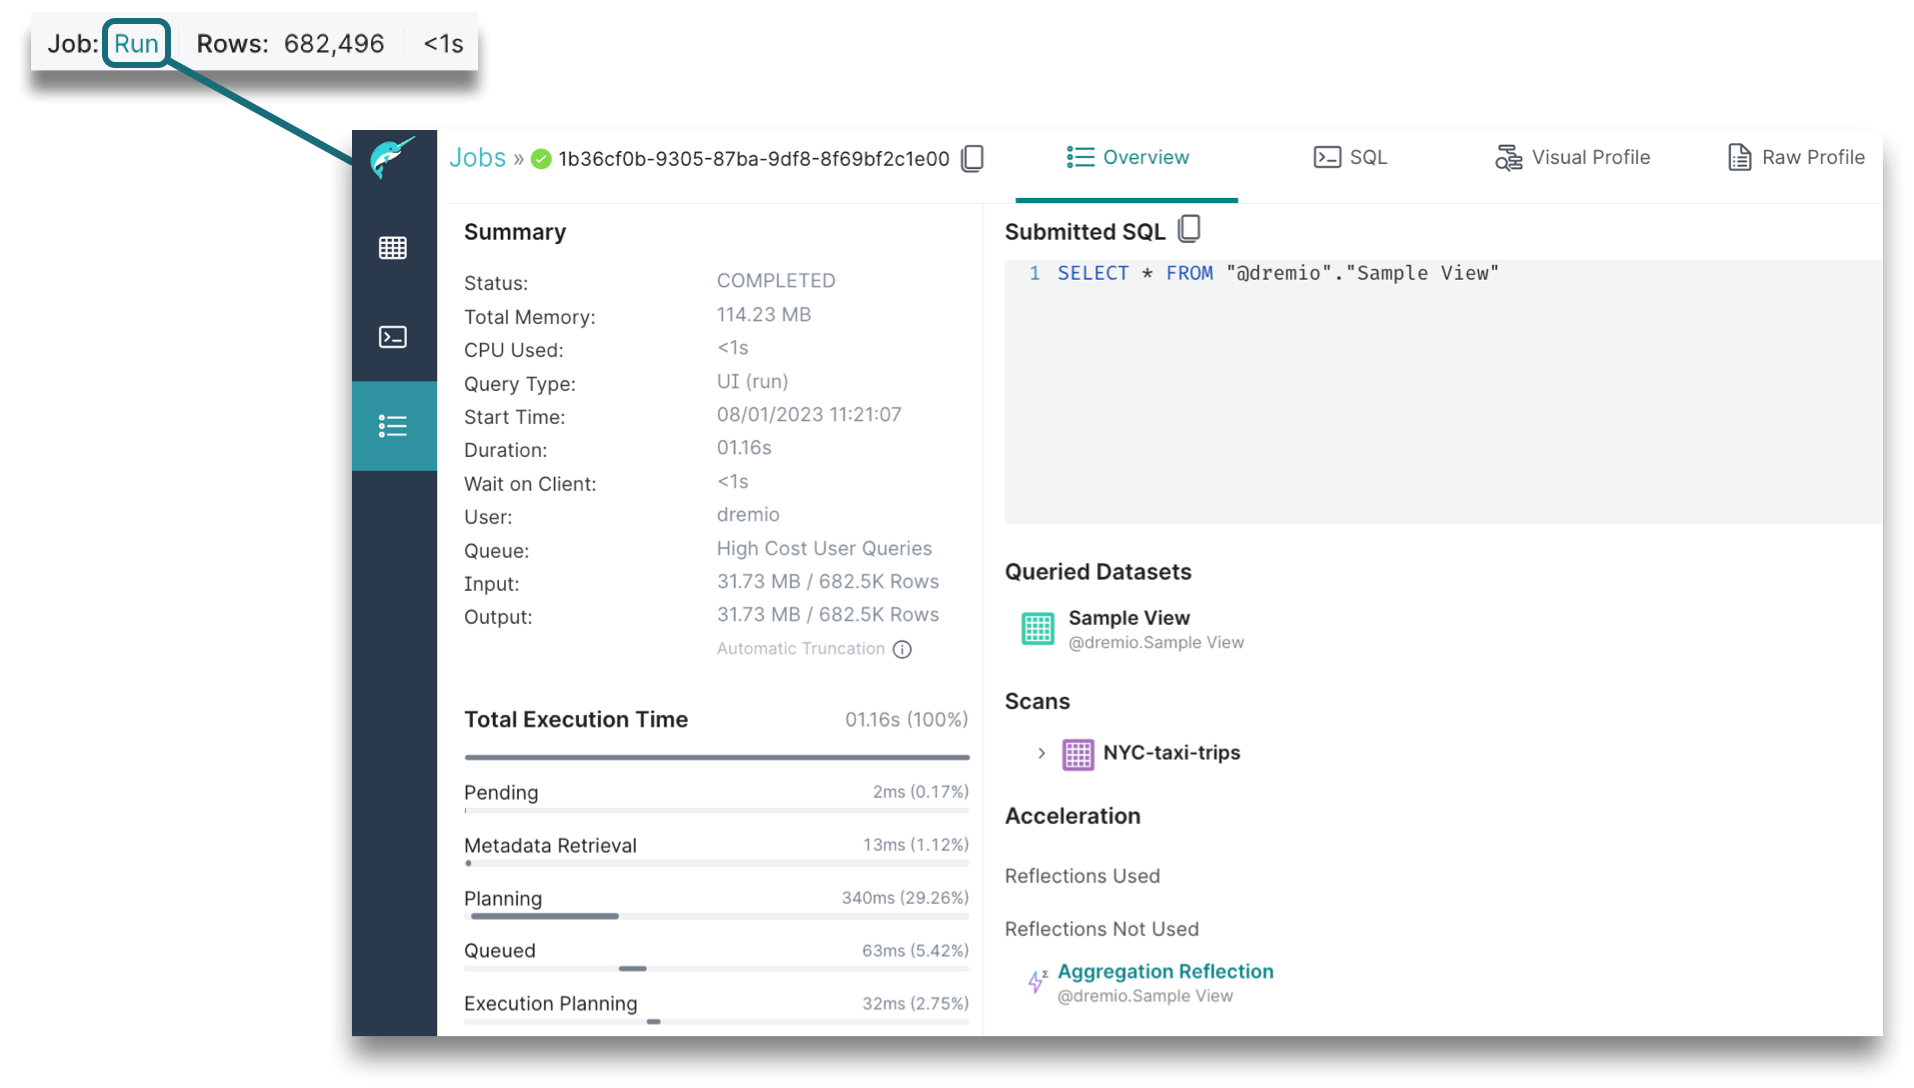
7. Execution State
The execution state will show you the type of job that was run, the number of records, and the amount of time that it took to run the query. When you click on the linked job, a Job Overview page opens in a new tab, providing a summary, total execution time, Reflections data, job results, and more details. If a job took too long or failed, viewing the job overview can help you troubleshoot what actually happened.
8. Transformations
Transformations can be applied to data. Using the following no-code UI flows automatically updates the SQL in the SQL editor:
- Add Field
- Group By
- Join
- Filter Columns
If you are using the preview mode, transformations use a subset of the results and may not provide a complete profile of the result set. It may show null or incomplete values in the dataset as a result of joining, grouping, or calculating fields. You may encounter an error showing "no rows returned due to the LIMIT logic" or "more rows returned due to an outer join".
9. Results Table
The results of the query are shown in a table format. You can edit a table column by clicking directly on the column title to open a dropdown of edit options, which include sorting results, converting data types, renaming columns, and calculating fields.
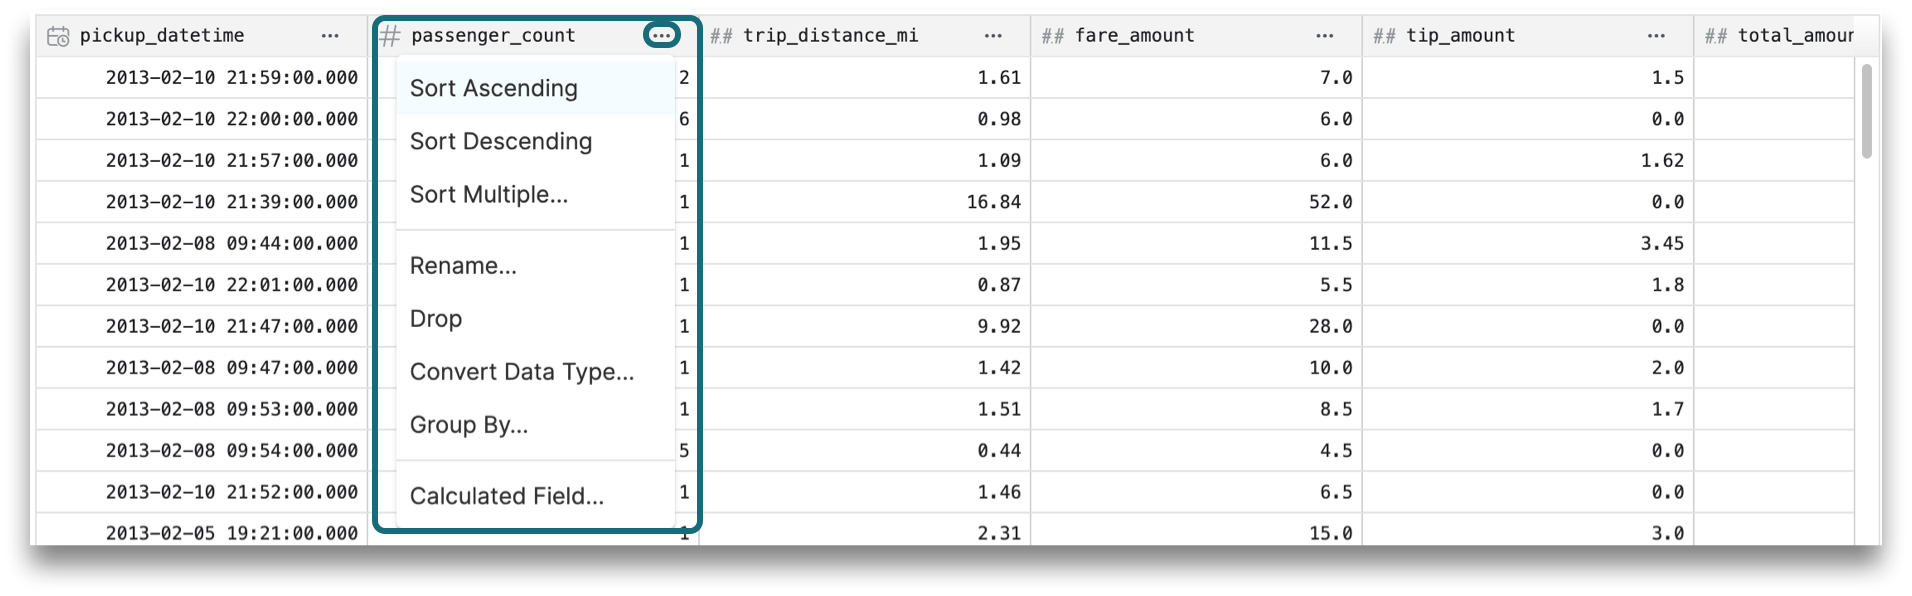
You can edit a result value directly if you click and drag your cursor over the result value, which opens a dropdown of available edit options such as to replace, keep only, exclude, or copy the result value.
Downloading large result sets could produce delays and errors. If you encounter these issues, create smaller views that summarize the results. You can then run queries on these smaller views and download the results.