Multiple AWS Clusters
Enterprise Edition only: Provisioning multiple execution clusters requires Workload Management available in the Enterprise Edition. Please contact Dremio if you would like to use this feature.
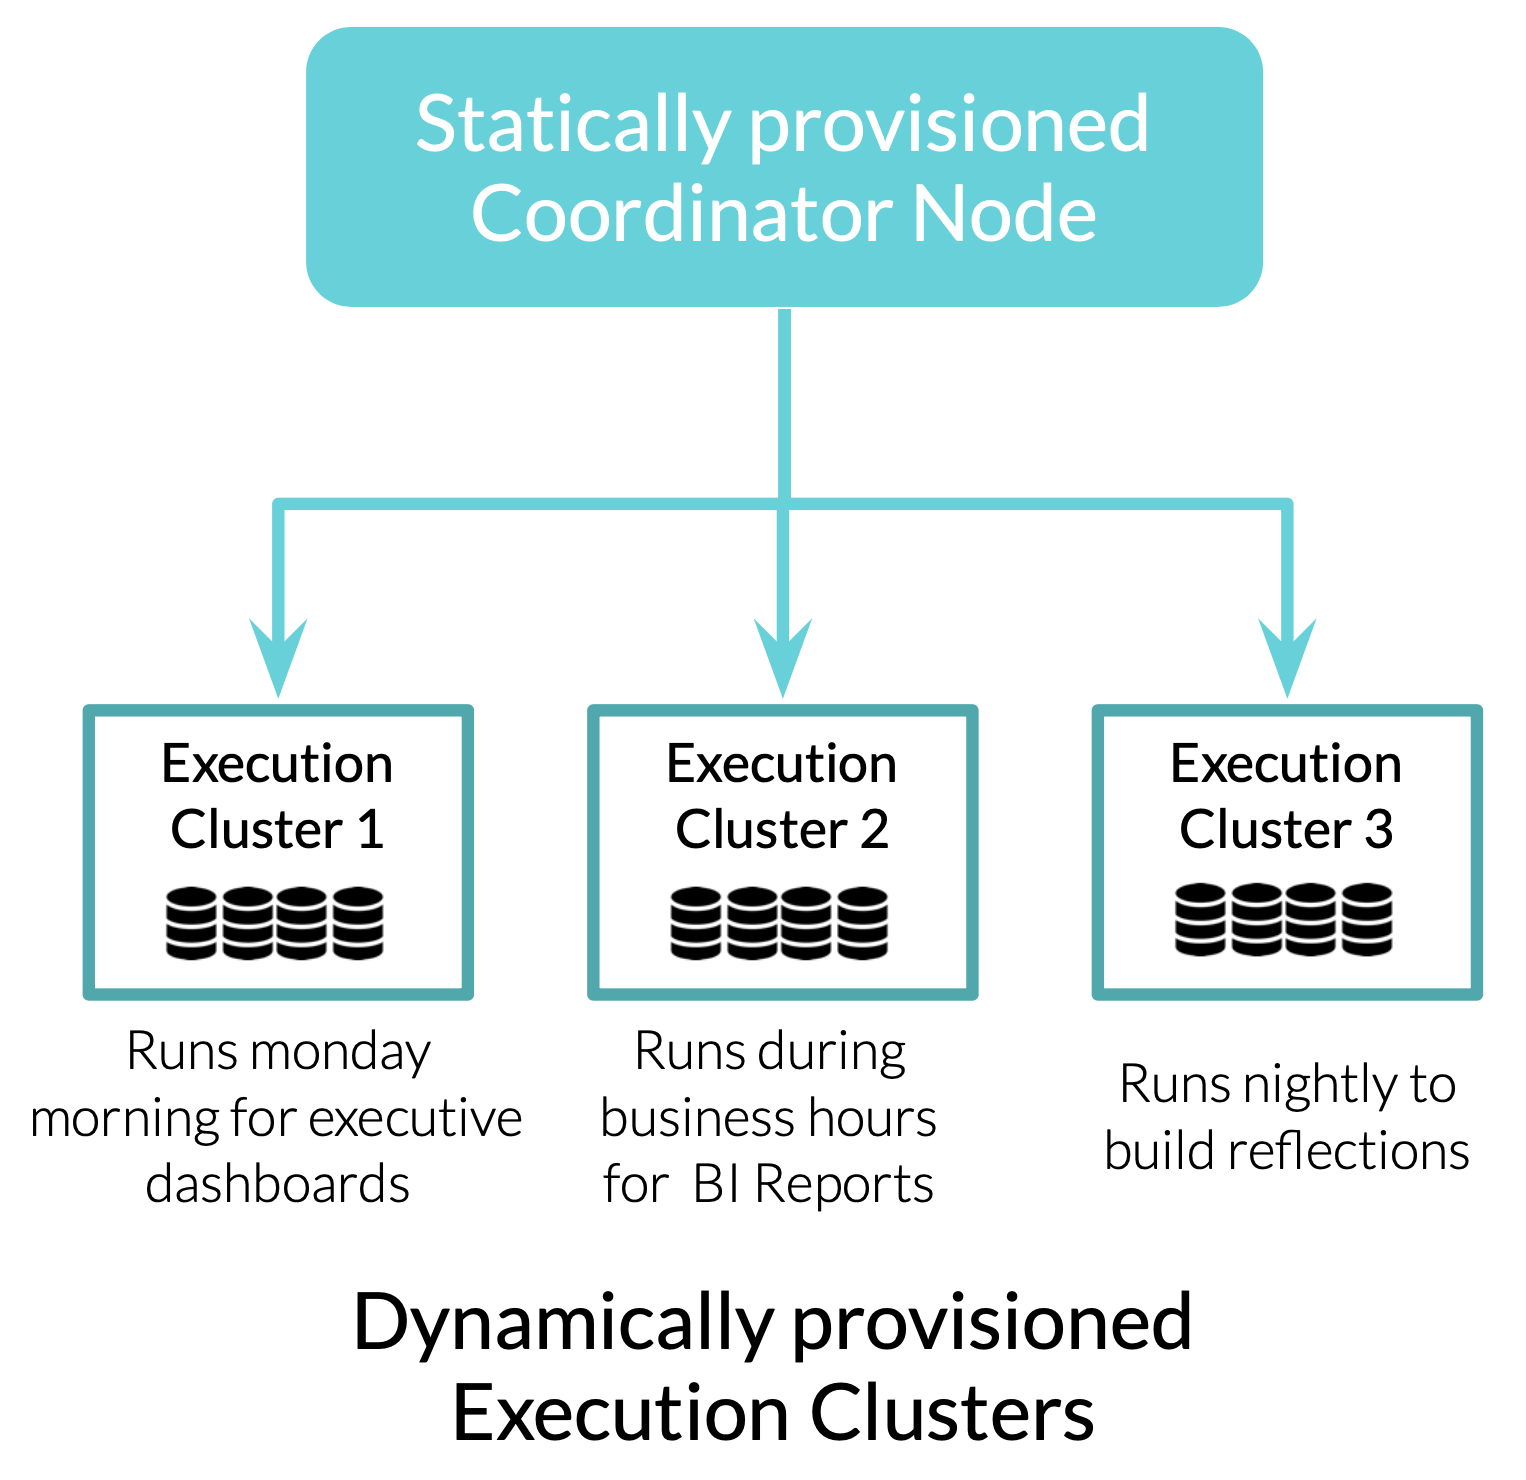
In AWS deployments, Dremio supports the ability to provision multiple separate execution clusters from a single Dremio coordinator node, dynamically schedule execution clusters to run idependently at different times and automatically start and stop based on workload requirements at runtime. This provides several benefits, including:
- Workloads are isolated within their own set of CPU, Memory & C3 resources and not impacted by other workloads
- Time-sensitive yet resource intensive workloads (nightly jobs, reflections refreshes, etc.) can be provisioned with the appropiate amount of resources to complete on time, but remain cost effective by only running when required
- Track cost by team by running workloads on their own resources
- Right size execution resources for each distinct workload, instead of implementing a one sized fits model
- Easily experiment with different execution resource sizes, at any scale
- Run execution resources in different regions for localization as required
Configuration
To provision multiple clusters in AWS the following steps are required to configure the AWS environment and Dremio.
- Create a S3 bucket for Distributed Storage
- Create an IAM Policy for Dremio
- Create an IAM Role for Dremio
- Launch an EC2 Instance for the Coordinator Node and Install Dremio
- Edit the dremio.conf file
- Add the core-site.xml file
- Start Dremio
Step 1: Create a S3 bucket for Distributed Storage
In AWS, create an S3 bucket that will be used by Dremio for Distributed Storage. Dremio will use this S3 bucket to store Reflections, File Uploads, and Job Result Downloads. Note: The S3 bucket should be created in the same AWS region the Dremio Coordinator node will run in.
Step 2: Create an IAM Policy for Dremio
Create a new IAM Policy to assign to the Dremio IAM Role and add the following permissions:
| Service | Actions | Resource |
|---|---|---|
| S3 | PutObject, GetObject, ListBucket, DeleteObject, GetBucketLocation | The ARN for the S3 bucket created in Step 1, e.g. "arn:aws:s3:::<S3 Bucket Name>/*" |
| S3 | ListAllMyBuckets | All Resources |
| EC2 | DeletePlacementGroup DescribeInstances TerminateInstances CreatePlacementGroup RunInstances DescribePlacementGroups | All Resources | IAM | PassRole | The ARN for the IAM role to be created in Step 3, e.g. "arn:aws:iam::<AccountID>:role/dremioiamorole" |
The IAM policy json file that can be used to define to policy is:
{
    "Version": "2012-10-17",
    "Statement": [
        {
            "Sid": "distS3Access",
            "Effect": "Allow",
            "Action": [
                "s3:PutObject",
                "s3:GetObject",
                "s3:ListBucket",
                "s3:DeleteObject",
                "s3:GetBucketLocation"
            ],
            "Resource": [
                "arn:aws:s3:::<S3 Bucket Name>",
                "arn:aws:s3:::<S3 Bucket Name>/*"
            ]
        },
        {
            "Sid": "getBucketsForS3Source",
            "Effect": "Allow",
            "Action": [
                "s3:ListAllMyBuckets"
            ],
            "Resource": "*"
        },
        {
            "Sid": "ec2ManagementOps",
            "Effect": "Allow",
            "Action": [
                "ec2:DescribeInstances",
                "ec2:RunInstances",
                "ec2:TerminateInstances",
                "ec2:DeletePlacementGroup",
                "ec2:CreatePlacementGroup",
                "ec2:DescribePlacementGroups",
                "ec2:CreateTags",
                "ec2:DescribeImages"
            ],
            "Resource": "*"
        },
        {
            "Sid": "ec2AssignRowAllowed",
            "Effect": "Allow",
            "Action": "iam:PassRole",
            "Resource": "arn:aws:iam::<AWS Accoount Number>:role/<IAM Role>"
        }
    ]
}
Step 3: Create an IAM Role for Dremio
Create a new IAM Role for Dremio, select EC2 as the service to use the role and assign the policy created in Step 2 to the role. The role should be the same name specified in the IAM:PassRole action in Step 2 above. For example, the IAM Role name for the above policy would be dremioiamrole.
Step 4: Launch an EC2 Instance for the Coordinator Node and Install Dremio
Create and launch an EC2 Instance to use as the Dremio coordinator node, and assign the IAM Role created in Step 3 to the instance.
After starting the instance, follow the instructions to install dremio as a standalone deployment.
Make sure to download and install the required Java version.
Step 5: Edit the dremio.conf file
The following configuration settings are required in the dremio.conf file on the coordinator node Dremio was installed on in Step 4.
- Configure the embedded Zookeeper service on the coordinator node by adding the
zookeeper: "<Coordinator IP Address>:2181"property to the dremio.conf file using the Private IP address of the coordinator's EC2 instance. - Disable the executor service on the coordinator node by setting
executor.enabled: falsein the dremio.conf file. This instructs Dremio to only start coordinator node services and requires execution resources to be separately configured and launched in order to process queries. - Configure Distributed Storage to use the S3 for
accelerator,uploads&downloads. Specify the bucket name to be the S3 bucket created in Step 1. - Ensure the local path is configured as
/var/lib/dremio
After making the above changes the dremio.conf should contain the following.
paths: {
  # the local path for dremio to store data.
  local: "/var/lib/dremio"

  # the distributed path Dremio data including job results, downloads, uploads, etc
  accelerator: "dremioS3:///<bucket_name>/accelerator"
  uploads: "dremioS3:///<bucket_name>/uploads"
  downloads: "dremioS3:///<bucket_name>/downloads"
  scratch: "dremioS3:///<bucket_name>/scratch"
}

services: {
  coordinator.enabled: true,
  coordinator.master.enabled: true,
  executor.enabled: false
}

zookeeper: "<Coordinator IP Address>:2181"
Step 6: Add the core-site.xml file
In the same directory as dremio.conf is saved, create a new file named core-site.xml with the same permissions and add the following to the file
<?xml version="1.0"?>
<configuration>
  <property>
    <name>fs.dremioS3.impl</name>
    <value>com.dremio.plugins.s3.store.S3FileSystem</value>
  </property>
  <property>
    <name>fs.s3a.aws.credentials.provider</name>
    <value>com.amazonaws.auth.InstanceProfileCredentialsProvider</value>
  </property>
  <property>
    <name>dremio.s3.async</name>
    <value>true</value>
  </property>
 </configuration>
Step 7: Set any additional configuration settings
Additional settings can be configured at this point, for example to configure Dremio to use High Availability or an External Zookeeper server.
Step 8: Start Dremio
Start Dremio with sudo service dremio start
After starting Dremio only the coordinator node will be active with no running execution resources. This can be seen by navigating to the Node Activity page Admin -> Cluster -> Node Activity, which shows only the coordinator node active.
At least one execution cluster needs to be configured and started to execute queries or access services such as UI previews.
Usage
Creating AWS Clusters
New execution clusters on AWS are configured by navigating to the Provisioning page Admin -> Cluster -> Provisioning. From the Provisioning page select Add New and then AWS Cluster.
The "Set Up AWS Cluster" popup page by default automatically selects EC2 configuration options used to launch the coordinator node (Security Group, VPC, EC2 Key Pair, etc). Assuming the execution cluster will use these defaults the main configuration options to specify are:
- Cluster Name - The name for the cluster
- Instance Type - The AWS Instance Type to use for each executor in the cluster, different clusters may be configured with different instance types
- Node Count - The number of executors for this cluster
After specifying the Cluster Name, Instance Type and Node Count, create and start the execution cluster by selecting Save & Launch, which:
- Saves the execution cluster's configuration
- Starts the execution cluster and provisions EC2 nodes
Typically execution clusters complete AWS EC2 provisioning and startup in less than one minute, however timeframes can vary based on instance availablity in EC2.
Note: The IAM Role for S3 Access parameter should automatically match the ARN for the IAM role resource provided for the IAM:PassRole permission specified in Step 2, with the change that "role" changes to "instance-provifile". For example, if the ARN provided in Step 2 was arn:aws:iam::<AccountID>:role/dremioiamrole the ARN shown in the IAM Role for S3 Access field should be arn:aws:iam::<AccountID>:instance-profile/dremioiamrole
After launching an execution cluster, new EC2 instances are provisioned as executor nodes. The state for each node can be monitored on the Provisioning page, nodes start in the Pending state while waiting for AWS EC2 to identify resources, transition to the Provisioning state during startup, and finally transition to Active once the EC2 node and Dremio Software are fully available on the node.
The execution cluster is available for queries once at least 70% of the nodes are available. If that percentage is not available after 5 minutes Dremio cancels the operation and terminates the cluster, including any launched nodes.
Managing EC2 Clusters
Monitoring Clusters
EC2 execution clusters can be viewed and monitored from two administration pages.
The Provisioning admin page shows each execution cluster, the summary status for each node in the cluster and controls to start/stop the cluster, change the cluster's configuration or delete the cluster.
The Node Activity admin page shows each coordinator and executor node along with which cluster a node is associated with
Stopping Clusters
Running clusters are stopped by selecting Stop on the Provisioning page. Stopping a cluster immediately cancels all active queries on the cluster and deletes all resources provisioned for the cluster, this includes EC2 instances, EBS volumes, etc.
Starting Clusters
Stopped clusters are started by selecting Start on the Provisioning page. Starting a cluster initiates the same process to launch the cluster as when the cluster was first created and started with Save & Launch described above.
Routing Queries
There are two methods available to control which execution cluster queries run on.
- Workload Management based Routing
- Direct Routing
Workload Management based Routing
Workload Management can control the execution cluster each query runs on by defining Rules processed during runtime that determine the Queue for each individual query. In deployments with only one cluster all Queues share the same execution resources and route to the same single cluster. However, when provisioning multiple EC2 execution clusters each Queue can be scheduled on a different execution cluster.
To route queries to a specific execution cluster:
- Configure WLM Rules to route a set of queries to a specific Queue
- Goto
Edit Queueand change the Queue's properties and set the Cluster Name to desired execution cluster
The following example demontrates routing high cost reflection rebuild queries to a specific cluster just for large reflection rebuilds.
The default Cluster Name for a queue is Any which allows queries in that WLM Queue to run on any cluster available at the time of execution. Once a specific Cluster Name is selected queries in that Queue will only run on the selected execution cluster and if the execution cluster is not available the query will fail with the error message Error: No executors are available even if other execution clusters are currently active.
Configurations that either have more than one execution cluster or use the Auto Start feature should specify a Cluster Name for all WLM Queues and make sure than no WLM Queues route to 'Any'. 'Any' is intended only for configuratations that do not make use of multiple execution clusters and for backward compatibility. Queues that route to 'Any' will not automatically start a cluster and can also route queries to clusters that are stopped.
Direct Routing
Direct Routing is used to specify the exact Queue and Execution Cluster to run queries on for a given ODBC or JDBC session. With Direct Routing WLM Rules are not considered and instead queries are routed directly to the specified Queue. Clients can be configured so that all queries run on a specific execution cluster or queries run on different execution clusters on a per-session basis.
To use Direct Routing add the Connection property ROUTING_QUEUE = <WLM Queue Name> to the ODBC or JDBC session parameters when connecting to Dremio. When set all queries for the session are automatically routed to the specified WLM Queue and the execution cluster selected for that Queue.
To disable Tag Routing set the Dremio support key dremio.wlm.direct_routing to false. By default Direct Routing is enabled.
Workload management provides details on how to configure ODBC and JDBC connections for Direct Routing
Automatic Cluster Management
Dremio supports automatic management of execution clusters and can automatically both start or stop clusters based on workload requirements. Automatic Cluster Management eliminates the need to manually provision and terminate execution clusters and helps users cost optimize Dremio by only running resources when workloads require them.
Auto Start
Auto Start instructs Dremio to automatically provision and start an execution cluster when new queries are issued to that cluster. When Auto Start is enabled in the execution cluster's Properties page, Dremio automatically starts the execution cluster under the following conditions:
- The execution cluster is selected as the queue's Cluster Name
- The execution cluster is currently stopped
Execution clusters are only automatically started if they are selected as the Cluster Name for a queue. If the Cluster Name for a queue is Any and no execution clusters are running, the query will fail with Error: No executors are available instead of selecting a random execution cluster to start.
Auto Stop
Auto Stop instructs Dremio to automatically stop an execution cluster after a period of inactivity. When you select a time period for Auto Stop in an engine's Properties page, the execution cluster will stop automatically if no queries are issued to that cluster for the selected time period. The default timeout for Auto Stop is two hours. To disable Auto Stop, select the Disable Auto Stop option.
Advanced Configuration
Cluster Properties
Additional cluster properties to configure are:
| Option | Description |
|---|---|
| Name | Name of the cluster |
| Region | AWS Region to deploy the cluster, supported regions are: us-east-1: US East (Northern Virginia), us-west-1: US West (Northern California), us-west-2 : US West (Oregon), eu-west-1 : EU (Ireland), ap-southeast-1 : Asia Pacific (Singapore) |
| Instance Type | AWS Instance Type used for execution nodes, supported types are: m5d.8xlarge (32c/128gb) - General Purpose (default), m5ad.8xlarge (32c/128gb) - General Purpose, r5d.4xlarge (16c/128gb) - Higher memory per unit of compute, c5d.18xlarge (72c/144gb) - Higher compute, i3.4xlarge (16c/122gb) - Higher local storage for caching |
| Instance Count | Number of execution nodes |
| EC2 Key Pair Name | AWS Key Pair used to log onto server instances |
| Security Group ID | The Group ID of the Security Group to use |
| IAM Role for S3 Access | IAM Role used to access S3 buckets for Distributed Storage (optional) |
| Use Clustered Placement | Whether or not to use placement groups which locates nodes closer together. It is recommended to enable this option but can take longer for AWS to identify resources with larger clusters |
| Enable Auto Start | Automatically start the cluster when new queries are submitted to the cluster |
| Enable Auto Stop | Automatically stop the cluster if no queries are submitted for a selected period of time |
| VPC | The VPC ID of the Virtual Private Network to use |
| Subnet ID | The Subnet ID of the Subnet to use |
| AMI Identifier | The AMI of the execution nodes to use, optional. By default uses the latest version |
| AWS API Authentication Mode | The authentication mode used to provision EC2 nodes and stop EC2 nodes. Auto uses an IAM Role to management execution nodes. Alternatively an AWS Access and Secret Key can be used |
| Access Key | The AWS Access Key if using Key/Secret authentication |
| Secret | The AWS Secret Key if using Key/Secret authentication |
| IAM Role for API Operations | The IAM Role to assume to provision and manage execution nodes, by default the IAM Role of the coordinator node is used. |
| Extra Dremio Configuration Properties | Additional configuration options |
Additional
Additional behaviors to be aware of:
- When a cluster stops the EC2 nodes are terminated and deleted. As a result there are no addition expenses incurred when a cluster is stopped, however logs on the executor nodes are not maintained after the cluster is stopped.
- Auto Stop only stops a cluster if there is at least one WLM Queue that connects to the cluster and routes queries to the cluster. Clusters not configured within WLM will not automatically stop.
- Refreshing the node activity page could cause a cluster to start
- If a cluster is in the process of stopping, a new query will not cause it to auto start and instead the query will be canceled with an error
- Stopping the coordinator node does not stop execution clusters, execution clusters should be stopped prior to shutting down the coordinator node