Open Catalog Enterprise
Dremio's built-in lakehouse catalog is built on Apache Polaris (incubating). The catalog enables centralized, secure read and write access to your Iceberg tables across different REST-compatible query engines and automates data maintenance operations to maximize query performance. Key features include:
- Iceberg REST compatibility: Read and write from the Open Catalog using any engine or framework compatible with the Iceberg REST API. For example, use Spark or Flink to ingest data into the catalog, and then use Dremio to curate and serve data products built on that data.
- Role-Based Access Control and Fine-Grained Access Control: Secure data using Role-Based Access Control (RBAC) privileges and create row filters and column masks to ensure users only access the data they need. For example, create a column mask to obfuscate credit card numbers or create a row filter on your employee details table that only returns rows with employees in your region.
- Automated table maintenance: Open Catalog automates Iceberg maintenance operations like compaction and vacuum, which maximizes query performance, minimizes storage costs, and eliminates the need to run manual data maintenance. Open Catalog also simplifies Iceberg table management and eliminates the risk of poor performance from suboptimal data layouts with support for Iceberg clustering keys.
- Enable data analysts: Open Catalog is fully compatible with Dremio's built-in data product capabilities, including semantic search (use natural language to discover AI-ready data products), descriptions (use built-in descriptions and labels to understand how to use data products to answer business questions), and lineage (use lineage graphs to understand how data products are derived and transformed and assess the impact of changes on downstream datasets).
This page provides instructions for configuring the Open Catalog. If you would like to connect to Open Catalogs deployed in other Dremio instances, see Open Catalog (External).
Prerequisites
Before you configure Open Catalog, make sure you do the following:
- Configure access to your storage provider, as described in Configure Storage Access.
- Configure the settings of your storage provider in Dremio's Helm chart, as described in Configuring Storage for the Open Catalog.
These configurations are required to enable support for vended credentials and to allow access to the table metadata necessary for Iceberg table operations.
Configure the Open Catalog
To configure Open Catalog:
- When creating the first Open Catalog, select Add an Open Catalog. Add a Name for the catalog. This name is immutable after the catalog has been created.
- When configuring an existing Open Catalog, right-click on your catalog and select Settings from the dropdown.
Storage
- The Default storage URI field displays the default storage location you configured in Dremio's Helm chart.
- Use the Storage access field to configure your preferred authentication method. Open Catalog supports two types of credentials for authentication:
- Use credential vending (Recommended): Credential vending is a security mechanism where the catalog service issues temporary, scoped access credentials to the query engine for accessing table storage. The engine is "vended" a temporary credential just in time for the query.
- Use master storage credentials: The credentials authenticate access to all storage URIs within this catalog. These credentials ensure all resources are accessible through a single authentication method. This should be used if STS is unavailable or the vended credentials mechanism is disabled. Select the object storage provider that hosts the location specified in the Default storage URI field:
- AWS – Select AWS for Amazon S3 and S3-compatible storage. You can refer to the Dremio documentation for connecting to Amazon S3, which is also applicable here. When selecting to assume an IAM role, ensure that the role policy grants access to the bucket or folder specified in the Default storage URI field.
- Azure – Select Azure for Azure Blob Storage. You can refer to the Dremio documentation for connecting to Azure Storage, which is also applicable here.
- Google Cloud Storage – Select Google for Google Cloud Storage (GCS). You can refer to the Dremio documentation for connecting to GCS, which is also applicable here.
- Enter any required storage connection properties in the Connection Properties field. Refer to the Advanced Options section for your storage provider (Amazon S3, Azure, or GCS) for available properties.
Advanced Options
To set advanced options:
-
Under Cache Options, review the following table and edit the options to meet your needs.
Cache Option Description Enable local caching when possible Selected by default. Along with asynchronous access for cloud caching, local caching can improve query performance. See Cloud Columnar Cache for details. Max percent of total available cache space to use when possible Specifies the disk quota, as a percentage, that a source can use on any single executor node only when local caching is enabled. The default is 100 percent of the total disk space available on the mount point provided for caching. You can either manually enter a percentage in the value field or use the arrows to the far right to adjust the percentage. -
Under Table maintenance, manage settings for automated table maintenance operations:
- Enable auto optimization: Compacts small files into larger files. Clusters data if Iceberg clustering keys are set on the table.
- Enable table cleanup: Deletes expired snapshots and orphaned metadata files.
Reflection Refresh
You can set the policy that controls how often Reflections are scheduled to be refreshed automatically, as well as the time limit after which Reflections expire and are removed. See the following options:
| Option | Description |
|---|---|
| Never refresh | Select to prevent automatic Reflection refresh. The default is to automatically refresh. |
| Refresh every | How often to refresh Reflections, specified in hours, days, or weeks. This option is ignored if Never refresh is selected. |
| Set refresh schedule | Specify the daily or weekly schedule. |
| Never expire | Select to prevent Reflections from expiring. The default is to automatically expire after the time limit below. |
| Expire after | The time limit after which Reflections expire and are removed from Dremio, specified in hours, days, or weeks. This option is ignored if Never expire is selected. |
Metadata
Specifying metadata options is handled with the following settings:
Dataset Handling
- Remove dataset definitions if the underlying data is unavailable (default).
- If this box is not checked and the underlying files under a folder are removed or the folder/source is not accessible, Dremio does not remove the dataset definitions. This option is useful in cases when files are temporarily deleted and put back in place with new sets of files.
Metadata Refresh
These are the optional Metadata Refresh parameters:
-
Dataset Discovery: The refresh interval for fetching top-level source object names, such as databases and tables. Set the time interval using this parameter.
Parameter Description Fetch every You can choose to set the frequency to fetch object names in minutes, hours, days, or weeks. The default frequency to fetch object names is 1 hour. -
Dataset Details: The metadata that Dremio needs for query planning, such as information needed for fields, types, shards, statistics, and locality. These are the parameters to fetch the dataset information.
Parameter Description Fetch mode You can choose to fetch only from queried datasets. Dremio updates details for previously queried objects in a source. By default, this is set to Only Queried Datasets. Fetch every You can choose to set the frequency to fetch dataset details in minutes, hours, days, or weeks. The default frequency to fetch dataset details is 1 hour. Expire after You can choose to set the expiry time of dataset details in minutes, hours, days, or weeks. The default expiry time of dataset details is 3 hours.
Privileges
You have the option to grant privileges to specific users or roles. See Access Control for additional information about privileges.
To grant access to a user or role:
- For Privileges, enter the user name or role name that you want to grant access to and click the Add to Privileges button. The added user or role is displayed in the USERS/ROLES table.
- For the users or roles in the USERS/ROLES table, toggle the checkmark for each privilege you want to grant on the Dremio source that is being created.
- Click Save after setting the configuration.
Configure Storage Access
To configure access to storage, select your storage provider below and follow the steps:
- Amazon S3
- S3-compatible
- Azure Storage
- Google Cloud Storage
S3 and STS Access via IAM Role (Preferred)
-
Create an Identity and Access Management (IAM) user or use an existing IAM user for Open Catalog.
-
Create an IAM policy that grants access to your S3 location. For example:
Example of a policy{
"Version": "2012-10-17",
"Statement": [
{
"Effect": "Allow",
"Action": [
"s3:PutObject",
"s3:GetObject",
"s3:GetObjectVersion",
"s3:DeleteObject",
"s3:DeleteObjectVersion"
],
"Resource": "arn:aws:s3:::<my_bucket>/*"
},
{
"Effect": "Allow",
"Action": [
"s3:ListBucket",
"s3:GetBucketLocation"
],
"Resource": "arn:aws:s3:::<my_bucket>",
"Condition": {
"StringLike": {
"s3:prefix": [
"*"
]
}
}
}
]
} -
Create an IAM role to grant privileges to the S3 location.
- In your AWS console, select Create Role.
- Enter an externalId. For example,
my_catalog_external_id. - Attach the policy created in the previous step and create the role.
-
Create IAM user permissions to access the bucket via STS:
The
sts:AssumeRolepermission is required for Open Catalog to function with vended credentials, as it relies on the STS temporary token to perform these validations.-
Select the IAM role created in the previous step.
-
Edit the trust policy and add the following:
Trust policy{
"Version": "2012-10-17",
"Statement": [
{
"Sid": "",
"Effect": "Allow",
"Principal": {
"AWS": "<dremio_catalog_user_arn>"
},
"Action": "sts:AssumeRole",
"Condition": {
"StringEquals": {
"sts:ExternalId": "<dremio_catalog_external_id>"
}
}
}
]
}Replace the following values with the ones obtained in the previous steps:
<dremio_catalog_user_arn>- The IAM user that was created in the first step.<dremio_catalog_external_id>- The external ID that was created in the third step.
-
S3 and STS Access via Access Key
-
In the Dremio console, select Use master storage credentials when adding Open Catalog.
-
The access keys must have permissions to access the bucket and the STS server.
-
Create a Kubernetes secret named
Run kubectl to create the Kubernetes secretcatalog-server-s3-storage-credsto access the configured location. Here is an example for S3 using an access key and secret key:export AWS_ACCESS_KEY_ID=<username>
export AWS_SECRET_ACCESS_KEY=<password>
kubectl create secret generic catalog-server-s3-storage-creds \
--namespace $NAMESPACE \
--from-literal awsAccessKeyId=$AWS_ACCESS_KEY_ID \
--from-literal awsSecretAccessKey=$AWS_SECRET_ACCESS_KEY
-
The access keys must have permissions to access the bucket.
- To use vended credentials, the access key must also have access to an STS server.
- If you cannot leverage an STS server, when setting up the catalog for the first time in the Dremio console, you must select master storage credentials.
-
Create a Kubernetes secret named
Run kubectl to create the Kubernetes secretcatalog-server-s3-storage-credsto access the configured location. Here is an example for S3 using an access key and secret key:export AWS_ACCESS_KEY_ID=<username>
export AWS_SECRET_ACCESS_KEY=<password>
kubectl create secret generic catalog-server-s3-storage-creds \
--namespace $NAMESPACE \
--from-literal awsAccessKeyId=$AWS_ACCESS_KEY_ID \
--from-literal awsSecretAccessKey=$AWS_SECRET_ACCESS_KEYFor S3-compatible storage providers (e.g., MinIO), the access keys should be the username and password.
- Soft delete for blobs is not supported for Azure Storage accounts. Soft delete should be disabled to establish a successful connection.
- Although not mandatory, Dremio recommends enabling Hierarchical Namespace when using Azure Data Lake Storage. For more information, see Azure Data Lake Storage Gen2 hierarchical namespace.
-
Register an application and create secrets:
-
Go to Azure Active Directory > App Registrations.
-
Register your app and take note of the Client ID and Tenant ID. For more information on these steps, refer to Register an application with Microsoft Entra ID and create a service principal.
-
Go to Certificates & Secrets > New Client Secret.
-
Create a secret and take note of the Secret Value.
-
Create a Kubernetes secret named
Run kubectl to create the Kubernetes secretcatalog-server-azure-storage-credsusing the following command:export AZURE_CLIENT_ID=<Azure App client id>
export AZURE_CLIENT_SECRET=<App secret value>
kubectl create secret generic catalog-server-azure-storage-creds \
--namespace $NAMESPACE \
--from-literal azureClientId=$AZURE_CLIENT_ID \
--from-literal azureClientSecret=$AZURE_CLIENT_SECRET
-
-
Create an Identity and Access Management (IAM) role in your Storage Account and set up the permission for your new application to access the storage account by following these steps:
- In the Azure console, go to your Storage Account and navigate to Access Control (IAM) > Role assignments > Add role assignment.
- Select the
Storage Blob Data Contributorrole and click Next. - In the Members section, click Select members, search for your app registration from step 1, and click Select.
- Review and assign the roles.
-
Go to your Google Cloud Platform (GCP), create a service account, and grant an Identity and Access Management (IAM) role with the following permissions:
Permissions for the IAM rolestorage.buckets.get
storage.objects.create
storage.objects.delete
storage.objects.get
storage.objects.list -
Obtain the JSON file with the GCP credentials from the Google service account.
-
Create the Kubernetes secret where Dremio is deployed using the following command:
Run kubectl to create the Kubernetes secretkubectl create secret generic catalog-server-gcs-storage-creds --from-file=<filename>.json
Update an Open Catalog Source
To update an Open Catalog source:
-
On the Datasets page, in the panel on the left, find the name of the Open Catalog source you want to edit.
-
Right-click the source name and select Settings from the list of actions. Alternatively, click the source name and then the
 at the top right corner of the page.
 -
In the Source Settings dialog, edit the settings you wish to update. Dremio does not support updating the source name.
-
Click Save. Once you have configured Open Catalog, the Catalog REST APIs are accessible via
http://{DREMIO_ADDRESS}:8181/api/catalog, whereDREMIO_ADDRESSis the IP address of your Dremio cluster.
Multiple Storage Locations
Open Catalog supports the simultaneous use of multiple storage locations for catalog objects. You can create folders in a single Open Catalog instance, each mapped to its own storage location. The path to each folder's storage Uniform Resource Identifier (URI) is configured during creation of the catalog folder. Each folder can:
- Inherit its URI from its parent folder or the catalog itself.
- Use a custom URI that points to another storage location.
The storage URI for any folder is the root path to the folder, starting with the last explicit URI in the path.
Storage URI Example
The diagram below depicts an Open Catalog with two namespaces NS1 and NS2, where their underlying folders, NS3 and NS5, utilize custom storage URIs:
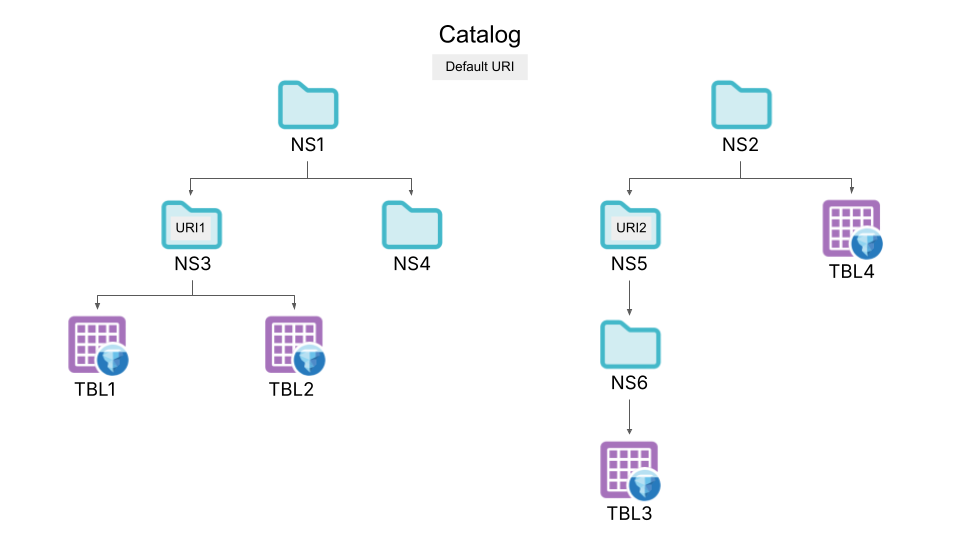
In this example:
- TBL1 is stored at
<Custom_URI_1>/NS3/TBL1 - TBL2 is stored at
<Custom_URI_1>/NS3/TBL2 - TBL3 is stored at
<Custom_URI_2>/NS5/NS6/TBL3 - TBL4 is stored at
<Base_Storage_URI>/NS2/TBL4
Configure Storage
A folder's storage URI must be a child path of one of the catalog-level storage URIs defined in the Helm chart. The catalog.storage.location parameter in the Helm chart should list only the common base URIs that will serve as roots for folder storage locations. See Configuring Storage for the Open Catalog for additional information.
Configure Storage URIs
- Select Open Catalog, then click New Folder in the top-right corner. Provide a name for the folder and its storage URI:
- Select Use inherited storage URI to inherit the URI of the parent folder or top-level catalog, appended with this folder name.
- Select Use custom storage URI to select a custom URI from the list contained in
catalog.storage.location.
- Ensure that the storage credentials configured for the Open Catalog can access the object storage associated with each new folder.