Azure Data Lake Storage Gen1
This topic describes how to configure Azure Data Lake Storage (ADLS) Gen1 as a source in Dremio. ADLS Gen1 is an optimized storage for big data analytics workloads and supports Data Lake Gen1 file systems.
On February 29, 2024, ADLS Gen1 was retired. For more information, see the official Microsoft announcement.
For information about Dremio support for ADLS Gen2, see Azure Storage.
Azure Configuration
Dremio connects to ADLS using a pre-generated authentication key.
Dremio supports offheap memory buffers for reading Parquet files from ADLS.
Registering application with Azure Active Directory
-
Go to Azure Portal and select
Azure Active Directoryfrom the left navigation bar. Then selectApp Registrations. -
Click on
Endpointsand note downOAUTH 2.0 TOKEN ENDPOINT. This will be theOAuth 2.0 Token Endpointfor your ADLS source in Dremio. -
Click
New application registration. Select aName, chooseWeb app / APIas type and enter aSign-on URL. This URL can be a valid arbitrary URL. -
Once created, click on the registered app and note down
Application ID. This will be theApplication IDfor your ADLS source in Dremio. -
While in the registered app, select
KeysunderAPI Access. Then enter aDescriptionand select anexpiration. Click Save and note downValue. This will be thePasswordfor your ADLS source in Dremio.
Granting ADLS Access
-
Go to your desired Data Lake Store resource. Note down the name of the Data Lake Store. This will be the
Resource Namefor your ADLS source in Dremio. -
Click on
Access control (IAM)and clickAdd. Select aRolethat has at minimum Read access and find the name of the application you registered above (i.e. the Owner Role can be used). ClickSave. -
For the same Data Lake Store resource, go to
Data explorer, then navigate to the top level directory that'll be used by Dremio. ClickAccessand addRead,ExecuteandWrite(if using as distributed store) permissions to the application registered above.
Dremio Configuration
General
| Dremio Field | Azure Property |
|---|---|
| Resource Name | Name of the resource |
| Application ID | Application ID of the registered application under Azure Active Directory |
| OAuth 2.0 Token Endpoint | Azure Active Directory OAuth 2.0 Token Endpoint for registered applications |
| Access key value | Generated password value for the registered application |
REQUIRED: After a successful first connection in Dremio, do the following:
-
Ensure that the source is successfully created and tested.
-
Add and set the
fs.adl.impl.disable.cacheconnection property to false.
This property is set to optimize performance. Do not set this property before the source is created and tested; it impacts credential usage and can cause issues if you are reconfiguring the connection.Per DX-13859 -
Restart your cluster after saving the source with this property.
Advanced Options
Advanced options include:
- Enable asynchronous access when possible (default)
- Enable exports into the source (CTAS and DROP).
- Root Path -- Root path for the source.
- Connection Properties -- A list of additional connection properties.
- Cache Options
- Enable local caching when possible
- Max percent of total available cache space to use when possible.

Reflection Refresh

- Never refresh -- Specifies how often to refresh based on hours, days, weeks, or never.
- Never expire -- Specifies how often to expire based on hours, days, weeks, or never.
Metadata
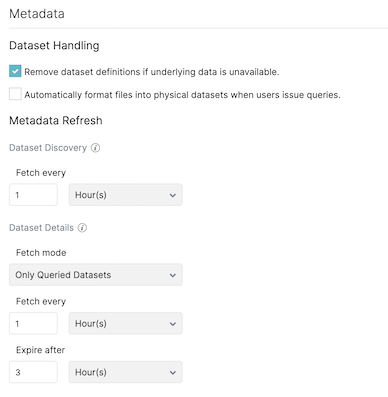
Dataset Handling
- Remove dataset definitions if underlying data is unavailable (Default).
If this box is not checked and the underlying files under a folder are removed or the folder/source is not accessible, Dremio does not remove the dataset definitions. This option is useful in cases when files are temporarily deleted and put back in place with new sets of files. - Automatically format files into tables when users issue queries. If this box is checked and a query runs against the un-promoted table/folder, Dremio automatically promotes using default options. If you have CSV files, especially with non-default options, it might be useful to not check this box.
Metadata Refresh
- Dataset Discovery -- Refresh interval for top-level source object names such as names of DBs and tables.
- Fetch every -- Specify fetch time based on minutes, hours, days, or weeks. Default: 1 hour
- Dataset Details -- The metadata that Dremio needs for query planning such as information needed for
fields, types, shards, statistics, and locality.
- Fetch mode -- Specify either Only Queried Datasets, All Datasets, or As Needed. Default: Only Queried Datasets
- Only Queried Datasets -- Dremio updates details for previously queried objects in a source.
This mode increases query performance because less work is needed at query time for these datasets. - All Datasets -- Dremio updates details for all datasets in a source. This mode increases query performance because less work is needed at query time.
- As Needed -- Dremio updates details for a dataset at query time. This mode minimized metadata queries on a source when not used, but might lead to longer planning times.
- Only Queried Datasets -- Dremio updates details for previously queried objects in a source.
- Fetch every -- Specify fetch time based on minutes, hours, days, or weeks. Default: 1 hour
- Expire after -- Specify expiration time based on minutes, hours, days, or weeks. Default: 3 hours
- Fetch mode -- Specify either Only Queried Datasets, All Datasets, or As Needed. Default: Only Queried Datasets
Sharing

You can specify which users can edit. Options include:
-
All users can edit.
-
Specific users can edit.
Configuring Cloud Cache
Cloud caching is available in Dremio Enterprise edition. See Configuring Cloud Cache for more information.