Manually Manage Reflections
With Autonomous Reflections reducing the need for manual work, you no longer need to create or manage Reflections. However, when Autonomous Reflections are not enabled or for situations that require manual control, this page provides guidance on getting Reflection recommendations, creating, managing, and testing Reflections in Dremio.
When a Reflection is created, Dremio runs a single job with two steps:
- The first step writes the query results as a materialization to the distributed acceleration storage by running the
REFRESH REFLECTIONSQL command. - The second step registers the materialization table and its metadata with the catalog so that the query optimizer can find the Reflection's definition and structure.
The following screenshot shows the REFRESH REFLECTION SQL command used to create the Reflection named Super-duper reflection:

The Reflection creation job is listed as a single job on the Jobs page, as shown in the example below:

Dremio creates all Reflections as Apache Iceberg tables, and the metadata for the Reflection is generated at the same time.
Reflection Recommendations
When Autonomous Reflections are not enabled, Dremio automatically provides recommendations to add and remove Reflections based on query patterns to optimize performance for queries on Iceberg tables, Parquet datasets, and views based on them. Recommendations to add Reflections are sorted by overall effectiveness, with the most effective recommendations shown on top. Effectiveness relates to metrics such as the estimated number of accelerated jobs, potential increase in query execution speedup, and potential time saved during querying. These are rough estimates based on past data that can give you insight into the potential benefits of each recommendation. Reflections created using these recommendations refresh automatically when source data changes on:
- Iceberg tables: when the table is modified through Dremio or other engines. Dremio polls tables every 10 seconds.
- Parquet datasets: when metadata is updated in Dremio. To view and apply Reflection recommendations:
- Navigate to Project Settings
- Select Reflections.
- Click Reflections Recommendations to access the list of suggested Reflections.
- To apply a recommendation, click on the plus icon at the end of the corresponding row.
Reflections created using usage based recommendations are only used when fully synchronized with their source data to ensure up-to-date query results.
Manually Requesting Recommendations for Specific Jobs
You can generate recommendations for default raw and aggregation Reflections by submitting job IDs to accelerate specific SQL queries using either the SYS.RECOMMEND_REFLECTIONS table function or the Recommendations API. Obtain the job IDs by looking them up on the Jobs page.
Running the SYS.RECOMMEND_REFLECTIONS Table Function
The SYS.RECOMMEND_REFLECTIONS table function returns a table of one or more recommendations.
SYS.RECOMMEND_REFLECTIONS table function
SELECT * FROM TABLE(SYS.RECOMMEND_REFLECTIONS(ARRAY['<jobId>', '<jobId>']))
The SYS.RECOMMEND_REFLECTIONS function's argument must be an array literal.
Parameters
The SYS.RECOMMEND_REFLECTIONS table function has one parameter: an array that contains the job IDs for the SQL queries that you want to accelerate.
You can list up to 100 job IDs in each SYS.RECOMMEND_REFLECTIONS query. You must have permission to view every job you list in the query.
Output
The output for SYS.RECOMMEND_REFLECTIONS queries is a table that includes the following columns:
| Column Name | Data Type | Description |
|---|---|---|
| view_sql | varchar | If the recommendation is for a default raw Reflection: The value in this field is --Default Raw Reflection.If the recommendation is for an aggregation Reflection: An SQL command that creates a view based on the initial SQL query in the referenced job ID. Dremio uses this view to create an aggregation Reflection when you run the SQL command from the reflection_sql column. Before running this command, ensure that you have already created an Arctic catalog or folder named recommended_view. |
| reflection_sql | varchar | If the recommendation is for a default raw Reflection: An SQL command for defining the Reflection on an existing view. If the recommendation is for an aggregation Reflection: An SQL command that alters and adds an aggregation Reflection to the view that is created when you run the SQL command in the view_sql column. Before running this command, ensure that you have run the corresponding command in the view_sql column.Dremio automatically consolidates recommendations for aggregation Reflections when possible to create a single recommendation for similar SQL queries, so the output table may not contain an individual row that corresponds to each job ID listed in the SYS.RECOMMEND_REFLECTIONS query. |
| job_ids | list | The unique identifier of the jobs that ran the queries for which the recommendation is given. |
| reflection_score | double | Dremio's score for the recommended Reflection's quality, on a scale of 0 (worst) to 100 (best). The reflection_score value considers the recommended Reflection's anticipated quality compared to existing Reflections and other recommended Reflections, as well as the likely improvement in query run times if the recommended Reflection is implemented. |
| average_improvement_factor | double | The likely average multiplicative rate of improvement for each query if you implement the recommended Reflection. For example, if the average_improvement_factor value is 2.34, implementing the recommended Reflection is likely to speed up each query by 2.34 times, on average. |
| average_improvement_ms | double | The likely average improvement, in milliseconds, for each query if you implement the recommended Reflection. For example, if the average_improvement_ms value is 5400, implementing the recommended Reflection is likely to save an average of 5400 milliseconds for each query that uses the Reflection. |
Example Query and Output
To request a recommendation, you must have the job ID for at least one SQL query that you want to accelerate. For example, suppose this is the SQL query:
Example SQL QuerySELECT Max("p_size")
FROM s3.bucket1.tpch.sf10.parquet.part
JOIN s3.bucket1.tpch.sf10.parquet.lineitem
ON "p_partkey" = "l_partkey"
GROUP BY "p_brand"
Obtaining Recommendations
-
Retrieve the job ID for the query.
-
Run the
ExampleSYS.RECOMMEND_REFLECTIONSquery with the job ID. In the following example, the job ID is844c0023-6272-8b16-aef3-aea289acadb1:SYS.RECOMMEND_REFLECTIONSQuerySELECT * FROM TABLE(SYS.RECOMMEND_REFLECTIONS(ARRAY['844c0023-6272-8b16-aef3-aea289acadb1']))
The result of the query is returned in this table:
Example Results| view_sql | reflection_sql | job_ids | reflection_score | average_improvement_factor | average_improvement_ms |
|---|---|---|---|---|---|
| CREATE VIEW "recommended_view"."Dataset_9d74a03b-747a-42a2-a5ca-7f9c6f77b55d" AS SELECT "part"."P_BRAND" AS "F0[P_BRAND]", "part"."P_SIZE" AS "F1[P_SIZE]", "part"."P_PARTKEY" AS "extra#0", "part"."P_NAME" AS "extra#1", "part"."P_MFGR" AS "extra#2", "part"."P_TYPE" AS "extra#4", "part"."P_CONTAINER" AS "extra#6", "part"."P_RETAILPRICE" AS "extra#7", "part"."P_COMMENT" AS "extra#8", "lineitem"."L_ORDERKEY" AS "extra#9", "lineitem"."L_PARTKEY" AS "extra#10", "lineitem"."L_SUPPKEY" AS "extra#11", "lineitem"."L_LINENUMBER" AS "extra#12", "lineitem"."L_QUANTITY" AS "extra#13", "lineitem"."L_EXTENDEDPRICE" AS "extra#14", "lineitem"."L_DISCOUNT" AS "extra#15", "lineitem"."L_TAX" AS "extra#16", "lineitem"."L_RETURNFLAG" AS "extra#17", "lineitem"."L_LINESTATUS" AS "extra#18", "lineitem"."L_SHIPDATE" AS "extra#19", "lineitem"."L_COMMITDATE" AS "extra#20", "lineitem"."L_RECEIPTDATE" AS "extra#21", "lineitem"."L_SHIPINSTRUCT" AS "extra#22", "lineitem"."L_SHIPMODE" AS "extra#23", "lineitem"."L_COMMENT" AS "extra#24" FROM "s3"."bucket1"."tpch"."sf10"."parquet"."lineitem" INNER JOIN "s3"."bucket1"."tpch"."sf10"."parquet"."part" ON "part"."P_PARTKEY" = "lineitem"."L_PARTKEY" | ALTER DATASET "recommended_view"."Dataset_9d74a03b-747a-42a2-a5ca-7f9c6f77b55d" CREATE AGGREGATE Reflection "agg_0e07a376-7f8e-4c68-b2ce-6f6e819bebe6" USING DIMENSIONS ("F0[P_BRAND]") MEASURES ("F1[P_SIZE]" (MAX)) | "6j6c34cf-9drf-b07a-5ab7-abea69a66d00", "1a3c67c0-aab0-f9fb-97b4-af374b520100", "1a3c67c0-db35-3645-9ef1-2a84e4d0ce00" | 50.00 | 10.00 | 7196 |
Using the Recommendation
-
If a recommendation is for an aggregation Reflection:
- Create an Arctic catalog or folder named
recommended_view. - Run the query listed in the
view_sqlcolumn to create a view based on the initial SQL query.
- Create an Arctic catalog or folder named
-
Run the query listed in the
reflection_sqlcolumn to create the recommended Reflection and wait for the Reflection to finish refreshing. -
When the Reflection refresh is complete, run the SQL query to observe the acceleration due to the added Reflection.
Limitations
The SYS.RECOMMEND_REFLECTIONStable function has the following limitations:
- The function cannot provide recommendations for jobs with multiple nested queries that contain joins.
- An SQL query can contain only inner joins. Outer joins that are part of a view definition are also supported. Other types of joins are not supported.
- An SQL query cannot contain Window functions.
Sending Requests to the Recommendations API
You can use the Recommendations API to submit the job IDs of jobs that ran SQL queries and receive recommendations for Reflections that can accelerate those queries.
Locations of the Reflections Editor
You use the Reflections editor to create, edit, and remove raw and aggregation Reflections.
If you know which table or view you want to create a Reflection from, follow either of these steps to open the Reflections editor:
- In the space in which the anchor is located, click the gear icon in the Action field for the anchor. In the sidebar of the Dataset Settings window, select Reflections.
- In the space in which the anchor is located, click the name of the anchor. Then, click Reflections in the bar at the top of the screen.
You can also open the Reflections editor from an existing Reflection that is listed in the Reflections page. Follow these steps to open the Reflections editor:
- Open the Reflections page.
- Click the gear in the sidebar, and then select Reflections in the sidebar of the Settings page.
- Click the name of the Reflection. The Acceleration window is opened. The editor appears in this window.
Creating Raw Reflections
You can use the Reflections editor to create two types of raw Reflection:
-
A default raw Reflection that includes all of the columns of the anchor, but does not sort or horizontally partition on any columns
-
A raw Reflection that includes all or a subset of the columns of the anchor, and that does one or both of the following things:
- Sorts on one or more columns
- Horizontally partitions the data according to the values in one or more columns
For creating Reflections on views and tables with row-access and column-masking policies, see Using Reflections on Datasets with Policies.
Prerequisites
- If you want to accelerate queries on unoptimized data or data in slow storage, create a view that is itself created from a table in a non-columnar format or on slow-scan storage. You can then create your raw Reflection from that view.
- If you want to accelerate "needle-in-a-haystack" queries, create a view that includes a predicate to include only the rows that you want to scan. You can then create your raw Reflection from that view.
- If you want to accelerate queries that perform expensive transformations, create a view that performs those transformations. You can then create your raw Reflection from that view.
- If you want to accelerate queries that perform joins, create a view that performs the joins. You can then create your raw Reflection from that view.
Creating Default Raw Reflections
In the Basic view of the Reflections editor, you can create a raw Reflection that includes all of the fields that are in a table or view. Creating a basic raw Reflection ensures that Dremio never runs user queries against the underlying table or view when the raw Reflection is enabled.
Restrictions of the Basic View
- You cannot select fields to sort or create horizontal partitions on.
- The name of the Reflection that you create is restricted to "Raw Reflection".
- You can create only one raw Reflection. If you want to create multiple raw Reflections at a time, use the Advanced view.
To create a raw Reflection in the Basic view of the Reflections editor:
- Open the Reflections editor.
See Locations of the Reflections Editor to find out where you can open the editor from.
- Click the toggle switch on the left side of the Raw Reflections bar.
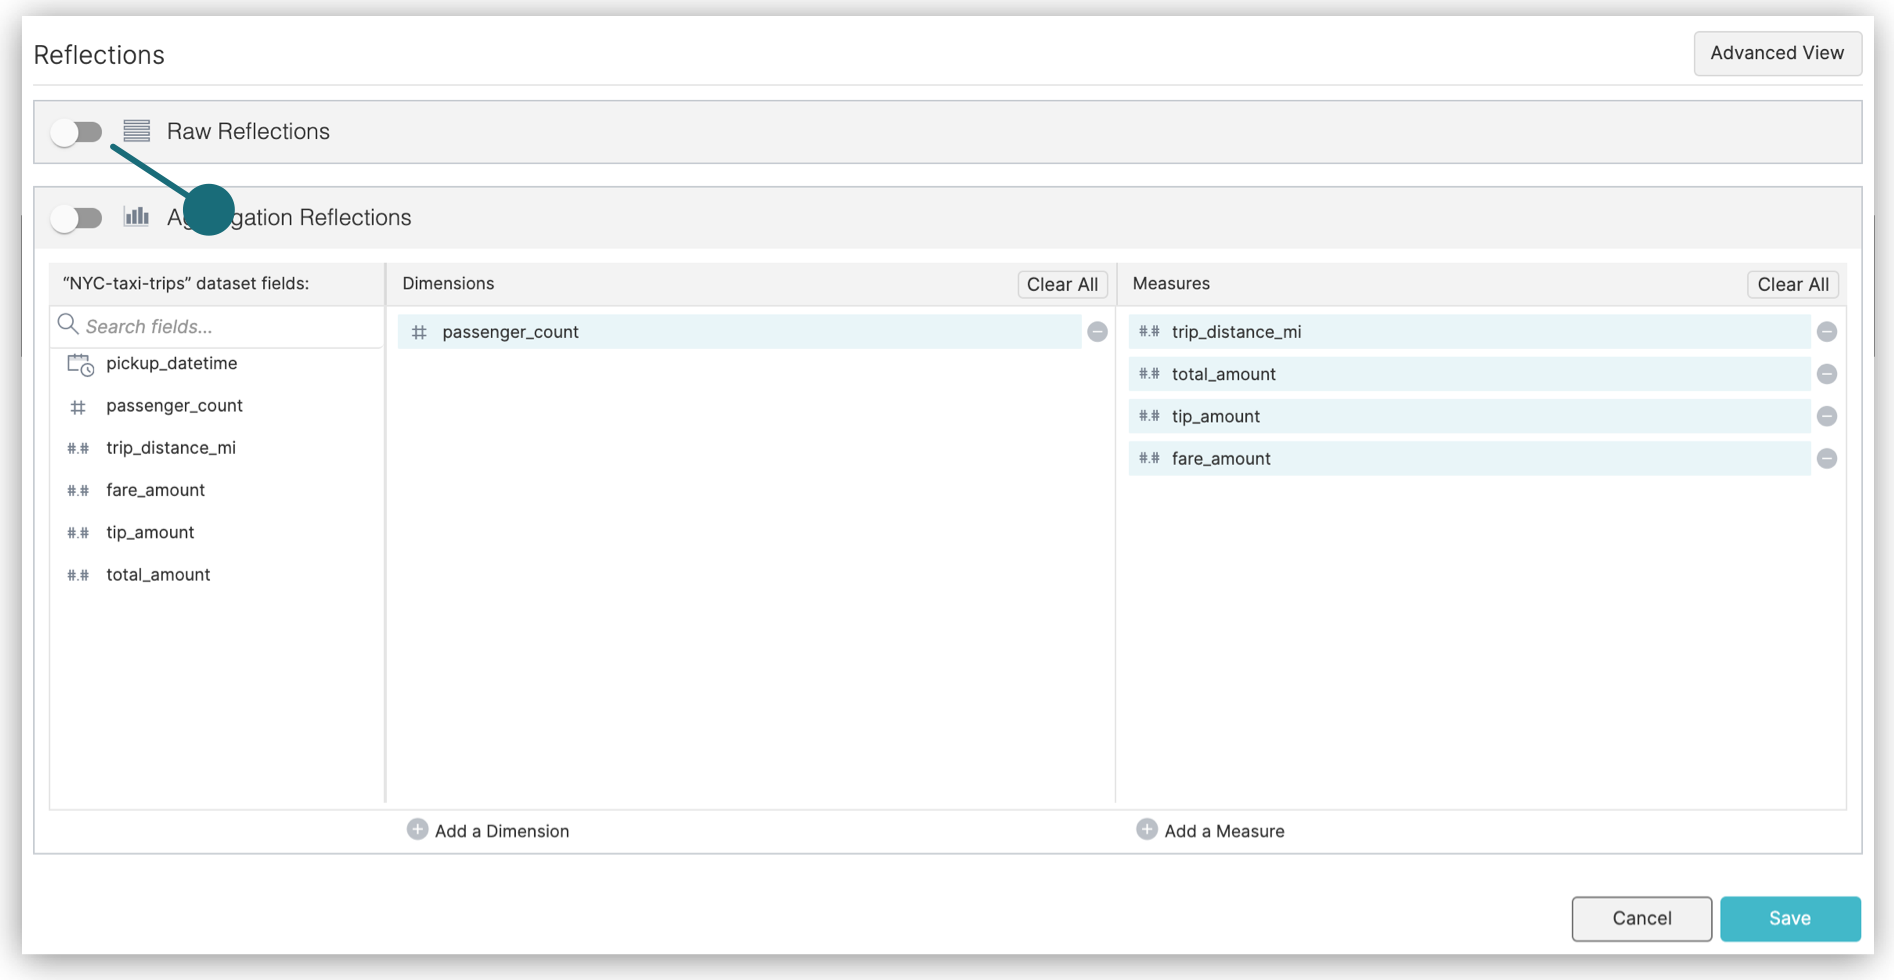
- Click Save.
You can also create raw Reflections using SQL commands.
For tips on what to do now after your raw Reflection is created and enabled, see What to Do Next.
Creating Customized Raw Reflections
In the Advanced view of the Reflections editor, you can create one or more raw Reflections that include all or a selection of the fields that are in the anchor or supported anchor. You can also choose sort fields and fields for partitioning horizontally.
Dremio recommends that you follow the best practices listed in Best Practices for Creating Raw and Aggregation Reflections when you create customized raw Reflections.
If you make any of the following changes to a raw Reflection when you are using the Advanced view, you cannot switch to the Basic view:
- Deselect one or more fields in the Display column. By default, all of the fields are selected.
- Select one or more fields in the Sort, Partition, or Distribute column.
To create a raw Reflection in the Advanced view of the Reflections editor:
- Open the Reflections editor.
See Locations of the Reflections Editor to find out where you can open the editor from.
- If the Advanced view is not already displayed, click the Advanced View button in the top-right corner of the editor.
- Click the toggle switch in the table labeled Raw Reflection to enable the raw Reflection.
Queries do not start using the Reflection, however, until after you finished editing the Reflection and click Save in a later step.
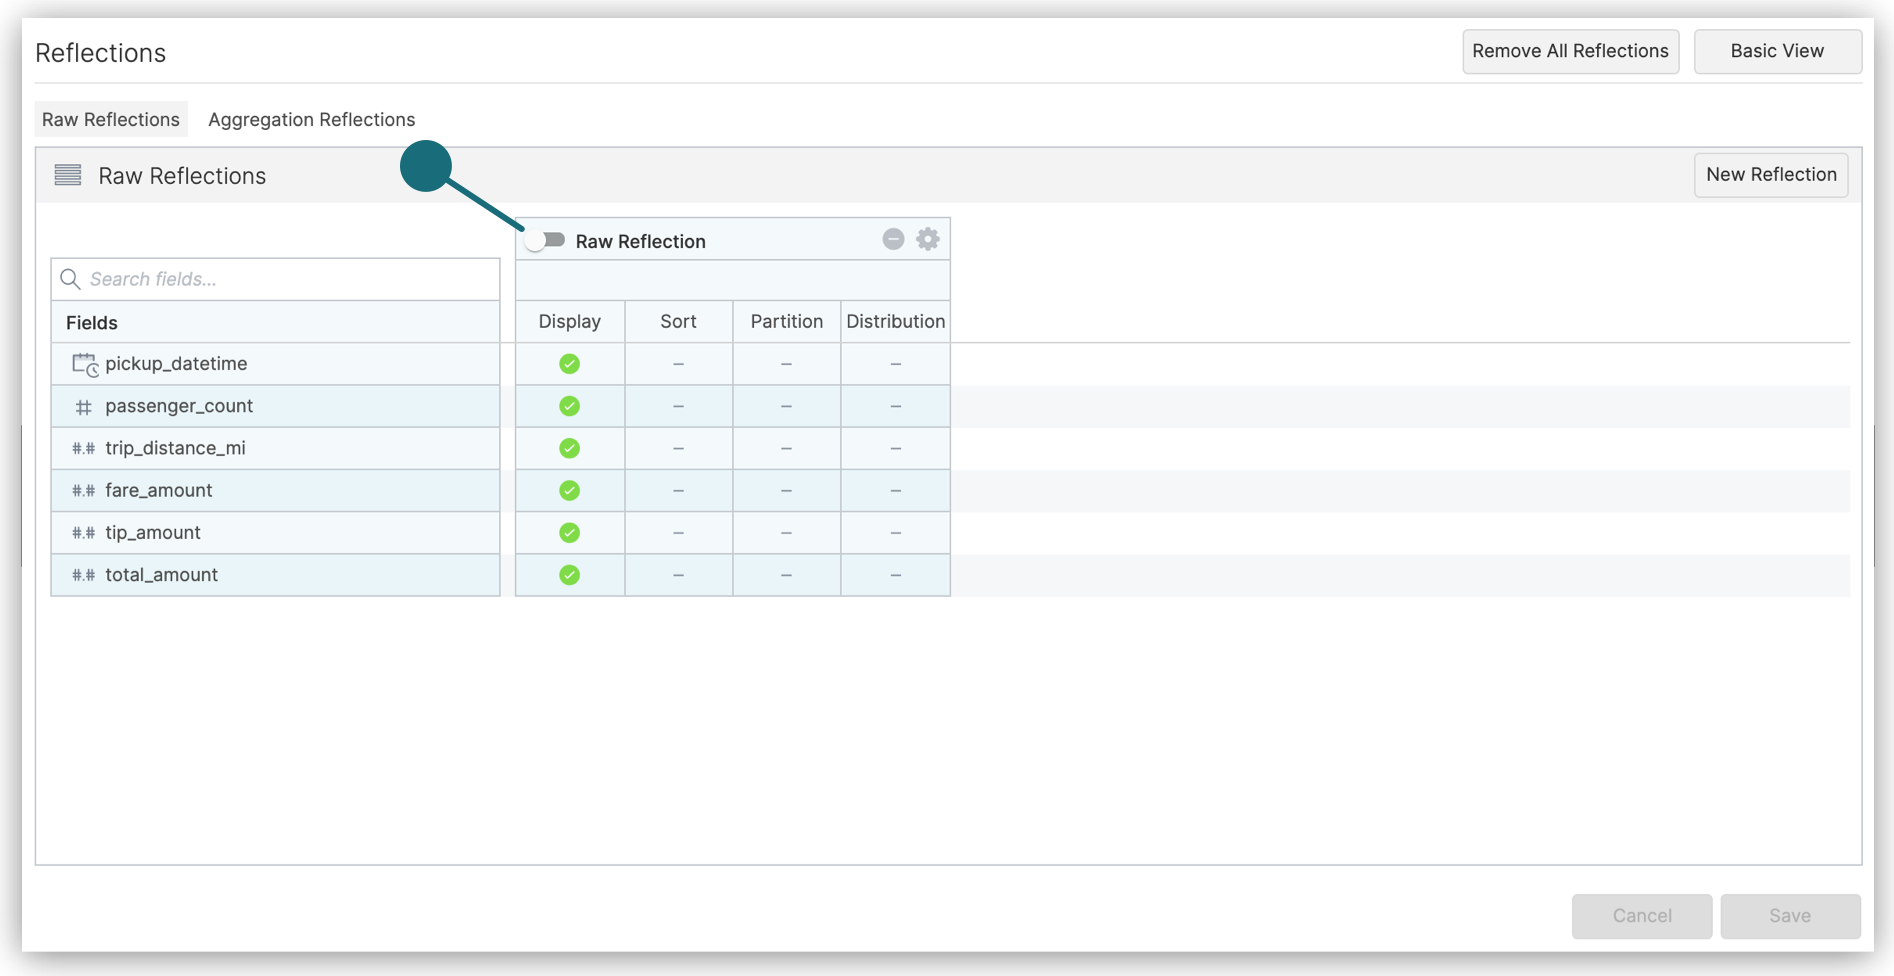
- (Optional) Click in the label to rename the Reflection.
The purpose of the name is to help you understand, when you read job reports, which Reflections the query optimizer considered and chose when planning queries.
- In the columns of the table, follow these steps, which you don't have to do in any particular order:
Ignore the Distribution column. Selecting fields in it has no effect on the Reflection.
-
Click in the Display column to include fields in or exclude them from your Reflection.
-
Click in the Sort column to select fields on which to sort the data in the Reflection. For guidance in selecting a field on which to sort, see the section Sort Reflections on High-Cardinality Fields in Best Practices for Creating Raw and Aggregation Reflections.
-
Click in the Partition column to select fields on which to horizontally partition the rows in the Reflection. For guidance in selecting fields on which to partition, and which partition transforms to apply to those fields, see the section Horizontally Partition Reflections that Have Many Rows.
noteIf the Reflection is based on an Iceberg table, a filesystem source, an AWS Glue source, or a Hive source, and that table is partitioned, recommended partition columns and transforms are selected for you. If you change the selection of columns, then this icon appears at the top of the table:
 . You can click it to revert back to the recommended selection of partition columns.
-
(Optional) Optimize the number of files used to store the Reflection. You can optimize for fast refreshes or for fast read performance by queries. Follow these steps:
a. Click the gear icon in the table in which you are defining the Reflection.
b. In the field Reflection execution strategy, select either of these options:
- Select Minimize Time Needed To Refresh if you need the Reflection to be created as fast as possible. This option can result in the data for the Reflection being stored in many small files. This is the default option.
- Select Minimize Number Of Files when you want to improve read performance of queries against the Reflection. With this option, there tend to be fewer seeks performed for a given query.
-
Click Save when you are finished.
What to Do Next
After you create a raw Reflection that is enabled, test whether the query optimizer is making queries use it. See Testing Reflections for the steps.
When you are sure that the Reflection is being used, follow one of these steps:
- If the base table is in the Apache Iceberg format or the Delta Lake format: Set the schedule according to which all Reflections on the table are refreshed.
- For all other base tables: Set the refresh type for all Reflections on the underlying table and set the schedule according to which they are refreshed.
See Refresh Reflections.
Creating Aggregation Reflections
Aggregation Reflections are summarized representations of data. Most BI tools generate aggregation and GROUP BY queries. Aggregation Reflections optimize these kinds of query patterns.
When you create aggregation Reflections, keep in mind these best practices:
-
Use dimensions that have relatively low cardinality in a table or view. The higher the cardinality of a dimension, the less benefit an aggregation Reflection has on query performance. Lower cardinality aggregation Reflections require less time to scan.
-
For a single table or view, create one aggregation Reflection for each important subset of dimensions in your queries, rather than one aggregation Reflection that includes all dimensions. Multiple small aggregation Reflections (versus one large one) are good for isolated pockets of query patterns on the same table or view that do not overlap. If your query patterns overlap, use fewer larger aggregation Reflections.
There are two cautions that accompany this advice, however:
-
Be careful of creating aggregation Reflections that have too few dimensions for your queries.
If a query uses more dimensions than are included in an aggregation Reflection, the Reflection cannot satisfy the query and the query optimizer does not run the query against it.
-
Be careful of creating more aggregation Reflections than are necessary to satisfy queries against a table or view.
The more Reflections you create, the more time the query optimizer requires to plan the execution of queries. Therefore, creating more aggregation Reflections than you need can slow down query performance, even if your aggregation Reflections are low-cardinality.
-
-
If you want to include a computed measure, first create a view with the computed column to use as a measure, and then create the aggregation Reflection on the view.
Dremio recommends that you also follow the best practices listed in Best Practices for Creating Raw and Aggregation Reflections when you create customized aggregation Reflections.
Creating Default Aggregation Reflections
You can use the Basic view of the Reflections editor to create one aggregation Reflection that includes fields, from the anchor or supported anchor, that are recommended for use as dimensions or measures. You can add or remove dimensions and measures, too.
Restrictions
- You can create only one aggregation Reflection in the Basic view. If you want to create multiple aggregations Reflections at a time, use the Advanced view.
- You cannot select fields for sorting or horizontally partitioning.
- The name of the Reflection is restricted to "Aggregation Reflection".
Procedure
To create an aggregation Reflection in the Basic view of the Reflections editor:
- Open the Reflections editor.
See Locations of the Reflections Editor to find out where you can open the editor from.
In the Aggregations Reflections section of the editor, click Generate to get recommended fields to use as dimensions and measures. This will override any previously selected dimensions and measures. If you wish to proceed, click Continue in the confirmation dialog that follows.
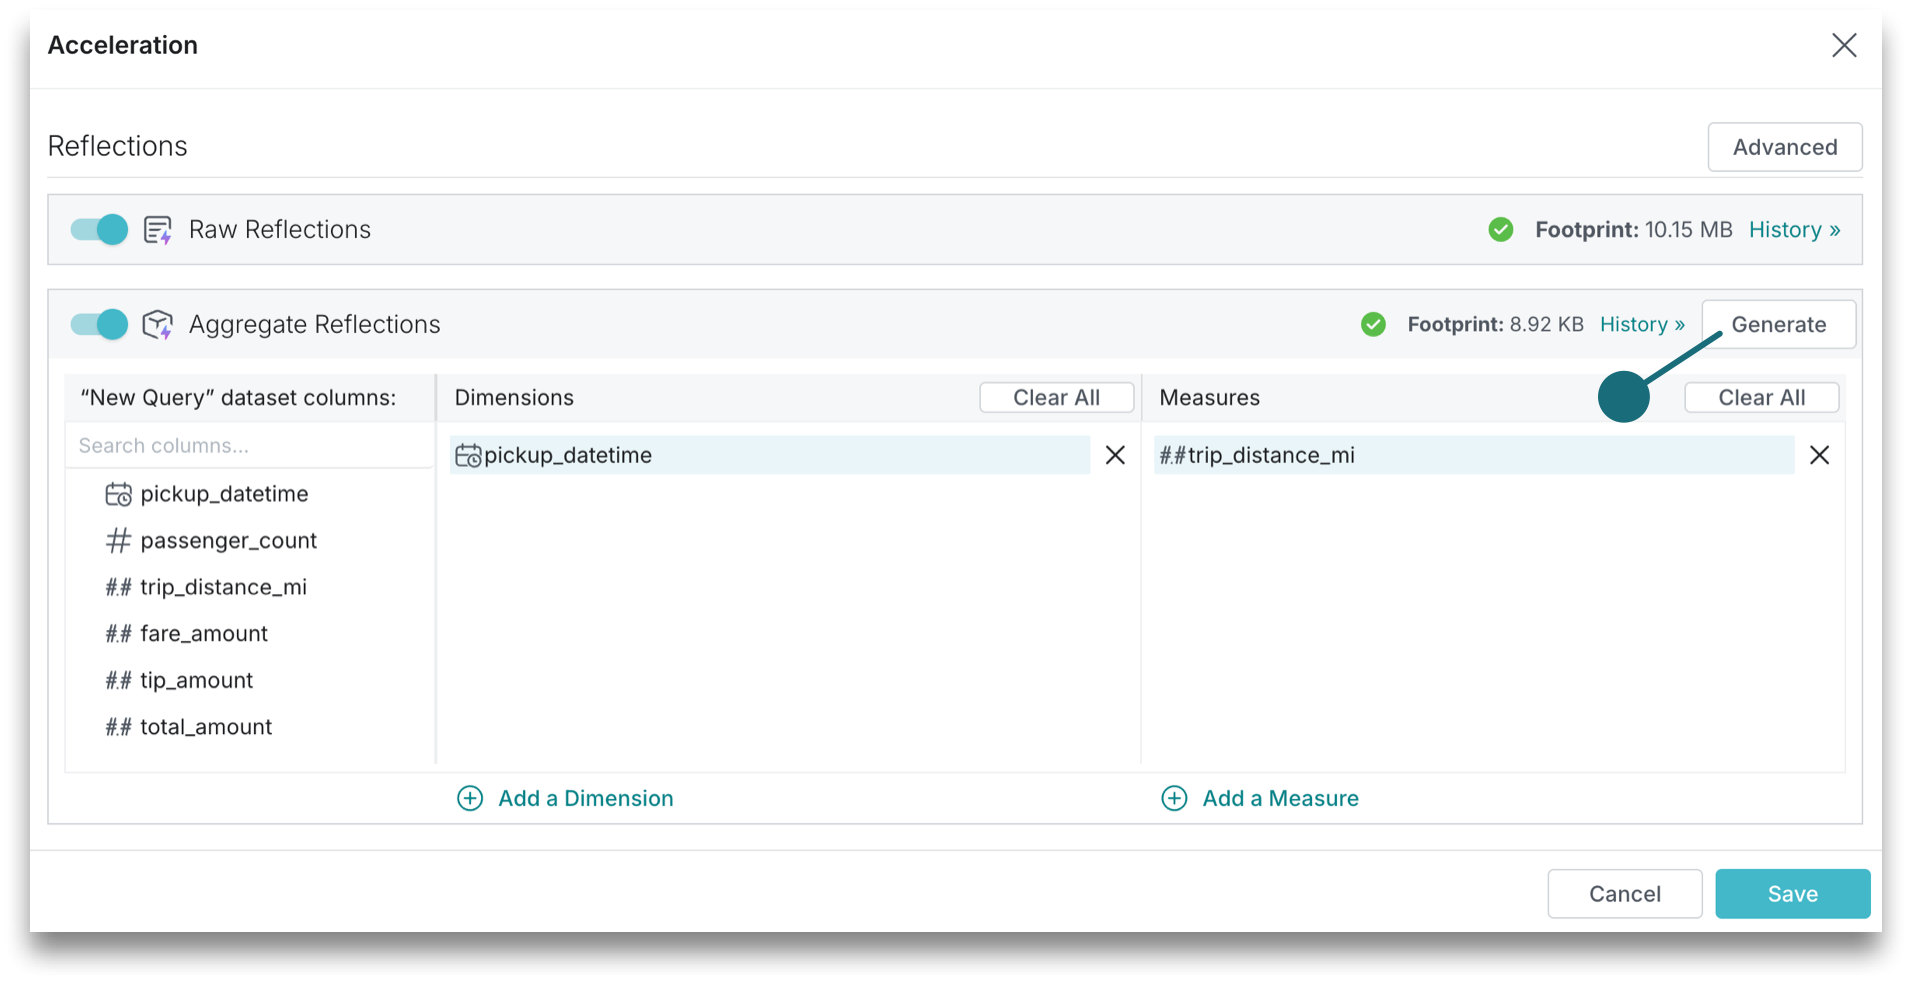
-
In the Aggregation Reflection section of the editor, modify or accept the recommended fields for dimensions and measures.
-
To make the Reflection available to the query optimizer after you create it, click the toggle switch on the left side of the Aggregation Reflections bar.
- Click Save.
You can also create aggregation Reflections using SQL commands.
For tips on what to do now after your aggregation Reflection is created and enabled, see What to Do Next.
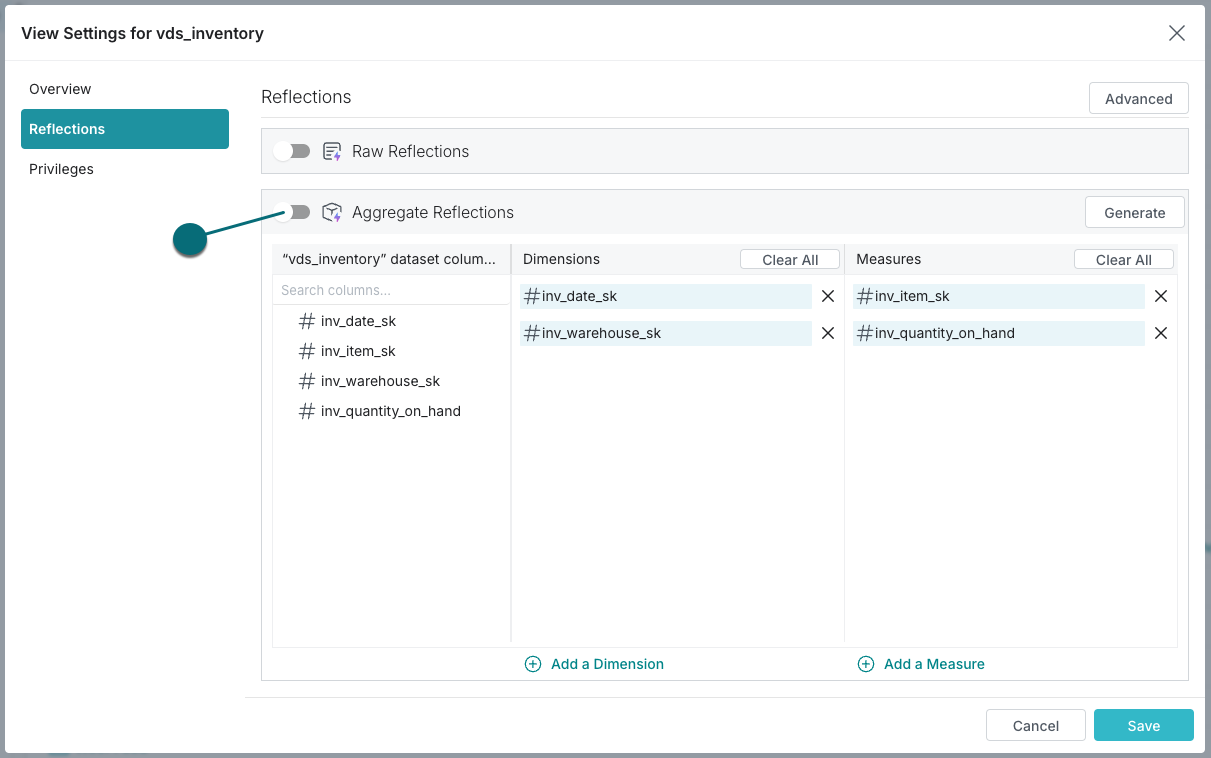
Creating Customized Aggregation Reflections
You can use the Advanced view of the Reflections editor to create one or more aggregation Reflections that select which fields in the anchor or supporting anchor to use as dimensions and measures. For each field that you use as a measure, you can use one or more of these SQL functions: APPROX_DISTINCT_COUNT, COUNT, MAX, and MIN. You can also choose sort fields and fields for partitioning horizontally.
Procedure
To create an aggregation Reflection in the Advanced view of the Reflections editor:
- Open the Reflections editor.
See Locations of the Reflections Editor to find out where you can open the editor from.
-
Click the Advanced View button in the top-right corner of the editor.
-
Click Aggregation Reflections.
The Aggregation Reflections section is displayed, and one table for refining the aggregation Reflection that appeared in the Basic view is ready.

- (Optional) Click in the name to rename the Reflection.
The purpose of the name is to help you understand, when you read job reports, which Reflections the query optimizer considered and chose when planning queries.
- In the columns of the table, follow these steps, which you don't have to do in any particular order:
Ignore the Distribution column. Selecting fields in it has no effect on the Reflection.
-
Click in the Dimensions column to include or exclude fields to use as dimensions.
-
Click in the Measures field to include or exclude fields to use as measures. You can use one or more of these SQL functions for each measure: APPROX_DISTINCT_COUNT, COUNT, MAX, and MIN.
The full list of SQL aggregation functions that Dremio supports is not supported in the Reflections editor. If you want to create a Reflection that aggregates data by using the sQL function AVG, CORR, HLL, SUM, VAR_POP, or VAR_SAMP, you must create a view that uses the function, and then create a raw Reflection from that view.
-
Click in the Sort column to select fields on which to sort the data in the Reflection. For guidance in selecting a field on which to sort, see the section Sort Reflections on High-Cardinality Fields in Best Practices for Creating Raw and Aggregation Reflections.
-
Click in the Partition column to select fields on which to horizontally partition the rows in the Reflection. For guidance in selecting fields on which to partition, and which partition transforms to apply to those fields, see the section Horizontally Partition Reflections that Have Many Rows.
noteIf the Reflection is based on an Iceberg table, a filesystem source, an AWS Glue source, or a Hive source, and that table is partitioned, recommended partition columns and transforms are selected for you. If you change the selection of columns, then this icon appears at the top of the table:
. You can click it to revert back to the recommended selection of partition columns.
-
(Optional) Optimize the number of files used to store the Reflection. You can optimize for fast refreshes or for fast read performance by queries. Follow these steps:
a. Click the gear icon in the table in which you are defining the Reflection.
b. In the field Reflection execution strategy, select either of these options:
- Select Minimize Time Needed To Refresh if you need the Reflection to be created as fast as possible. This option can result in the data for the Reflection being stored in many small files. This is the default option.
- Select Minimize Number Of Files when you want to improve read performance of queries against the Reflection. With this option, there tend to be fewer seeks performed for a given query.
-
Click Save when you are finished.
What to Do Next
After you create an aggregation Reflection that is enabled, test whether the query optimizer is making queries use it. See Testing Reflections for the steps.
When you are sure that the Reflection is being used, follow one of these steps:
- If the base table is in the Apache Iceberg format or the Delta Lake format: Set the schedule according to which all Reflections on the table are refreshed.
- For all other base tables: Set the refresh type for all Reflections on the underlying table and set the schedule according to which they are refreshed.
See Refresh Reflections.
Editing Raw Reflections
You can edit an existing raw Reflection. You might want to do so if you are iteratively designing and testing a raw Reflection, if the definition of the view that the Reflection was created from was changed, or if the schema of the underlying table was changed.
If you created a raw Reflection in the Basic view of the Reflections editor, you must use the Advanced view to edit it.
Dremio runs the job or jobs to recreate the Reflection after you click Save.
Procedure
- Open the Reflections editor.
See Locations of the Reflections Editor to find out where you can open the editor from.
-
Click the Advanced View button in the top-right corner of the editor.
-
In the Raw Reflections section of the Advanced view, locate the table that shows the definition of your Reflection.
-
(Optional) Click in the label to rename the Reflection.
The purpose of the name is to help you understand, when you read job reports, which Reflections the query optimizer considered and chose when planning queries.
- In the columns of the table, follow these steps, which you don't have to do in any particular order:
Ignore the Distribution column. Selecting fields in it has no effect on the Reflection.
-
Click in the Display column to include fields in or exclude them from your Reflection.
-
Click in the Sort column to select fields on which to sort the data in the Reflection. For guidance in selecting a field on which to sort, see the section Sort Reflections on High-Cardinality Fields in Best Practices for Creating Raw and Aggregation Reflections.
-
Click in the Partition column to select fields on which to horizontally partition the rows in the Reflection. For guidance in selecting fields on which to partition, and which partition transforms to apply to those fields, see the section Horizontally Partition Reflections that Have Many Rows.
noteIf the Reflection is based on an Iceberg table, a filesystem source, an AWS Glue source, or a Hive source, and that table is partitioned, partition columns and transforms are recommended for you. Hover over the
icon at the top of the table to see the recommendation. Click the icon to accept the recommendation.
-
(Optional) Optimize the number of files used to store the Reflection. You can optimize for fast refreshes or for fast read performance by queries. Follow these steps:
a. Click the gear icon in the table in which you are defining the Reflection.
b. In the field Reflection execution strategy, select either of these options:
- Select Minimize Time Needed To Refresh if you need the Reflection to be created as fast as possible. This option can result in the data for the Reflection being stored in many small files. This is the default option.
- Select Minimize Number Of Files when you want to improve read performance of queries against the Reflection. With this option, there tend to be fewer seeks performed for a given query.
-
Click Save when you are finished.
Editing Aggregation Reflections
You might want to edit an aggregation Reflection if you are iteratively designing and testing an aggregation Reflection, if the definition of the view that the Reflection was created from was changed, if the schema of the underlying table was changed, or if you want to revise one or more aggregations defined in the Reflection.
If you created an aggregation Reflection in the Basic view of the Reflections editor, you can edit that Reflection either in the Basic view or in the Advanced view.
Dremio runs the job or jobs to recreate the Reflection after you click Save.
Editing Aggregation Reflections in the Basic View of the Reflections Editor
- Open the Reflections editor.
See Locations of the Reflections Editor to find out where you can open the editor from.
-
In the Aggregation Reflection section of the editor, modify or accept the recommendation for dimension fields and measure fields.
-
Click Save.
Editing Aggregation Reflections in the Advanced View of the Reflections Editor
- Open the Reflections editor.
See Locations of the Reflections Editor to find out where you can open the editor from.
-
Click the Advanced View button in the top-right corner of the editor.
-
Click Aggregation Reflections.
-
(Optional) Click in the name to rename the Reflection.
The purpose of the name is to help you understand, when you read job reports, which Reflections the query optimizer considered and chose when planning queries.
- In the columns of the table, follow these steps, which you don't have to do in any particular order:
Ignore the Distribution column. Selecting fields in it has no effect on the Reflection.
-
Click in the Dimensions column to include or exclude fields to use as dimensions.
-
Click in the Measures field to include or exclude fields to use as measures. You can use one or more of these SQL functions for each measure: APPROX_DISTINCT_COUNT, COUNT, MAX, and MIN.
The full list of SQL aggregation functions that Dremio supports is not supported in the Reflections editor. If you want to create a Reflection that aggregates data by using the sQL function AVG, CORR, HLL, SUM, VAR_POP, or VAR_SAMP, you must create a view that uses the function, and then create a raw Reflection from that view.
-
Click in the Sort column to select fields on which to sort the data in the Reflection. For guidance in selecting a field on which to sort, see the section Sort Reflections on High-Cardinality Fields in Best Practices for Creating Raw and Aggregation Reflections.
-
Click in the Partition column to select fields on which to horizontally partition the rows in the Reflection. For guidance in selecting fields on which to partition, and which partition transforms to apply to those fields, see the section Horizontally Partition Reflections that Have Many Rows.
noteIf the Reflection is based on an Iceberg table, a filesystem source, an AWS Glue source, or a Hive source, and that table is partitioned, partition columns and transforms are recommended for you. Hover over the
icon at the top of the table to see the recommendation. Click the icon to accept the recommendation.
-
(Optional) Optimize the number of files used to store the Reflection. You can optimize for fast refreshes or for fast read performance by queries. Follow these steps:
a. Click the gear icon in the table in which you are defining the Reflection.
b. In the field Reflection execution strategy, select either of these options:
- Select Minimize Time Needed To Refresh if you need the Reflection to be created as fast as possible. This option can result in the data for the Reflection being stored in many small files. This is the default option.
- Select Minimize Number Of Files when you want to improve read performance of queries against the Reflection. With this option, there tend to be fewer seeks performed for a given query.
-
Click Save when you are finished.
Creating External Reflections
See External Reflections for a description of what external Reflections are and their benefits.
To create an external Reflection:
-
Follow these steps in the data source:
a. Select your source table.
b. Create a table that is derived from the source table, such as an aggregation table, if you do not already have one.
-
Follow these steps in Dremio:
a. Define a view on the derived table in the data source. The definition must match that of the derived table.
b. Define a new external Reflection that maps the view to the derived table.
The data types and column names in the external Reflection must match those in the view that the external Reflection is mapped to.
Example
Suppose you have a data source named mySource that is connected to Dremio. In that data source, there are (among all of your other tables) these two tables:
sales, which is a very large table of sales data.sales_by_region, which aggregates by region the data that is insales. You want to make the data insales_by_regionavailable to data analysts who use Dremio. However, because you already have thesales_by_regiontable created, you do not see the need to create a Dremio table fromsales, then create a Dremio view that duplicatessales_by_region, and finally create a Reflection on the view. You would like instead to makesales_by_regionavailable to queries run from Bi tools through Dremio.
To do that, you follow these steps:
- Create a view in Dremio that has the same definition as
sales_by_region. Notice that theFROMclause points to thesalestable that is in your data source, not to a Dremio table.
CREATE VIEW "myWorkspace"."sales_by_region" AS
SELECT
    AVG(sales_amount) average_sales,
    SUM(sales_amount) total_sales,
    COUNT(*) sales_count,
    region
FROM mySource.sales
GROUP BY region
- Create an external Reflection that maps the view above to
sales_by_regioninmySource.
ALTER DATASET "myWorkspace"."sales_by_region"
CREATE EXTERNAL Reflection "external_sales_by_region"
USING "mySource"."sales_by_region"
The external Reflection lets Dremio's query planner know that there is a table in mySource that matches the Dremio view myWorkplace.sales_by_region and that can be used to satisfy queries against the view. When Dremio users query myWorkspace.sales_by_region, Dremio routes the query to the data source mySource, which runs the query against mySource.sales_by_region.
Editing External Reflections
If you have modified the DDL of a derived table in your data source, follow these steps in Dremio to update the corresponding external Reflection:
-
Replace the view with one that has a definition that matches the definition of the derived table. When you do so, the external Reflection is dropped.
-
Define a new external Reflection that maps the view to the derived table.
Viewing Whether Queries Used Reflections
You can view the list of jobs on the Jobs page to find out whether queries were accelerated by Reflections. The Jobs page lists the jobs that ran queries, both queries from your data consumers and queries run within the Dremio user interface.
To find whether a query used a Reflection:
- Find the job that ran the query by looking below the details in each row.
- Look for the indicator that one or more Reflections were used. A lightning-bolt icon appears next to the job to indicate that a query was accelerated.
- View the job summary by clicking the row that represents the job that ran the query. The job summary appears in the pane to the right of the list of jobs.
Relationship between Reflections and Jobs
The relationship between a job and a Reflection can be one of the following types:
-
CONSIDERED: the Reflection is defined on a dataset that is used in the query but was determined to not cover the query (for example the Reflection did not have a field that is used by the query).
-
MATCHED: a Reflection could have been used to accelerate the query but Dremio determined that it would not provide any benefits or another Reflection was determined to be a better choice.
-
CHOSEN: a Reflection is used to accelerate the query. Note that multiple Reflections can be used to accelerate queries.
Testing Reflections
You can test whether Reflections that you created are used to satisfy a query without actually running the query. This practice can be helpful when the tables are very large and you want to avoid processing large queries unnecessarily.
To test whether one or more Reflections are used by a query:
- In the side navigation bar, click the SQL Runner icon.
- In the SQL editor, type
EXPLAIN PLAN FORand then type or paste in your query. - Click the Run button.
- When the query has finished, click the Run link found directly above the query results to view the job details. Any Reflections used will be shown on the page.
Setting the Expiration Policy for Reflections
Rather than delete a Reflection manually, you can specify how long you want Dremio to retain the Reflection before deleting it automatically.
Dremio does not allow expiration policies to be set on external Reflections or Reflections that automatically refresh when Iceberg data changes according to the refresh policy.
To set the expiration policy for all Reflections derived from tables in a data source:
- Right-click a data lake or external source.
- Select Edit Details.
- In the sidebar of the Edit Source window, click Reflection Refresh.
- After making your changes, click Save. The changes take effect on the next refresh.
To set the expiration policy on Reflections derived from a particular table:
The table must be based on more than one file.
- Locate a table.
- Click the gear icon to its right.
- In the sidebar of the Dataset Settings window, click Reflection Refresh.
- After making your changes, click Save. The changes take effect on the next refresh.
Removing Reflections
You can choose to disable or delete Reflections.
Disabling Reflections
Disabled Reflections become unavailable for use by queries and will not be refreshed manually or according to their schedule.
Dremio does not disable external Reflections.
To disable a Reflection:
- Open the Reflections editor for the Reflection's anchor or supporting anchor. See Locations of the Reflections Editor.
- Follow one of these steps:
- If there is only one raw Reflection for the table or view, in the Basic view click the toggle switch in the Raw Reflections bar.
- If there are two or more raw Reflections for the table or view, in the Advanced view click the toggle switch for the individual raw Reflection that you want to disable.
- If there is only one aggregation Reflection for the table or view, in the Basic view click the toggle switch in the Raw Reflections bar.
- If there are two or more aggregation Reflections for the table or view, in the Advanced view click the toggle switch for the individual aggregation Reflection that you want to disable.
- Click Save. The changes take effect immediately.
Deleting Reflections
You can delete Reflections individually, or all of the Reflections on a table or view. When you delete a Reflection, its definition, data, and metadata are entirely deleted.
To delete a single raw or aggregation Reflection:
- Open the Reflections editor for the Reflection's anchor or supporting anchor. See Locations of the Reflections Editor.
- Open the Advanced view, if it is not already open.
- If the Reflection is an aggregation Reflection, click Aggregation Reflections.
- Click the trash can icon for the Reflection that you want to delete.
- Click Save. The deletion takes effect immediately.
To delete all raw and aggregation Reflections on a table or view:
- Open the Reflections editor for the Reflection's anchor or supporting anchor. See Locations of the Reflections Editor.
- Click Remove All Reflections.
- Click Save.
To delete an external Reflection, or to delete a raw or aggregation Reflection without using the Reflections editor, run this SQL command:
Delete a ReflectionALTER DATASET <DATASET_PATH> DROP Reflection <REFLECTION_NAME>
- DATASET_PATH: The path of the view on which the external Reflection is based.
- REFLECTION_NAME: The name of the external Reflection.
Additional Resources
Find out more about Reflections by enrolling in the Data Reflections Deep Dive course in Dremio University.